
Pickled Green Tomatoes Recipe: Tart & Tangy Perfection!
👩🍳 The Home Chef's Essential Kitchen
Consistently cooking incredible, healthy meals at home is so much easier when you aren't fighting with cheap tools. These are the 5 absolute powerhouse kitchen essentials that professional chefs and serious home cooks rely on every single day to get perfect results.
🍳 Lodge 10.25" Cast Iron Skillet
The single greatest value in all of cookware. It retains heat infinitely better than cheap non-stick pans, allowing you to get a restaurant-quality crust on steaks or perfect crispy edges on cornbread. With proper care, this $20 pan will literally outlive you.
🔪 Victorinox Fibrox Pro 8" Chef's Knife
A dull knife makes cooking a frustrating chore. This specific blade is the undisputed champion of the culinary world—it holds a terrifyingly sharp edge, features a comfortable non-slip grip, and performs identical to German knives that cost quadruple the price.
🌡️ ThermoPro Instant Read Thermometer
Never serve dry chicken or undercooked pork again. An instant-read thermometer is the secret difference between amateur cooks who 'guess' when protein is done, and professionals who know exactly when to pull meat off the heat for maximum juiciness.
🍲 Lodge Enameled Cast Iron Dutch Oven
The ultimate workhorse for soups, stews, braised short ribs, and baking crusty artisanal bread. The enameled interior provides incredible heat distribution for slow-cooking while eliminating the intense seasoning maintenance required by bare cast iron.
🥄 Bpa-Free Silicone Utensil Set
Throw away those melting plastic spatulas and bacteria-harboring wooden spoons. This pure silicone set is heat-resistant up to 600°F, won't scratch your expensive pans, and features seamless designs that make cleaning out thick sauces and batters effortless.
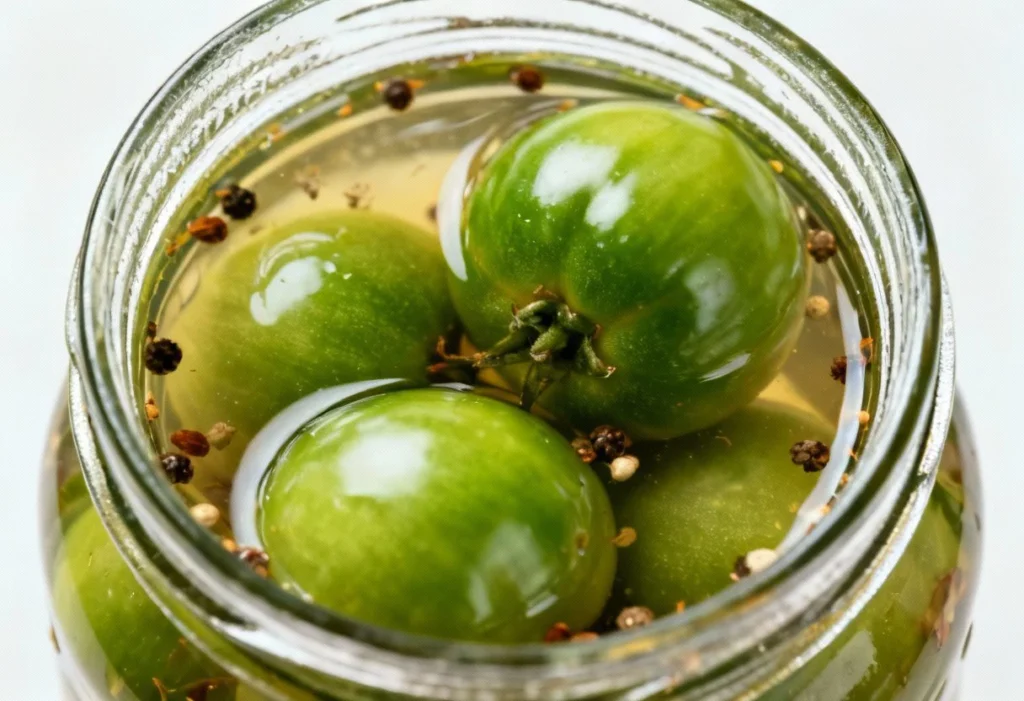
Late summer’s bounty is overflowing, but what happens when the first frost threatens your precious tomato plants? Don’t despair! Those unripe, green tomatoes aren’t destined for the compost bin. Instead, transform them into a culinary delight with this easy and delicious pickled green tomatoes recipe. These tart and tangy bites are a fantastic addition to sandwiches, salads, charcuterie boards, or simply enjoyed straight from the jar. Forget bland, boring pickles; this recipe delivers a vibrant, flavorful experience that will have you craving more. Get ready to discover a new favorite way to savor the end of summer!
Why This Recipe Works
This recipe isn’t just about preserving green tomatoes; it’s about crafting a pickle that’s both flavorful and texturally satisfying. Here’s why it works so well:
- The Brine Balance: The ratio of vinegar, water, salt, and sugar is carefully calibrated to create a brine that’s both tart and slightly sweet, perfectly complementing the inherent acidity of green tomatoes. The salt draws out excess moisture, helping to maintain a crisp texture.
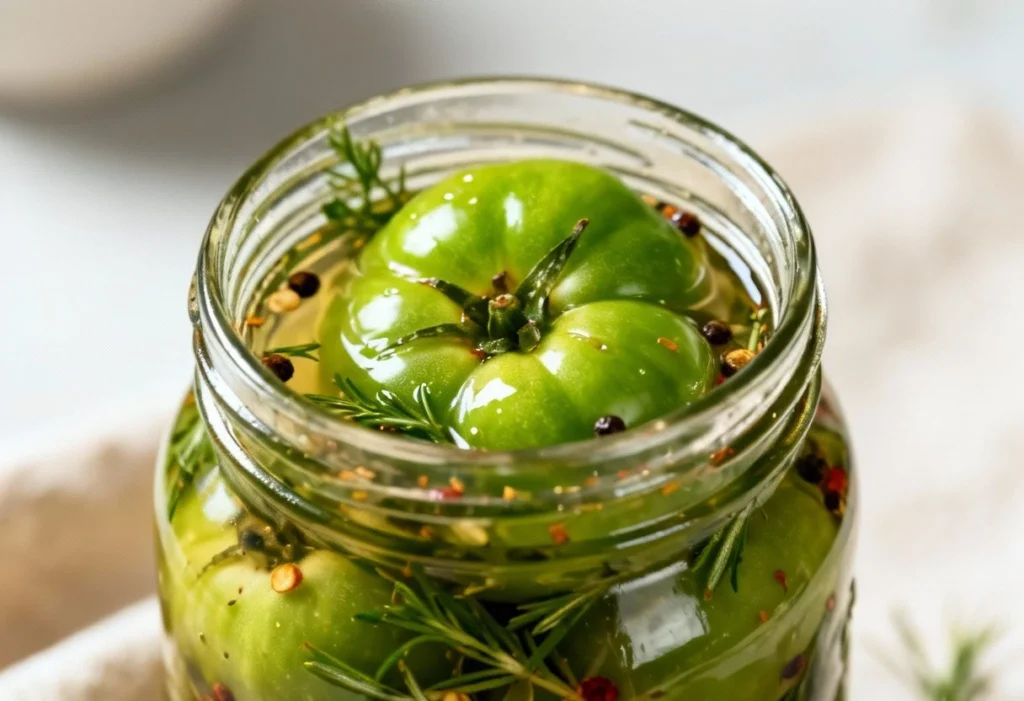
- Spice Infusion: The blend of spices, including mustard seeds, peppercorns, and red pepper flakes, adds layers of complexity and warmth to the pickles. Feel free to adjust the spices to your personal preference.
- Proper Processing: Following proper canning procedures ensures that your pickled green tomatoes are shelf-stable and safe to eat for months to come.
- Texture Matters: The recipe emphasizes slicing the tomatoes to a uniform thickness, allowing them to pickle evenly and maintain a pleasant bite.
Ingredients
- 4 pounds green tomatoes, washed and sliced ¼-inch thick
- 2 cups white vinegar (5% acidity)
- 2 cups water
- 1/4 cup pickling salt
- 1/4 cup granulated sugar
- 2 tablespoons yellow mustard seeds
- 1 tablespoon black peppercorns
- 1 teaspoon red pepper flakes (optional, for heat)
- 4 cloves garlic, peeled and smashed
- 4 sprigs fresh dill (optional)
Instructions
- Prepare the Tomatoes: Wash the green tomatoes thoroughly and slice them into ¼-inch thick rounds. Discard the stem end.
- Brine the Tomatoes (Optional): For extra crispness, place the sliced tomatoes in a large bowl and sprinkle with 1/4 cup of pickling salt. Cover with cold water and let them sit for 1-2 hours. This helps draw out excess moisture. Rinse the tomatoes thoroughly and drain well. This step can be skipped if you prefer a slightly softer pickle.
- Prepare the Brine: In a large, non-reactive saucepan (stainless steel or enamel), combine the white vinegar, water, pickling salt, and sugar. Bring the mixture to a boil over medium-high heat, stirring until the salt and sugar are completely dissolved.
- Pack the Jars: While the brine is heating, prepare your canning jars. Wash four pint-sized canning jars and lids in hot, soapy water. Rinse well and keep them hot until ready to use. You can sterilize them by boiling them in a water bath canner for 10 minutes.
- Add Spices to Jars: To each hot jar, add ½ tablespoon mustard seeds, ¼ tablespoon black peppercorns, ¼ teaspoon red pepper flakes (if using), 1 clove of garlic, and a sprig of dill (if using).
- Pack Tomatoes into Jars: Pack the sliced green tomatoes tightly into the prepared jars, leaving ½-inch headspace at the top.
- Pour Brine over Tomatoes: Carefully pour the hot brine over the tomatoes in each jar, maintaining ½-inch headspace. Use a non-metallic utensil (like a wooden chopstick or plastic spatula) to remove any air bubbles trapped in the jars.
- Wipe Rims and Seal: Wipe the rims of the jars with a clean, damp cloth. Place the lids on the jars and screw on the bands until fingertip tight.
- Process in a Water Bath Canner: Place the jars in a water bath canner filled with enough water to cover the jars by at least 1 inch. Bring the water to a rolling boil and process for 15 minutes for pint jars (adjust processing time for altitude; consult a reliable canning guide).
- Cool and Check Seals: Carefully remove the jars from the canner using a jar lifter and place them on a towel-lined surface to cool completely. As the jars cool, you should hear a “pop” sound, indicating that the lids have sealed properly.
- Test the Seals: After the jars have cooled completely (about 12-24 hours), check the seals. Press down on the center of each lid. If the lid doesn’t flex or bounce back, it’s properly sealed. If the lid flexes, it’s not sealed and should be refrigerated and consumed within a few weeks, or reprocessed with a new lid.
Tips for Success
- Use Fresh, Firm Green Tomatoes: The best pickled green tomatoes are made with fresh, firm, unripe tomatoes. Avoid using tomatoes that are bruised, damaged, or starting to ripen.
- Use Pickling Salt: Pickling salt (also known as canning salt) is pure sodium chloride without any additives like iodine or anti-caking agents that can cloud the brine and affect the flavor of the pickles.
- Don’t Overpack the Jars: Leaving the proper headspace is crucial for creating a proper seal. Overpacking can prevent the lids from sealing correctly.
- Use a Non-Reactive Saucepan: Avoid using aluminum or copper saucepans, as they can react with the vinegar and affect the flavor and color of the pickles.
- Adjust Spices to Your Taste: Feel free to experiment with different spices to create your own unique flavor profile. Add a bay leaf, some dried chilies, or even a few slices of fresh ginger to the jars for extra flavor.
Storage Instructions
Properly sealed jars of pickled green tomatoes can be stored in a cool, dark place (like a pantry or basement) for up to one year. Once opened, refrigerate the pickles and consume them within a few weeks.
FAQ
Q: Can I use regular table salt instead of pickling salt?
A: While you can, it’s not recommended. Table salt contains iodine and anti-caking agents that can darken the pickles and make the brine cloudy. Pickling salt is the best choice for clear, crisp pickles.
Q: Can I use a different type of vinegar?
A: White vinegar (5% acidity) is the standard for pickling because it has a neutral flavor and won’t discolor the tomatoes. You can experiment with other vinegars like apple cider vinegar, but be aware that they will alter the flavor and color of the pickles.
Q: How long do I have to wait before eating the pickles?
A: For the best flavor, allow the pickled green tomatoes to sit for at least 2-3 weeks before eating them. This allows the flavors to meld and the tomatoes to fully absorb the brine.
Q: My brine is cloudy. What did I do wrong?
A: Cloudy brine can be caused by using table salt instead of pickling salt, overcooking the tomatoes, or using hard water. Make sure to use pickling salt and avoid overcooking the tomatoes. If you have hard water, consider using filtered water for the brine.
Q: My lids didn’t seal. Can I still eat the pickles?
A: If the lids didn’t seal, the pickles are not shelf-stable and should be refrigerated and consumed within a few weeks. You can also reprocess the jars with new lids, following the same canning instructions.
🍰 The Master Baker & Prep Kit
Baking is a science, and meal prep requires efficiency. If you want consistently flaky pie crusts, perfectly risen cakes, and healthy meals ready for the week, these are the 5 upgrade tools that take your execution to the next level.
⚖️ OXO Good Grips 11lb Food Scale
The secret to why bakery bread and cookies are always perfect while home batches vary wildly. Measuring by weight (grams) instead of volume (cups) guarantees precise hydration and flawlessly consistent results every single time you bake.
🧑🍳 KitchenAid Classic Stand Mixer
The undisputed holy grail of the kitchen. From aggressively kneading heavy pizza doughs to whipping meringues into stiff peaks, this powerful motor saves your arms from exhaustion and cuts your hands-on prep time in half.
🍪 Silpat Premium Silicone Baking Mats
Stop wasting money on rolls of parchment paper or agonizing over cookies permanently fused to your metal pans. These reusable, professional-grade silicone mats ensure completely even heat distribution and instantly release even the stickiest caramel.
🌪️ Braun MultiQuick Immersion Blender
The ultimate shortcut tool for creamy tomato soups, lump-free gravies, and rapid smoothies. Avoid the burns and mess of dangerously transferring boiling liquids in batches to a traditional blender by simply blending right inside your cooking pot.
🍱 Premium Glass Meal Prep Containers
If you want to bake and cook healthier, batch preparation is required. These durable glass containers transition safely from freezer to microwave, never absorb tomato sauce stains, and feature airtight seals to keep your hard work fresh all week.
Conclusion
This pickled green tomatoes recipe is a fantastic way to preserve the flavors of late summer and enjoy a unique and delicious condiment throughout the year. With its perfect balance of tartness, sweetness, and spice, this recipe is sure to become a new favorite. So, gather your green tomatoes, follow these simple instructions, and get ready to savor the tangy perfection of homemade pickled green tomatoes! Happy pickling!