Pineapple Bread Recipe Easy: The Tropical Loaf That Makes Your Kitchen Smell Like Vacation
👩🍳 The Home Chef's Essential Kitchen
Consistently cooking incredible, healthy meals at home is so much easier when you aren't fighting with cheap tools. These are the 5 absolute powerhouse kitchen essentials that professional chefs and serious home cooks rely on every single day to get perfect results.
🍳 Lodge 10.25" Cast Iron Skillet
The single greatest value in all of cookware. It retains heat infinitely better than cheap non-stick pans, allowing you to get a restaurant-quality crust on steaks or perfect crispy edges on cornbread. With proper care, this $20 pan will literally outlive you.
🔪 Victorinox Fibrox Pro 8" Chef's Knife
A dull knife makes cooking a frustrating chore. This specific blade is the undisputed champion of the culinary world—it holds a terrifyingly sharp edge, features a comfortable non-slip grip, and performs identical to German knives that cost quadruple the price.
🌡️ ThermoPro Instant Read Thermometer
Never serve dry chicken or undercooked pork again. An instant-read thermometer is the secret difference between amateur cooks who 'guess' when protein is done, and professionals who know exactly when to pull meat off the heat for maximum juiciness.
🍲 Lodge Enameled Cast Iron Dutch Oven
The ultimate workhorse for soups, stews, braised short ribs, and baking crusty artisanal bread. The enameled interior provides incredible heat distribution for slow-cooking while eliminating the intense seasoning maintenance required by bare cast iron.
🥄 Bpa-Free Silicone Utensil Set
Throw away those melting plastic spatulas and bacteria-harboring wooden spoons. This pure silicone set is heat-resistant up to 600°F, won't scratch your expensive pans, and features seamless designs that make cleaning out thick sauces and batters effortless.
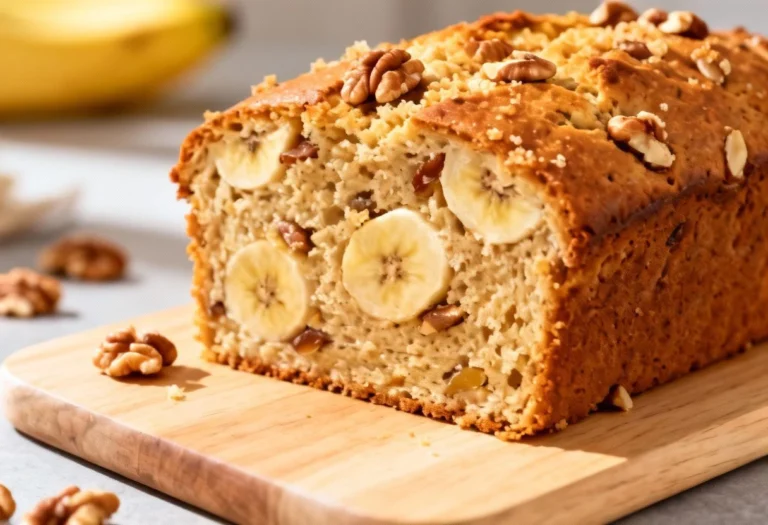
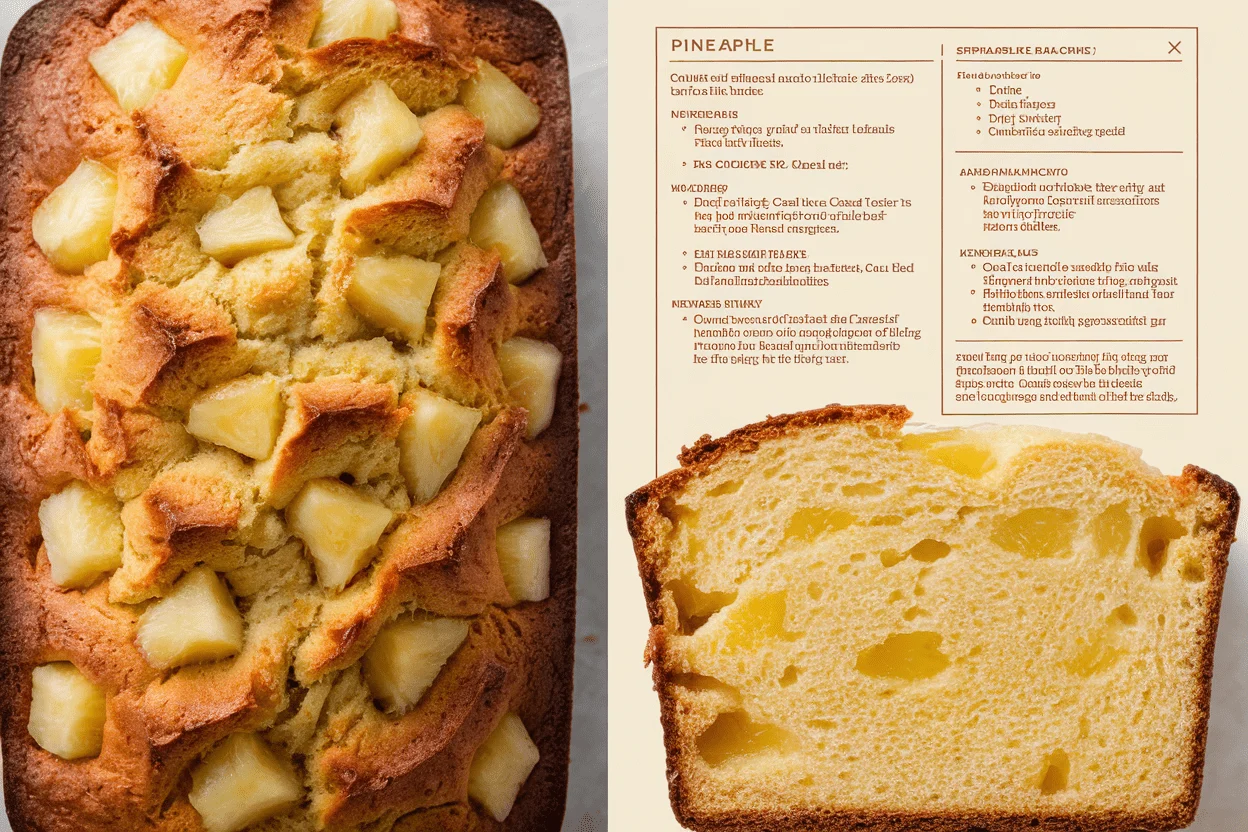
Forget gourmet gymnastics. This is the loaf that looks bakery-level, tastes like a sunshine hug, and takes less effort than finding your mixer attachments. We’re talking coconut-kissed crust, juicy pineapple bits inside, and a buttery crumb that could convert team “banana bread only.” No dough drama, no overnight rise—just one bowl, one pan, one flex.
If you can stir, you can win breakfast, brunch, and bragging rights.
The Secret Behind This Recipe
The magic is moisture plus texture. Crushed pineapple keeps the crumb tender while tiny chunks add bursts of sweet-tart flavor. A quick hit of brown sugar deepens the caramel notes, and a touch of coconut milk (or yogurt) keeps the bread soft for days.
The real cheat code? A final brush of pineapple syrup on top for that glossy, bake-shop finish. Two more power moves: room-temperature ingredients for a smooth batter and minimal mixing to avoid a tough loaf.
Overmixing is how good bread goes rubbery—don’t do it.
What You’ll Need (Ingredients)
- 1 3/4 cups (220g) all-purpose flour
- 1 tsp baking soda
- 1/2 tsp baking powder
- 1/2 tsp fine salt
- 1/2 cup (100g) granulated sugar
- 1/3 cup (70g) light brown sugar, packed
- 2 large eggs, room temperature
- 1/2 cup (120ml) neutral oil (canola or vegetable)
- 1 tsp vanilla extract
- 1/2 cup (120ml) coconut milk or plain yogurt
- 1 can (8 oz/227g) crushed pineapple in juice, well-drained, reserve 2–3 tbsp juice
- 1/2 cup (50g) unsweetened shredded coconut (optional but awesome)
- 1/2 tsp ground cinnamon (optional)
- Zest of 1 lime or lemon (optional but adds pop)
Instructions
- Prep your pan and oven. Heat oven to 350°F (175°C). Grease a 9×5-inch loaf pan and line with a parchment sling for easy removal.
- Drain the pineapple. Press gently to remove excess juice, but don’t dry it out completely. Reserve 2–3 tablespoons of the juice for glazing later.
- Mix the dry stuff. In a bowl, whisk flour, baking soda, baking powder, salt, and cinnamon until combined.
- Whisk the wet stuff. In a large bowl, whisk eggs, granulated sugar, brown sugar, oil, vanilla, and coconut milk (or yogurt) until smooth.
Stir in citrus zest if using.
- Combine like a pro. Add dry ingredients to wet and mix with a spatula until just combined—no streaks, no overmixing. Fold in crushed pineapple and shredded coconut.
- Fill and level. Pour batter into the pan and smooth the top. If you want a prettier split, run a thin line of oil down the center with a butter knife.
- Bake. Bake 50–60 minutes.
Start checking at 48 minutes. The loaf is done when a tester comes out with a few moist crumbs and the top is deep golden.
- Glaze for glory. Mix reserved pineapple juice with 1 tablespoon sugar. Brush over the hot loaf.
Let cool in the pan 10–15 minutes, then lift out to a rack to cool fully.
- Slice smart. Use a serrated knife once the loaf is almost cool to avoid tearing. Patience pays (yes, we know it smells insane).
Preservation Guide
- Room temperature: Wrap tightly and keep 2–3 days. It actually tastes better on day two—more pineapple flavor, softer crumb.
- Fridge: Up to 5 days, wrapped.
Warm slices in the microwave for 10–15 seconds to revive the bakery vibes.
- Freezer: Slice, wrap individually, and freeze up to 2 months. Thaw at room temp or toast straight from frozen.
- Revive dry bread: Brush with a little pineapple juice or simple syrup, then toast lightly. Instant glow-up.
Benefits of This Recipe
- Ridiculously easy: One bowl, no mixer, beginner-proof.
- Moist and fluffy: Pineapple + oil + coconut milk/yogurt keep the crumb tender.
- Versatile: Breakfast, snack, dessert, or fancy brunch centerpiece.
- Budget-friendly: Pantry staples plus one can of pineapple.
That’s it.
- Customizable: Add nuts, swap milks, tweak spices—this loaf is chill.
Don’t Make These Errors
- Overmixing the batter: Leads to dense, rubbery bread. Stir just until combined.
- Skipping the drain: Too much juice = gummy center. Drain pineapple but keep it juicy.
- Wrong pan size: Using an 8×4 can cause overflow or underbaked middle.
If that’s all you have, fill 3/4 full and bake remaining batter as a muffin.
- Baking blind: Ovens vary. Start checking early and use the crumb test, not just time.
- Slicing too hot: The loaf crumbles and seems underbaked. Give it 30–45 minutes to set.
Hard, I know.
Different Ways to Make This
- Pineapple Coconut Bliss: Add 1/2 cup toasted coconut and a handful of white chocolate chips. Dessert energy, zero regrets.
- Tropical Nut Crunch: Fold in 1/2 cup chopped macadamias or pecans for crackly texture.
- Gluten-Free: Swap in a 1:1 gluten-free flour blend with xanthan gum. Add 1 extra tablespoon yogurt if batter seems thick.
- Dairy-Free: Use coconut milk, skip yogurt, and verify chocolate add-ins if using.
The loaf stays lush—promise.
- Spice Route: Add 1/2 tsp ginger and a pinch of nutmeg. Bright, cozy, and surprisingly elegant.
- Muffins: Bake in a lined muffin tin at 350°F (175°C) for 18–22 minutes. Great for lunchboxes and portion control (in theory).
- Cream Cheese Swirl: Beat 4 oz cream cheese with 2 tbsp sugar and 1 egg yolk.
Swirl into the batter before baking. Ooof.
FAQ
Can I use fresh pineapple instead of canned?
Yes. Chop it finely and pulse a few times in a processor to mimic crushed pineapple.
Measure 1 cup, then lightly drain. Fresh pineapple is slightly less sweet, so keep the sugars as written.
Why did my bread sink in the middle?
Usually underbaking, too much liquid, or expired leaveners. Make sure the tester has just a few moist crumbs, drain the pineapple well, and check that your baking soda/powder are fresh.
Can I reduce the sugar?
You can cut 2–3 tablespoons without wrecking texture.
Go beyond that and the crumb may dry out, IMO. The pineapple tang balances the sweetness nicely as written.
What oil works best?
Neutral oils like canola, vegetable, or light olive oil. Coconut oil works, too—melt and cool it first.
Expect a slightly denser crumb with coconut oil.
How do I know it’s fully baked?
The top will be deep golden, the sides pull slightly from the pan, and a tester inserted in the center comes out with a few moist crumbs. If it’s wet, give it 5–8 more minutes.
Can I add banana?
Totally. Use 1 small ripe banana, mashed, and reduce the pineapple by 1/4 cup.
It turns into a tropical hybrid that slaps, FYI.
The Bottom Line
This pineapple bread recipe easy is the shortcut to bakery-level results without the drama. It’s tender, bright, and wildly forgiving—the kind of loaf that disappears slice by slice and has people asking for “that pineapple thing” next week. Keep a can in the pantry, and you’re always 60 minutes from a tropical win.
Bake it once, flex forever.