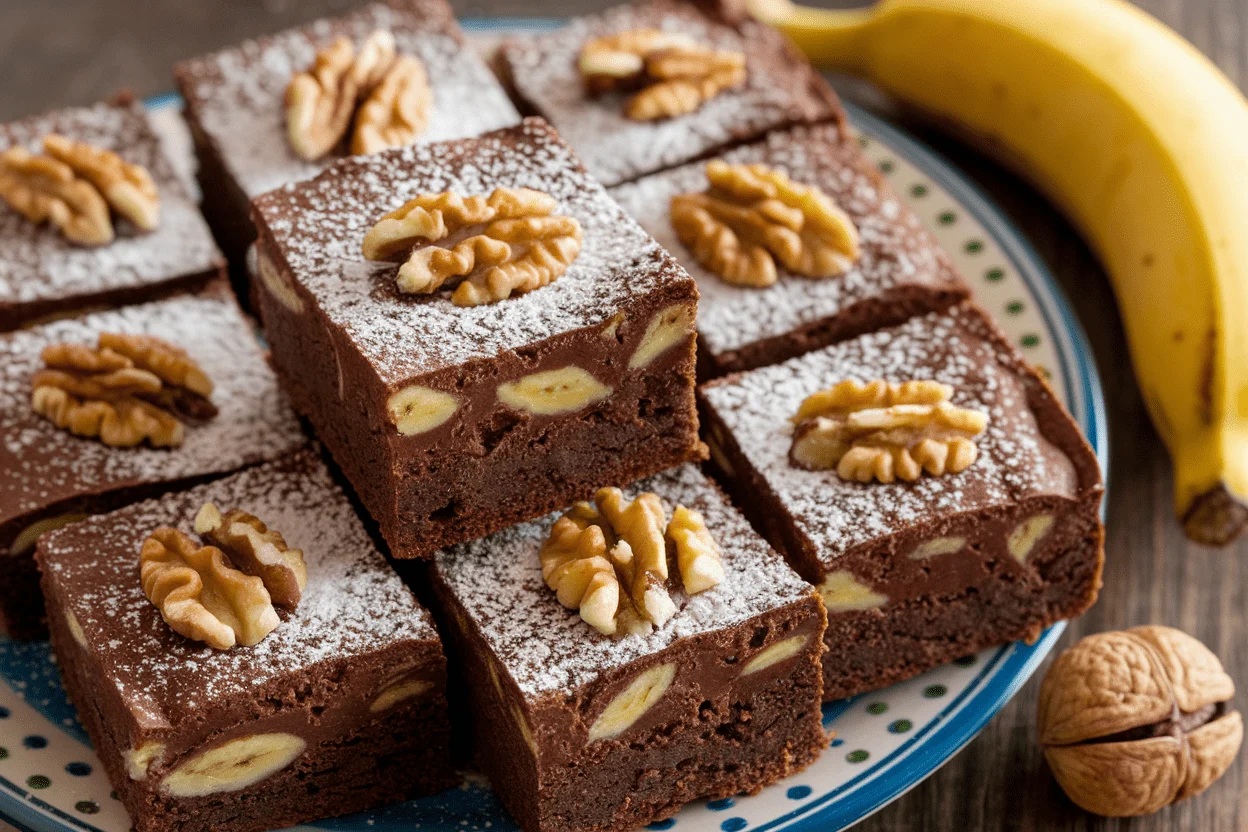
Banana Bread Brownies Recipe That Breaks the Internet (Moist, Fudgy, and Gone in 60 Seconds)
👩🍳 The Home Chef's Essential Kitchen
Consistently cooking incredible, healthy meals at home is so much easier when you aren't fighting with cheap tools. These are the 5 absolute powerhouse kitchen essentials that professional chefs and serious home cooks rely on every single day to get perfect results.
🍳 Lodge 10.25" Cast Iron Skillet
The single greatest value in all of cookware. It retains heat infinitely better than cheap non-stick pans, allowing you to get a restaurant-quality crust on steaks or perfect crispy edges on cornbread. With proper care, this $20 pan will literally outlive you.
🔪 Victorinox Fibrox Pro 8" Chef's Knife
A dull knife makes cooking a frustrating chore. This specific blade is the undisputed champion of the culinary world—it holds a terrifyingly sharp edge, features a comfortable non-slip grip, and performs identical to German knives that cost quadruple the price.
🌡️ ThermoPro Instant Read Thermometer
Never serve dry chicken or undercooked pork again. An instant-read thermometer is the secret difference between amateur cooks who 'guess' when protein is done, and professionals who know exactly when to pull meat off the heat for maximum juiciness.
🍲 Lodge Enameled Cast Iron Dutch Oven
The ultimate workhorse for soups, stews, braised short ribs, and baking crusty artisanal bread. The enameled interior provides incredible heat distribution for slow-cooking while eliminating the intense seasoning maintenance required by bare cast iron.
🥄 Bpa-Free Silicone Utensil Set
Throw away those melting plastic spatulas and bacteria-harboring wooden spoons. This pure silicone set is heat-resistant up to 600°F, won't scratch your expensive pans, and features seamless designs that make cleaning out thick sauces and batters effortless.
Forget choosing between banana bread and brownies. This banana bread brownies recipe hits the sweet spot between cozy and indulgent—like a hug that learned how to flex. We’re talking fudgy center, caramelized banana flavor, and a crackly top that basically screams “slice me.” No mixer.
No fancy stuff. Just a pan of rich, banana-loaded brownies that disappear faster than your willpower on a Sunday night.
Why This Recipe Works
- Bananas = natural moisture and sweetness. Extra-ripe bananas bring intense flavor and creamy texture, letting you use less added sugar and fat.
- Browned butter amplifies depth. It adds nutty, toffee notes that make the bananas pop and the chocolate taste more complex.
- Two sugars for texture. Brown sugar keeps it moist and chewy; granulated sugar helps with that shiny, brownie-like top.
- Just enough cocoa. A measured amount delivers brownie vibes without bulldozing the banana bread character.
- One-bowl simplicity. Minimal cleanup, maximum payoff. Even your future self will thank you.
Ingredients
- 3 large very ripe bananas (about 1 1/4 cups mashed)
- 1/2 cup (115 g) unsalted butter, browned
- 1/2 cup (100 g) light brown sugar, packed
- 1/3 cup (65 g) granulated sugar
- 2 large eggs, room temperature
- 1 teaspoon pure vanilla extract
- 3/4 cup (95 g) all-purpose flour
- 1/4 cup (25 g) unsweetened cocoa powder, natural or Dutch-process
- 1/2 teaspoon baking powder
- 1/4 teaspoon baking soda
- 1/2 teaspoon fine sea salt
- 1/2 cup (85 g) chocolate chips or chunks (optional but recommended)
- 2 tablespoons sour cream or Greek yogurt (for extra fudginess)
- Optional swirl: 2 tablespoons peanut butter or Nutella
The Method – Instructions
- Prep the pan and oven. Preheat to 350°F (175°C).
Line an 8×8-inch pan with parchment, leaving overhang for easy lifting. Lightly grease.
- Brown the butter. In a light-colored saucepan, melt butter over medium heat. Stir until it foams, smells nutty, and brown bits form (3–5 minutes).
Pull off heat immediately to avoid burning.
- Cool briefly. Let the browned butter sit 3–5 minutes so it doesn’t scramble your eggs later. Patience beats omelet vibes.
- Mash the bananas. In a large bowl, mash bananas until mostly smooth with a few small lumps. You want body, not banana soup.
- Whisk in sugars and vanilla. Add brown sugar, granulated sugar, and vanilla.
Whisk until glossy and combined.
- Add eggs and dairy. Whisk in eggs one at a time, then sour cream or yogurt. Mix until silky. This is your fudgy foundation.
- Stir in the browned butter. Slowly stream it in while whisking.
The aroma? Ridiculous.
- Combine dry ingredients. In a separate bowl, whisk flour, cocoa, baking powder, baking soda, and salt. Don’t skip the whisk—no one wants cocoa clumps.
- Fold it together. Add dry mix to wet.
Fold gently just until streaks disappear. Overmixing = tough texture. We want tender and fudgy.
- Add chocolate. Fold in chips or chunks.
If using peanut butter or Nutella, reserve for a swirl on top.
- Pan and swirl. Pour batter into the pan. If swirling, dollop the peanut butter/Nutella and drag a knife in figure-eights. Chef’s kiss.
- Bake. Bake 25–32 minutes until the edges are set and the center is just slightly wobbly with moist crumbs on a toothpick.
Don’t overbake—carryover heat finishes the job.
- Cool like you mean it. Let it cool in the pan at least 30–45 minutes. Warm is fine, molten is messy. Lift out, slice into squares, and try not to “taste test” half the pan.
Keeping It Fresh
- Room temp: Store in an airtight container up to 3 days.
Slip in a slice of bread to keep them moist (bananas love company).
- Fridge: Up to 5 days, well wrapped. Rewarm 10–15 seconds in the microwave for fudgy revival.
- Freeze: Wrap individual squares, then bag. Freeze up to 2 months.
Thaw at room temp or microwave in short bursts.
- Pro tip: Don’t refrigerate uncovered—fridges are moisture thieves.
Why This is Good for You
- Bananas bring potassium, fiber, and natural sweetness. You’re getting dessert with benefits. Not a salad, but not nothing.
- Cocoa offers antioxidants. The dark stuff isn’t just for flavor—it’s doing micro-hero work behind the scenes.
- Controlled sugar + fat. Ripe bananas allow less added sugar than typical brownies, and browned butter packs more flavor per tablespoon.
- Energy without the crash (IMO). Pair with protein—like Greek yogurt—for a smarter snack that actually satisfies.
Don’t Make These Errors
- Using underripe bananas. Green-ish bananas lack sweetness and mash poorly. Spots are your friend.
- Skipping the cool-down after browning butter. Hot butter straight into eggs = breakfast disaster.
- Overmixing the batter. This develops gluten and toughens the brownies.
Fold gently; you’re not whipping meringue.
- Overbaking. If you wait for a clean toothpick, you’ve gone too far. Look for moist crumbs.
- Wrong pan size. A 9×9 will bake faster and be thinner; adjust time. A loaf pan?
Please don’t—uneven baking city.
Different Ways to Make This
- Double chocolate overload: Add 2 tablespoons extra cocoa and 1/3 cup more chips. Expect ultra-fudge.
- Walnut crunch: Fold in 1/2 cup toasted walnuts. Banana + walnut = timeless.
- Espresso boost: Add 1 teaspoon instant espresso powder to deepen chocolate flavor without making it “coffee.”
- Gluten-free: Swap flour for a 1:1 GF blend with xanthan gum.
Bake the lower end of the time range; GF dries faster.
- Dairy-free: Use plant butter and coconut yogurt; dairy-free chocolate chips if adding. Still fabulous.
- Marble cheesecake swirl: Beat 4 oz softened cream cheese with 1 tablespoon sugar and 1 egg yolk. Spoon and swirl on top before baking.
FAQ
Can I use frozen bananas?
Yes.
Thaw completely, drain excess liquid, and mash. Frozen bananas are often sweeter and work great for baking.
How ripe should the bananas be?
Heavily speckled or mostly brown on the outside. If they’re perfuming your kitchen with banana aroma, they’re ready for greatness.
Can I reduce the sugar?
You can drop granulated sugar by 2–3 tablespoons without wrecking structure.
Any more and you’ll lose shine and moisture. FYI, brown sugar is key to chewiness.
What if I only have a 9×9 pan?
Bake 20–26 minutes and start checking early. They’ll be thinner and may set faster, so watch the center closely.
Do I need a mixer?
Nope.
A whisk and a spatula get it done. One bowl, minimal drama.
Why brown the butter?
It adds nutty, caramelized notes that play perfectly with banana and chocolate, making the flavor taste “bakery-level” without extra effort.
Can I make these ahead?
Absolutely. They slice cleanly on day two and taste even more fudgy.
Store airtight and warm briefly before serving.
Wrapping Up
If banana bread is comfort and brownies are celebration, this banana bread brownies recipe is the VIP party sweatshirt—effortless, upgraded, and ridiculously satisfying. You get a fudgy bite, big banana energy, and a top that looks bake-shop legit. Make it once for “research,” then make it again because the first pan vanished.
Your move.