🌶️ The Ultimate Crazy Feta Cava Recipe (Copycat!)
👩🍳 The Home Chef's Essential Kitchen
Consistently cooking incredible, healthy meals at home is so much easier when you aren't fighting with cheap tools. These are the 5 absolute powerhouse kitchen essentials that professional chefs and serious home cooks rely on every single day to get perfect results.
🍳 Lodge 10.25" Cast Iron Skillet
The single greatest value in all of cookware. It retains heat infinitely better than cheap non-stick pans, allowing you to get a restaurant-quality crust on steaks or perfect crispy edges on cornbread. With proper care, this $20 pan will literally outlive you.
🔪 Victorinox Fibrox Pro 8" Chef's Knife
A dull knife makes cooking a frustrating chore. This specific blade is the undisputed champion of the culinary world—it holds a terrifyingly sharp edge, features a comfortable non-slip grip, and performs identical to German knives that cost quadruple the price.
🌡️ ThermoPro Instant Read Thermometer
Never serve dry chicken or undercooked pork again. An instant-read thermometer is the secret difference between amateur cooks who 'guess' when protein is done, and professionals who know exactly when to pull meat off the heat for maximum juiciness.
🍲 Lodge Enameled Cast Iron Dutch Oven
The ultimate workhorse for soups, stews, braised short ribs, and baking crusty artisanal bread. The enameled interior provides incredible heat distribution for slow-cooking while eliminating the intense seasoning maintenance required by bare cast iron.
🥄 Bpa-Free Silicone Utensil Set
Throw away those melting plastic spatulas and bacteria-harboring wooden spoons. This pure silicone set is heat-resistant up to 600°F, won't scratch your expensive pans, and features seamless designs that make cleaning out thick sauces and batters effortless.
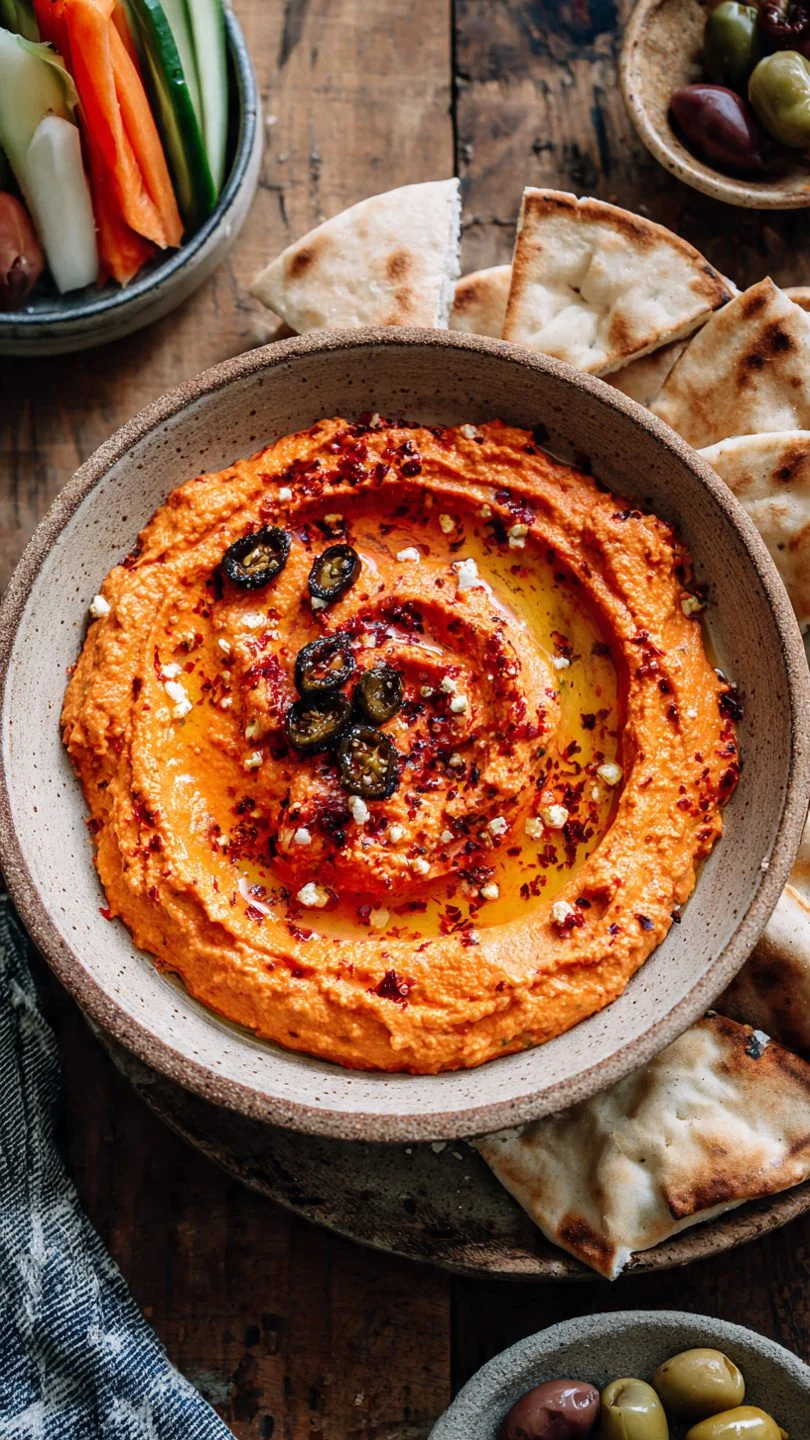
Raise your hand if you’ve personally victimized your bank account at Cava just to get an extra scoop of that spicy, creamy feta goodness. Yeah, same. It’s practically a support group at this point. There is something deeply hypnotic about that neon-orange spread that turns a regular grain bowl into a spiritual experience. But listen, today we’re stopping the financial bleeding. We are making that liquid gold at home. And honestly? It might even be better than the original because you don’t have to ration it. Buckle up, buttercup; we’re getting cheesy.

Why This Recipe is Awesome
Look, I don’t use the word “life-changing” lightly—usually only for high-waisted jeans or really good dry shampoo—but this crazy feta Cava recipe is up there. It’s not just a dip; it’s a lifestyle.
First off, the flavor profile is what chefs call “perfectly balanced” and what I call “highly addictive crack-dip.” You’ve got the intense, briny salinity of the feta cheese hitting the back of your tongue first. Then, the heat from the jalapeños creeps in—it’s not punch-you-in-the-face hot, but a warming, “hello there” kind of spice. Finally, the high-quality olive oil mellows everything out, creating a velvety, rich mouthfeel that makes you involuntarily close your eyes when you take a bite. It hits salt, fat, acid, and heat all at once.
Secondly, it is embarrassingly easy to make. Like, “I can make this after three glasses of wine” easy. There is no cooking involved unless you count roasting a pepper as “cooking” (which I totally do). The food processor does 95% of the heavy lifting here. If you can push a button, you can make this dip.
Finally, the versatility is off the charts. Obviously, it belongs in a Mediterranean bowl with falafel and hummus. But have you tried it spread thick on avocado toast? Or as a “sauce” for grilled chicken? Or, and let’s be real here, just eaten straight off a spoon while standing in front of the open fridge at 11 PM? It’s a judgment-free zone here. This recipe makes a big batch, meaning your snacking game is secured for the week.
Ingredients You’ll Need
We aren’t reinventing the wheel here; we’re just making it delicious. Here is your grocery list for greatness:
- Feta Cheese: Listen to me very carefully: Do not buy pre-crumbled feta. Put down the tub. Step away. Pre-crumbled cheese is coated in anti-caking agents (like cellulose—wood pulp!) that make it dry and prevent it from blending into a creamy dream. You need a block of feta in brine. It’s moister, tangier, and vastly superior.
- Jalapeños: The “crazy” in the crazy feta. We need about 3–4 fresh ones. We’re going to roast them to bring out a smoky sweetness that raw peppers just don’t have.
- Extra Virgin Olive Oil: Since this is a main component of the flavor and texture, don’t use the cheap stuff that tastes like motor oil. Use a decent EVOO that you actually enjoy the taste of. It’s the vehicle that carries all the flavor to your tastebuds.
- Garlic: Measure with your heart. I usually go for 2–3 cloves. Raw garlic adds a punchy bite that cuts through the rich cheese.
- Lemon Juice: Just a squeeze of fresh lemon brightens everything up. It acts as the acid to balance the heavy fats.
- Red Pepper Flakes (Optional): If you want to crank the heat level from “sociable” to “mildly alarming,” toss a pinch of these in.
Step-by-Step Instructions
Ready to create magic? Let’s do this.
1. Fire Up the Peppers Turn your oven broiler on high. We are going to char these jalapeños until they look like they’ve been through a war. Place the whole peppers on a baking sheet lined with foil (for easy cleanup, obviously). Broil them for about 5–8 minutes, flipping halfway through, until the skins are blistered and blackened.
Why we do this: Roasting breaks down the cell walls of the pepper, making them soft and releases their natural sugars, adding a smoky depth rather than just raw vegetable heat.
2. The Sweat and Peel Once charred, immediately toss the hot peppers into a bowl and cover it tightly with plastic wrap or a plate. Let them “sweat” for 10 minutes. This steam loosens the skin. After steaming, wear gloves (seriously, wear gloves, unless you want spicy eyes later), peel off the blackened skins, slice them open, and scrape out the seeds. Keep the seeds if you want extra heat! Roughly chop the pepper flesh.
3. Crumble and Combine Take your glorious block of feta cheese out of the brine. Drain it well. Crumble the block with your hands right into the bowl of your food processor. Toss in the roughly chopped roasted jalapeños, the garlic cloves, the squeeze of lemon juice, and chili flakes if you’re using them.

4. The Blitz (Part 1) Pulse the food processor about 10–15 times. You aren’t trying to liquefy it yet; you just want to break down the big chunks of garlic and combine the peppers with the cheese. It should look like a chunky confetti at this stage.
5. The Emulsion (The Important Part) This is where the magic happens. Turn the food processor on low to medium speed. While the blade is spinning, slowly stream in the olive oil through the feed tube at the top.
The Science Bit: By streaming the oil in slowly while the mixture is agitated, you are creating an emulsion—forcing the oil to suspend within the cheese solids. If you dump it all in at once, you’ll get an oily, separated mess. Watch as the mixture transforms from chunky crumbs into a velvety, bright orange, aerated spread.
6. The Texture Check Stop the machine and scrape down the sides with a spatula. Give it a taste test. Does it need more lemon? More spice? Check the texture. Cava’s version isn’t perfectly smooth like hummus; it still has tiny, discernible grains of feta. Don’t over-process it into baby food. It should have character.
7. The Hardest Part (Waiting) Scoop your masterpiece into an airtight container. Now—and this is crucial—put it in the fridge for at least an hour before eating. The flavors need time to get to know each other, meld, and marry. The dip will also firm up slightly as the olive oil chills, giving you that perfect scoopable consistency.
Common Mistakes to Avoid
Even though this is easy, things can go wrong. Don’t be that person.
- Using “Dry” Feta: I’m saying it again because it’s vital: using pre-crumbled feta results in a grainy, sad dip that tastes dusty. Use the block in brine. Period.
- Ignoring the Jalapeño Seeds: The heat of a pepper lives mostly in the white pith (the ribs) and the seeds. If you remove absolutely all of them, you’ll have “Mildly Annoyed Feta,” not “Crazy Feta.” Leave a few seeds in for a kick.
- Dumping the Oil: Patience is a virtue, especially when emulsifying. If you dump all the oil in at once, the fats won’t bind correctly with the cheese proteins. You’ll end up with a slick of oil floating on top of cheese sludge. Stream it in slowly!
- Serving Immediately: Eating it right out of the food processor is tempting (and I definitely do it), but the flavor improves significantly after an hour in the fridge. The garlic mellows out, and the smokiness of the peppers infuses the cheese.
Alternatives & Substitutions
Customize your dip experience. It’s your world; we’re just snacking in it.
- Make it Vegan: Believe it or not, this works shockingly well with high-quality vegan feta brands (like Violife). The texture might be slightly different, but the flavor profile is solid.
- Can’t Handle the Heat?: If jalapeños scare you, you can swap them for roasted poblano peppers. They have a wonderful, rich, smoky flavor but very little heat. It won’t be traditional “Crazy Feta,” but it will still be delicious.
- No Food Processor?: Okay, this is tough. You can try using a potato masher and a lot of elbow grease, whipping the oil in with a whisk at the end. It will be much chunkier, more like a rustic salad topper than a creamy dip, but it’ll still taste good.
- Herb it Up: Cava’s version is pretty streamlined, but feel free to add a handful of fresh dill or parsley to the food processor for an herbal, fresh kick. IMO, dill makes everything better.
FAQ (Frequently Asked Questions)
How long does this stuff last? Assuming you don’t eat it all in one sitting (a bold assumption), it lasts amazingly well in an airtight container in the fridge for about a week to 10 days. The salt and oil act as natural preservatives.
Can I use a blender instead of a food processor? Technically, yes. But blenders require more liquid to get things moving. You might have to add way more olive oil than necessary to get the blades to catch the cheese, resulting in a soupier dip. A food processor is really the superior tool here.
Is this exactly like Cava’s? It’s incredibly close. Some argue Cava might use a blend of cheeses or some industrial emulsifiers to get their specific texture, but this homemade version is fresher, contains no weird additives, and tastes 99% identical to the real deal.
Can I freeze it? Please don’t. Dairy doesn’t love the freezer. When you thaw it out, the emulsion will break, the water will separate from the cheese fats, and you’ll have a weird, grainy, watery mess that will make you sad.

Final Thoughts
There you have it. You have successfully cracked the code to the most addictive spread in the fast-casual game. You have harnessed the power of brine and spice. You are practically a Mediterranean deity now.
Whether you slap this on a pita, dollop it on a grain bowl, or just use it as a vehicle to get more pretzels into your mouth, you’ve upgraded your snacking game significantly. Now go impress someone—or just impress yourself in front of Netflix—with your new culinary skills. You’ve earned it!