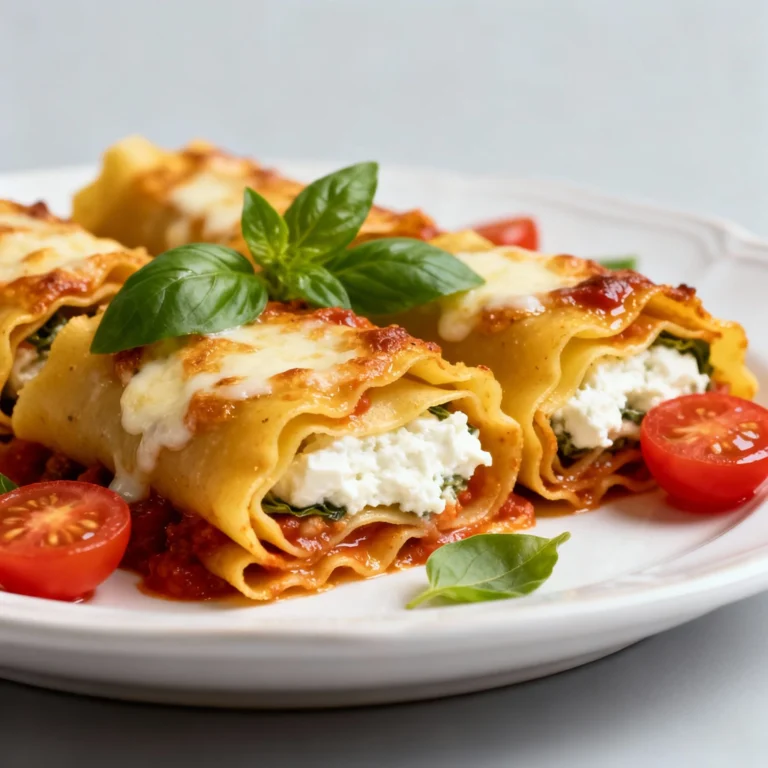
🍝 Cheesy Spinach Lasagna Roll Ups Recipe (Easy Dinner Win!)
👩🍳 The Home Chef's Essential Kitchen
Consistently cooking incredible, healthy meals at home is so much easier when you aren't fighting with cheap tools. These are the 5 absolute powerhouse kitchen essentials that professional chefs and serious home cooks rely on every single day to get perfect results.
🍳 Lodge 10.25" Cast Iron Skillet
The single greatest value in all of cookware. It retains heat infinitely better than cheap non-stick pans, allowing you to get a restaurant-quality crust on steaks or perfect crispy edges on cornbread. With proper care, this $20 pan will literally outlive you.
🔪 Victorinox Fibrox Pro 8" Chef's Knife
A dull knife makes cooking a frustrating chore. This specific blade is the undisputed champion of the culinary world—it holds a terrifyingly sharp edge, features a comfortable non-slip grip, and performs identical to German knives that cost quadruple the price.
🌡️ ThermoPro Instant Read Thermometer
Never serve dry chicken or undercooked pork again. An instant-read thermometer is the secret difference between amateur cooks who 'guess' when protein is done, and professionals who know exactly when to pull meat off the heat for maximum juiciness.
🍲 Lodge Enameled Cast Iron Dutch Oven
The ultimate workhorse for soups, stews, braised short ribs, and baking crusty artisanal bread. The enameled interior provides incredible heat distribution for slow-cooking while eliminating the intense seasoning maintenance required by bare cast iron.
🥄 Bpa-Free Silicone Utensil Set
Throw away those melting plastic spatulas and bacteria-harboring wooden spoons. This pure silicone set is heat-resistant up to 600°F, won't scratch your expensive pans, and features seamless designs that make cleaning out thick sauces and batters effortless.
Let’s be real for a second. You want lasagna. Like, deep in your soul, you are craving that saucy, cheesy, carb-heavy embrace that only lasagna can provide.
But then you remember the reality of making actual lasagna. The endless layering. The precise structural engineering required to keep it from collapsing into a sad pasta avalanche the second you cut a square. The sheer amount of time it takes to bake a brick of food.
Suddenly, ordering pizza sounds a lot easier.
Stop right there. Put down the phone. We have a better solution. Enter: The spinach lasagna roll ups recipe.
Think of these as lasagna’s cuter, lower-maintenance younger sibling. They have all the flavor of a traditional lasagna—the gooey mozzarella, the creamy ricotta, the tangy tomato sauce—but they come in adorable, individual portions that are infinitely easier to assemble and serve.
Are you ready to impress everyone (including yourself) with minimal trauma? Let’s do this.
Why This Recipe is Awesome
Look, I don’t throw the word “life-changing” around lightly when it comes to pasta, but these roll ups make a strong case. If you’ve ever felt personally victimized by a towering lasagna that slid off your spatula onto the floor, this recipe is your redemption arc.
Here is precisely why you need this spinach lasagna roll ups recipe in your rotation immediately:
1. The Perfect Ratio Every Time With traditional lasagna, you always end up with “the bad piece.” You know the one—it’s mostly noodle with barely any cheese, or it’s a corner piece that’s just a little too crunchy. With roll ups, every single bite is engineered for perfection. Because you are individually rolling the filling inside the noodle, you guarantee a flawless distribution of spinach, creamy ricotta, and sauce in every single forkful. It’s democracy in pasta form.
2. They Don’t Look Like a Car Crash on a Plate Let’s be honest, serving traditional lasagna elegantly is impossible unless you are a trained Italian nonna. It always slops onto the plate. Roll ups, however? They look restaurant-quality. You scoop one or two pretty little spirals onto a plate, spoon some extra sauce over the top, sprinkle some fresh basil, and suddenly you look like you actually tried. It’s highly Instagrammable comfort food.
3. The Texture is Superior (Yes, I Said It) Here is where the magic happens. When you bake a giant tray of lasagna, the middle noodles can sometimes get a bit gummy while waiting for the center to heat through.
With roll ups, heat circulates around each individual roll. This means the edges of the noodles peeking out of the sauce get delightfully crispy and golden brown (the best part, IMO), while the filling inside stays molten and creamy. The spinach, having been properly drained, provides a lovely earthy contrast to the richness of the cheese without making the dish watery. It’s a symphony of textures—crunchy, gooey, saucy, and chewy—all at once.
4. Built-in Portion Control (Sort Of) Okay, “portion control” is a loose term here because you will want to eat four of them. But technically, they are pre-portioned. It’s much easier to put two rolls on a plate and call it a meal than it is to eyeball a “reasonable slice” from a giant casserole dish.
5. It Feels Slightly Healthy Because: Spinach There is a significant amount of green stuff in here. Popeye ate spinach and look at those forearms. Therefore, this is basically health food. (Don’t fact-check me on this, just enjoy the cheese).
Ingredients You’ll Need
We aren’t reinventing the wheel here. We’re sticking to classic flavors because they work. Here is your grocery list for greatness:
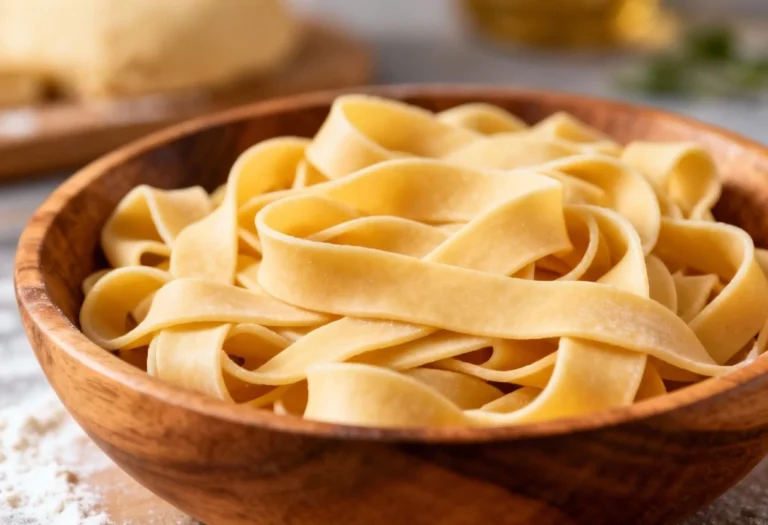
- Lasagna Noodles: You need about 12–15 classic ruffled lasagna noodles. Crucial tip: Do NOT buy “oven-ready” or “no-boil” noodles for this. They do not roll well; they snap, crackle, and pop. You need the old-school boil-em-up kind.
- Frozen Spinach: Grab a 10-ounce package of frozen chopped spinach. Yes, you can use fresh, but you’d need a mountain of it to cook down to what you need. Frozen is easier. Thaw it completely before starting.
- Ricotta Cheese: You need a 15-ounce tub. Please, for the love of flavor, use whole milk ricotta. Low-fat ricotta tends to be grainy and watery. We want luxurious creaminess here.
- Mozzarella Cheese: You’ll need about 2 cups shredded, divided. This is the glue that holds the universe (and these roll ups) together.
- Parmesan Cheese: About 1/2 cup of grated Parmesan. This adds that salty, nutty, savory punch that makes Italian food taste authentic.
- One Large Egg: The unsung hero. The egg binds the ricotta mixture together so it doesn’t ooze out the sides of your rolls like a sad cheesy river when baked.
- Marinara Sauce: You need a big jar (about 24–32 ounces). If you have a homemade sauce recipe you love, use it. If you want to buy the good jarred stuff because it’s Tuesday night and you’re tired? Do it. No judgment here.
- Garlic & Herbs: A teaspoon or two of garlic powder, dried oregano, and maybe some red pepper flakes if you’re feeling spicy. Salt and black pepper are mandatory.
- Fresh Basil (Optional): For sprinkling on top at the end so people think you’re fancy.
Step-by-Step Instructions
Okay, let’s build these bad boys. It’s an assembly line process, so turn on some music and get into the zone.
1. Prep the Spinach (The Most Important Step) Thaw your frozen spinach completely. Now, you must squeeze every single drop of water out of it. I mean it. Wrap it in a clean kitchen towel or cheesecloth and wring it out like it owes you money. If you skip this, your lasagna rolls will be swimming in green swamp water. You want dry, dense spinach clumps.
2. The Noodle Situation Preheat your oven to 375°F (190°C). Get a large pot of heavily salted water boiling. Cook the lasagna noodles according to the package directions for al dente. Do not overcook them! They need to be pliable enough to roll, but firm enough not to tear.
Pro Tip: When you drain them, rinse them briefly with cool water to stop the cooking. Then, lay them out flat in a single layer on sheets of parchment paper or foil brushed with a little oil. Do NOT throw them all in a colander together; they will stick into one giant unusable carb-monster.
3. Create the Filling In a medium bowl, combine the well-drained spinach, the whole milk ricotta, 1 cup of the shredded mozzarella, the Parmesan cheese, the egg, garlic powder, oregano, salt, and pepper. Mix it with a fork until everything is combined into a thick, speckly green paste. Give it a tiny taste (watch out for the raw egg if that worries you, though it’s minimal risk) to ensure it’s seasoned well.
4. Set the Stage Take a 9×13 inch baking dish. Pour about 1 cup of your marinara sauce into the bottom and spread it around to coat the bottom nicely. This ensures the rolls don’t stick and gives them a saucy bed to rest in.
5. The Roll Up Assembly Line This is the fun part. Take one flat noodle. Spoon about 1/4 cup of the cheese-spinach mixture along the entire length of the noodle. Spread it out relatively evenly with the back of your spoon, leaving a tiny bit of space at the very end.
Starting from one end, gently but firmly roll the noodle up over the filling, jelly-roll style. Don’t squeeze too hard or the filling will squish out the sides.
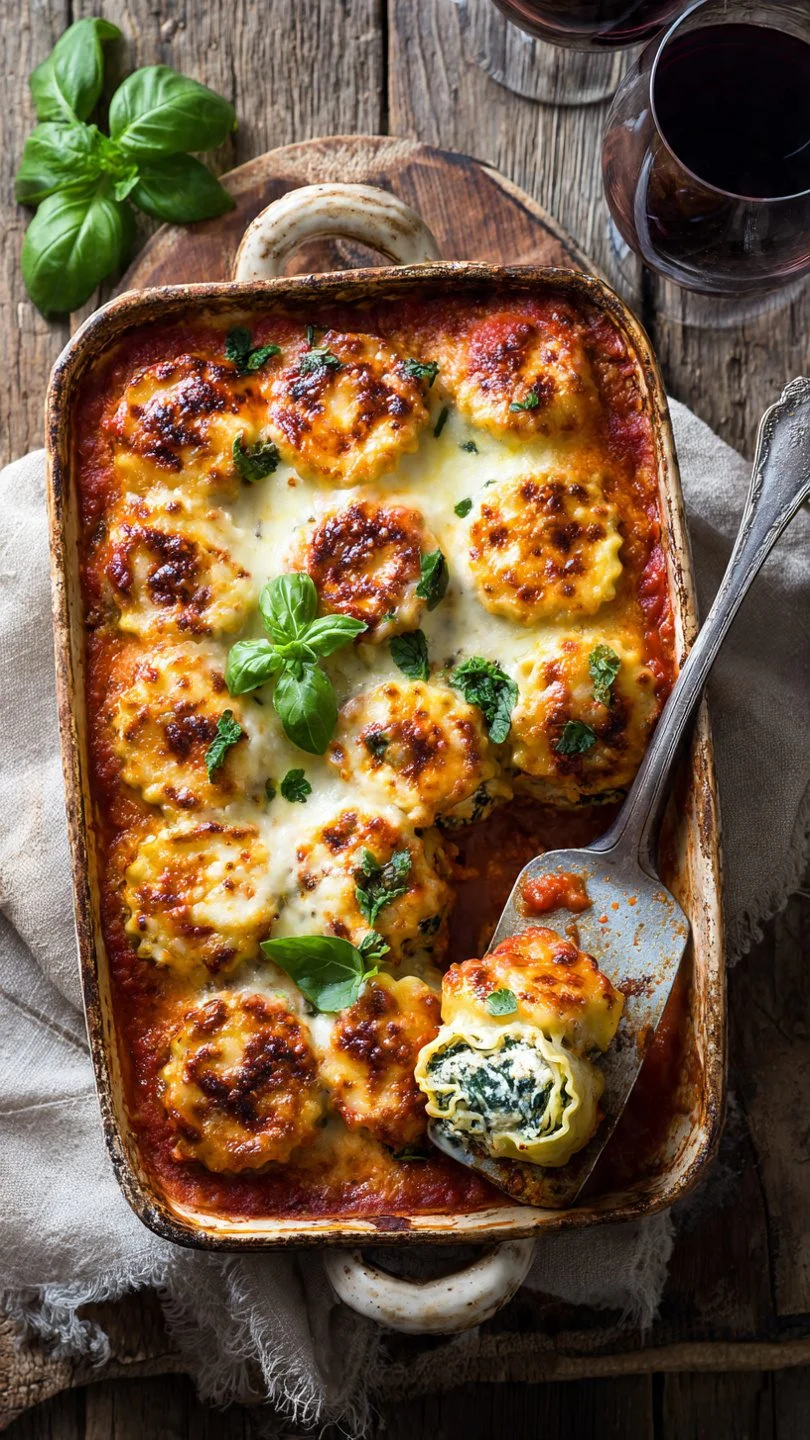
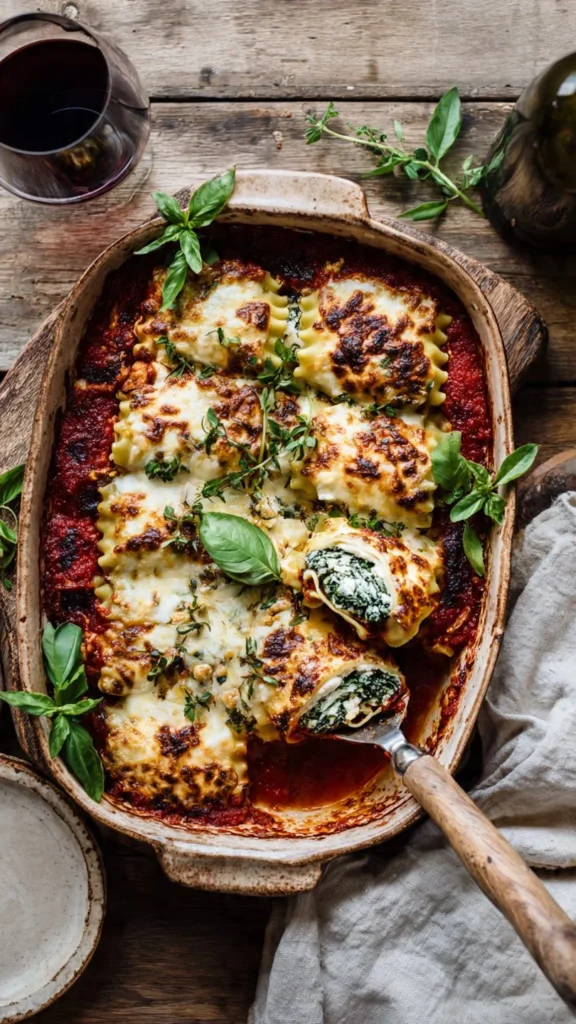
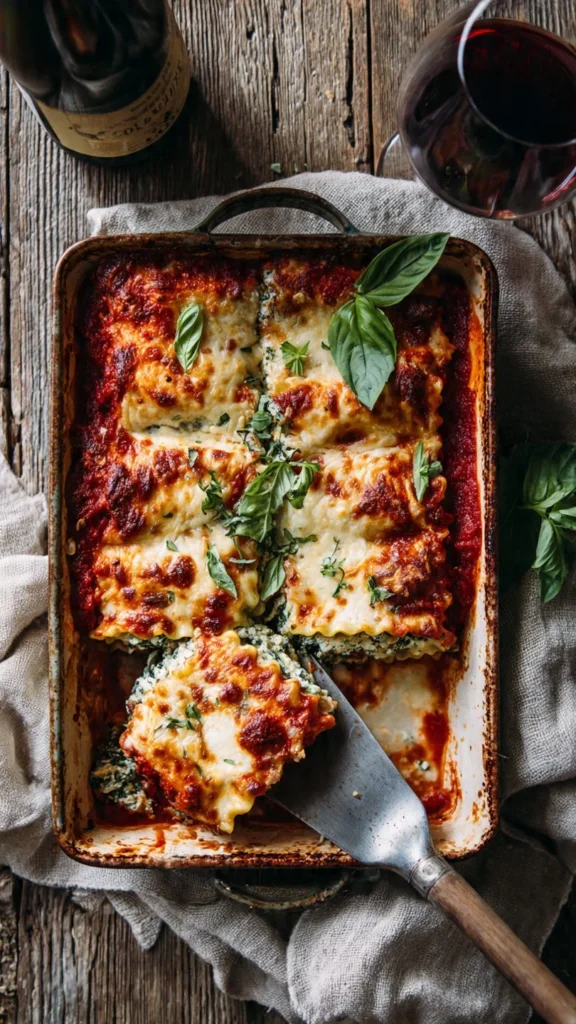
6. Nestling and Topping Place your beautiful little roll seam-side down into the sauced baking dish. Repeat the process with the remaining noodles and filling, nestling them snugly against each other in the pan. You should fit about 12 rolls in comfortably.
Once they are all in, top the rolls with the remaining marinara sauce. Be generous. Finally, rain down the remaining 1 cup of mozzarella cheese over everything.
7. The Bake Cover the dish tightly with aluminum foil. FYI: If your cheese is piled high, spray the underside of the foil with oil spray so the cheese doesn’t stick to it. Bake covered for 20 minutes. This steams the noodles to perfect tenderness and melts the filling.
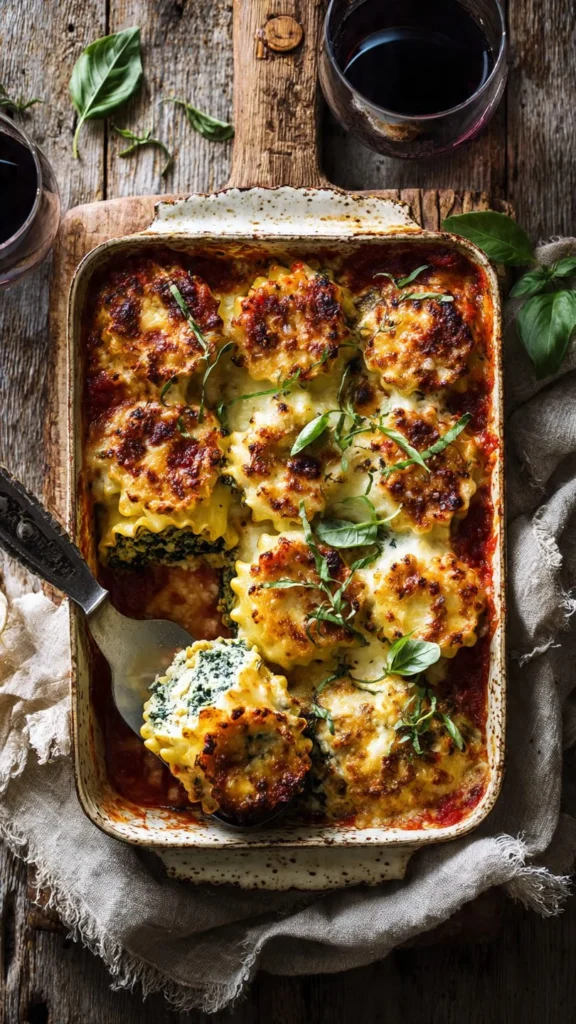
8. The Finish Remove the foil. The cheese should be melted, and the sauce should be bubbly. Bake uncovered for another 10–15 minutes until the cheese on top is golden brown and spotty, and the edges of the noodles peeking out are slightly crispy.
9. The Hardest Part: Waiting Remove the pan from the oven. Let it stand for at least 10 minutes before serving. I know, it smells incredible and you want to dive in. But if you serve it molten hot, the filling will be too runny. Letting it rest allows everything to set up for the perfect texture. Top with fresh basil and devour.
Common Mistakes to Avoid
Listen, this recipe is pretty forgiving, but there are a few ways to bungle it. Avoid these rookie moves:
- The Watery Grave: I’m saying it again because it’s the #1 issue: Squeeze the spinach dry. If your filling looks soupy before you even roll it, you’re in trouble.
- Overcooking the Noodles: If you boil the noodles until they are totally soft, they will tear when you try to roll them. It’s frustrating and messy. Aim for a firm al dente.
- Using “Oven-Ready” Noodles: Just don’t. They are too brittle to roll when dry, and the texture is weird when baked this way.
- Skimping on Sauce: These noodles need moisture to finish cooking in the oven. If you don’t put enough sauce on the bottom and over the top, you’ll end up with dry, chewy roll ups.
- Forgeting the Egg: The egg is the binder. Without it, when you cut into your roll up, the ricotta filling will just spill out onto the plate instead of staying in a nice distinct layer.
Alternatives & Substitutions
Want to switch things up? These babies are versatile.
- The Meat Lover: Craving protein? Brown some Italian sausage or ground beef, drain the grease, and mix it right into your ricotta filling along with the spinach. Or, use a hearty Bolognese meat sauce on top instead of marinara.
- The Veggie Swap: Hate spinach? (Who hurt you?) You can swap it out for finely chopped kale (sauté it first to soften it) or even roasted red peppers that have been patted dry.
- The “I Hate Ricotta” Crew: If you dislike the texture of ricotta, you can substitute cottage cheese. However, you must blend the cottage cheese in a food processor first to get rid of the curds and make it smooth. It will be a bit tangier than ricotta.
- Gluten-Free: Yes, you can use gluten-free lasagna noodles. Be warned: they are much more delicate and prone to breaking than wheat noodles. Handle with extreme care when boiling and rolling.
FAQ (Frequently Asked Questions)
Can I make these ahead of time? Absolutely. This is a meal prep dream. Assemble the entire dish right up to the point of baking, cover it tightly with plastic wrap and foil, and stick it in the fridge for up to 24 hours. When you’re ready to eat, just remove the plastic wrap, replace the foil, and bake. You might need to add 5–10 minutes to the covered baking time since it’s starting cold.
Can I freeze lasagna roll ups? Yes! You can freeze them unbaked (in a freezer-safe dish) for up to 3 months. Thaw in the fridge overnight before baking. Or, bake them, let them cool, and freeze individual rolls for quick emergency lunches.
My noodles tore while rolling! What do I do? Don’t panic. Just patch it up. Nobody is going to inspect the structural integrity of your roll up once it’s covered in sauce and melted cheese. Just overlap the torn bits and keep rolling. It’ll taste fine.
Can I use fresh spinach instead of frozen? Technically yes, but you’ll need a lot. You need about 1 to 1.5 pounds of fresh spinach cooked down to equal the amount in a 10oz frozen box. You still need to squeeze it dry after cooking it!
Final Thoughts
There you have it. The spinach lasagna roll ups recipe that is going to save your weeknight dinners and make you look like a culinary wizard with half the effort of a traditional lasagna.
These are cheesy, comforting, and just fancy enough to serve for company, but easy enough to make while wearing sweatpants and watching Netflix on a Tuesday.
Now go forth, boil some noodles, squeeze some spinach, and impress yourself with your new culinary skills. You’ve earned this carb-fest.