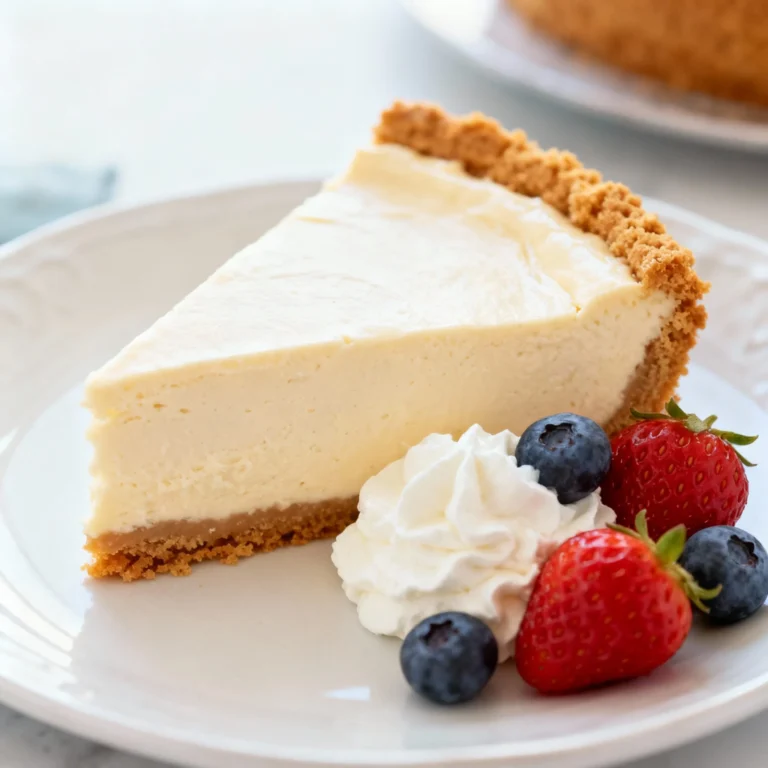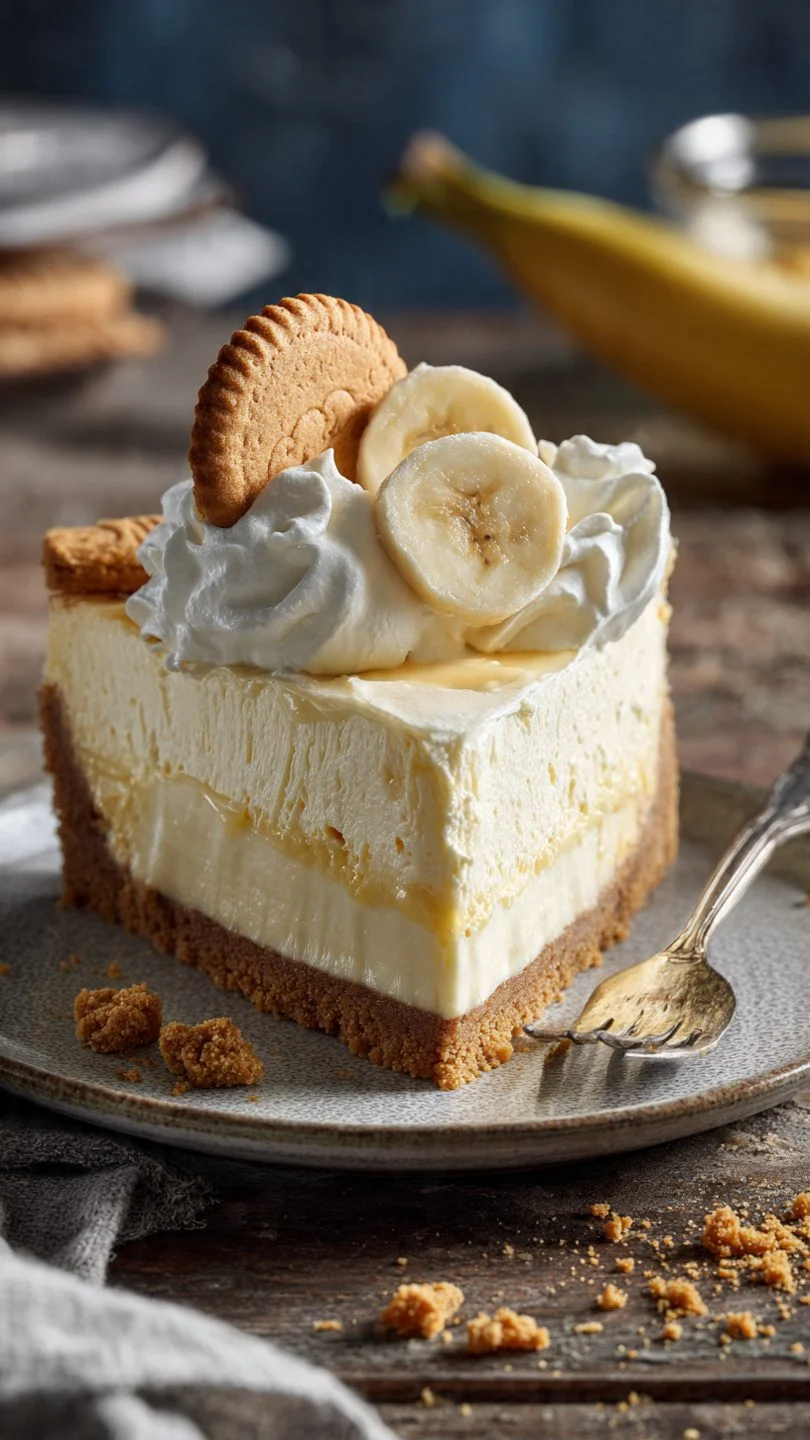
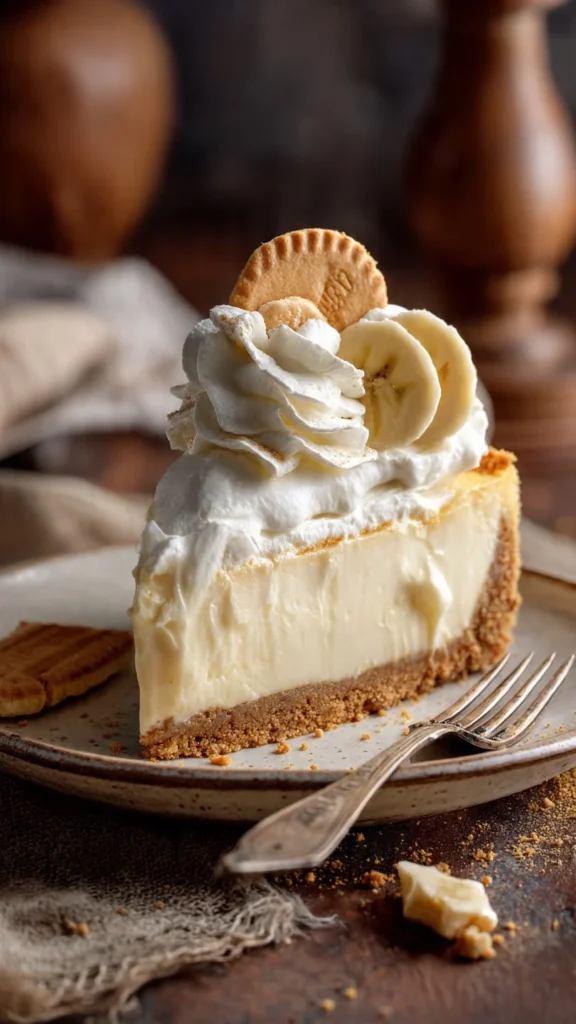
🍌 The Best Banana Pudding Cheesecake Recipe: Creamy & Dreamy!
👩🍳 The Home Chef's Essential Kitchen
Consistently cooking incredible, healthy meals at home is so much easier when you aren't fighting with cheap tools. These are the 5 absolute powerhouse kitchen essentials that professional chefs and serious home cooks rely on every single day to get perfect results.
🍳 Lodge 10.25" Cast Iron Skillet
The single greatest value in all of cookware. It retains heat infinitely better than cheap non-stick pans, allowing you to get a restaurant-quality crust on steaks or perfect crispy edges on cornbread. With proper care, this $20 pan will literally outlive you.
🔪 Victorinox Fibrox Pro 8" Chef's Knife
A dull knife makes cooking a frustrating chore. This specific blade is the undisputed champion of the culinary world—it holds a terrifyingly sharp edge, features a comfortable non-slip grip, and performs identical to German knives that cost quadruple the price.
🌡️ ThermoPro Instant Read Thermometer
Never serve dry chicken or undercooked pork again. An instant-read thermometer is the secret difference between amateur cooks who 'guess' when protein is done, and professionals who know exactly when to pull meat off the heat for maximum juiciness.
🍲 Lodge Enameled Cast Iron Dutch Oven
The ultimate workhorse for soups, stews, braised short ribs, and baking crusty artisanal bread. The enameled interior provides incredible heat distribution for slow-cooking while eliminating the intense seasoning maintenance required by bare cast iron.
🥄 Bpa-Free Silicone Utensil Set
Throw away those melting plastic spatulas and bacteria-harboring wooden spoons. This pure silicone set is heat-resistant up to 600°F, won't scratch your expensive pans, and features seamless designs that make cleaning out thick sauces and batters effortless.
Let’s be real for a second. Life is filled with way too many difficult choices. Paper or plastic? Text or call? Netflix or actual sleep? But the absolute worst one is standing in the kitchen, staring into the void of your pantry, trying to decide between the creamy, comforting nostalgia of Southern banana pudding and the rich, decadent sophistication of a New York-style cheesecake.
Well, stop stressing. I’m here to tell you that you can have it all.
This banana pudding cheesecake recipe is the culinary equivalent of that crossover episode where all your favorite characters finally meet. It’s got the buttery, vanilla-wafer crust that hits you right in the childhood feels, a dense, tangy cheesecake filling loaded with real banana flavor, and a mountain of whipped cream on top. It is, frankly, ridiculous in the best possible way. So, tie your apron tight (or don’t, I’m not your mom) and let’s make some magic.
Why This Recipe is Awesome
Look, I don’t use the word “masterpiece” lightly—mostly because I usually burn toast—but this recipe is a masterpiece. Here is why you need this in your life immediately:
- The Texture Clash: You know how standard banana pudding is… mushy? Like, delicious mush, but still mush. This recipe fixes that. You get the crunch of the Nilla Wafer crust, the velvet smoothness of the cheesecake, and the fluffy cloud of whipped cream. It’s a textural rollercoaster that your mouth will thank you for.
- No Artificial Nonsense: A lot of banana recipes rely on that fake yellow extract that tastes like banana-flavored candy run over by a truck. Not here. We are using real, spotted, ugly bananas. The kind you usually throw away because you forgot to make banana bread.
- It’s a Showstopper: If you bring this to a potluck, you win. I don’t know what the prize is, but you win it. It looks incredibly high-effort, but between you and me, the hardest part is just waiting for it to cool down without eating it.
- Cheesecake Science (The Cool Part): This recipe uses a specific ratio of heavy cream to sour cream. Why? Because we want tang, but we also want richness. The sour cream cuts through the sweetness of the bananas so you don’t feel like your teeth are vibrating after one bite. It is balanced, beautiful, and bold.
Ingredients You’ll Need
Don’t try to be a hero and substitute things willy-nilly. Baking is chemistry, and chemistry is vengeful. Here is what you need to grab:
- Nilla Wafers (Vanilla Wafers): You need the OG box. We are using these for the crust and the garnish. If you buy the generic brand, don’t come crying to me when the crust isn’t buttery enough.
- Butter: Salted or unsalted? Honestly, I use salted because I like living on the edge, and that little salty kick helps the crust pop. Melt it down.
- Cream Cheese: You need four blocks (32 oz total). Crucial: It must be full-fat bricks, not the whipped stuff in a tub, and it must be at room temperature. If you try to mix cold cream cheese, you will have lumpy cheesecake, and nobody wants lumpy cheesecake.
- Granulated Sugar: Standard white sugar to keep things sweet.
- Eggs: Four large ones, room temperature. Cold eggs hitting room-temp batter equals a curdled disaster.
- Sour Cream: Full fat. This adds that classic cheesecake tang and keeps the texture moist.
- Bananas: You want about 1 cup of mashed banana (usually 2–3 bananas). The browner, the better. If they look like they’re about to rot, they’re perfect.
- Vanilla Extract: Measure with your heart, but officially, use about 2 teaspoons.
- Heavy Whipping Cream: For the topping. Because calories don’t count when you’re making something this good. FYI, keep this cold until you whip it.
- Cornstarch: Just a smidge. This is your insurance policy against cracking. It helps bind the batter.
Step-by-Step Instructions
Alright, let’s do this. Read through the whole list before you start. I know you want to skip ahead, but trust the process.
1. Prep the Oven and Your Mind Preheat your oven to 325°F (163°C). Move your oven rack to the lower middle position. Take a deep breath. You’ve got this.
2. Destroy the Wafers (The Crust) Throw about 2 cups of Nilla Wafers into a food processor and pulse them until they look like fine sand. If you don’t have a food processor, put them in a zip-top bag and smash them with a rolling pin (excellent therapy, by the way). Mix the crumbs with 2 tablespoons of sugar and your melted butter. It should feel like wet sand. Press this mixture firmly into the bottom and slightly up the sides of a 9-inch springform pan. Pro Tip: Use the bottom of a flat glass to press it down evenly. Bake the crust for 10 minutes, then let it cool.
3. The Cream Cheese Situation In a large bowl (or stand mixer with the paddle attachment), beat the room-temperature cream cheese and sugar on medium-low speed. Note: Do not go high speed! We aren’t making whipped cream. High speed adds air bubbles. Air bubbles rise while baking and then pop, causing cracks. Beat until it is completely smooth and creamy, scraping down the sides of the bowl often.
4. Add the Moisture Mix in the sour cream, vanilla extract, and cornstarch. Stir until just combined. Next, fold in your mashed bananas. The batter should smell like heaven right about now.
5. The Egg Phase (Proceed with Caution) Add the eggs one at a time, mixing on low speed after each addition just until the yolk disappears. Stop mixing as soon as the last egg is incorporated. Over-mixing eggs destroys the protein structure and leads to a dense, rubbery cake. We want creamy, not rubbery.
6. The Water Bath (Don’t Skip This!) Wrap the bottom of your springform pan in two or three layers of heavy-duty aluminum foil. You want it watertight. Place the springform pan inside a large roasting pan. Pour the batter over your pre-baked crust. Smooth the top with a spatula. Place the roasting pan in the oven. carefully pour boiling water into the roasting pan until it comes about halfway up the side of the cheesecake pan. Why? This creates steam, cooking the cheesecake gently and evenly so the edges don’t dry out before the center is done.
7. The Bake Bake for 60 to 75 minutes. You know it’s done when the edges are set but the center still has a “Jell-O wobble.” If the whole thing is liquid, keep baking. If it’s stiff as a board, you’ve gone too far.
8. The Cool Down (Patience is Key) Turn off the oven. Crack the oven door open slightly (stick a wooden spoon in the door if needed) and leave the cheesecake inside for 1 hour. This slow cooling prevents temperature shock, which is the number one cause of the Grand Canyon-sized cracks on top. After an hour, remove it, take it out of the water bath, run a thin knife around the edge to release it from the ring, and let it cool completely on the counter. Then, refrigerate for at least 6 hours (overnight is best).
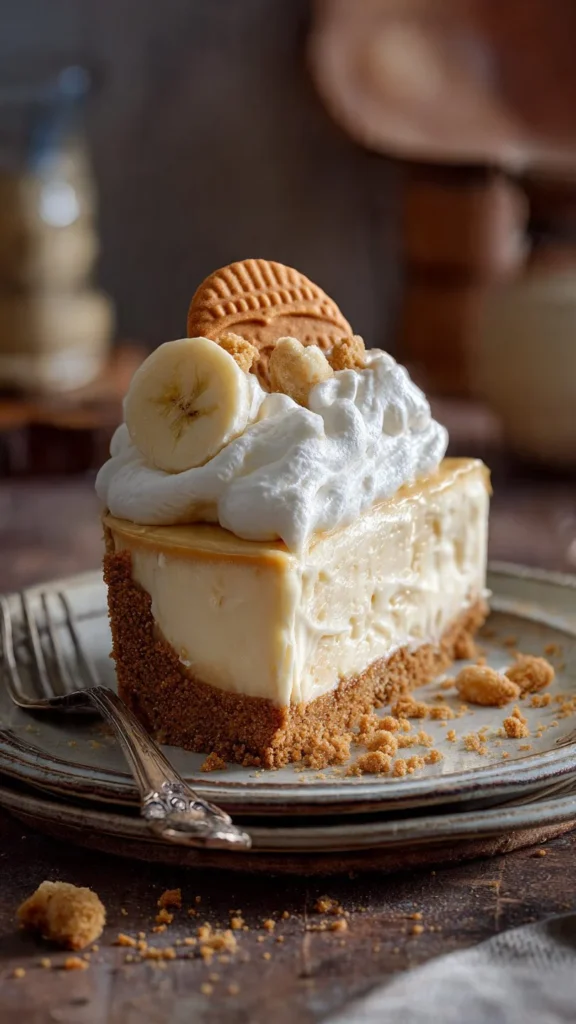
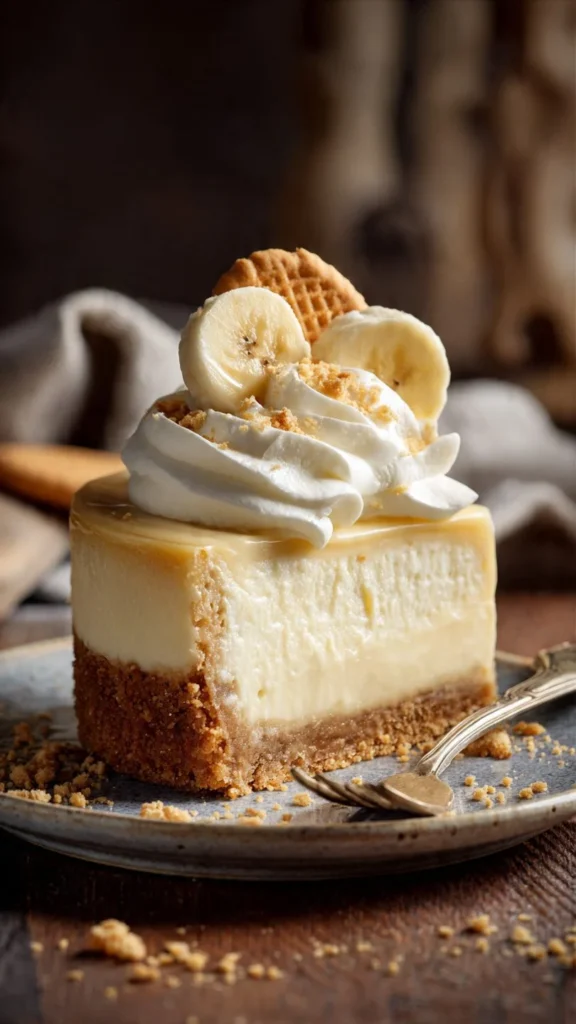
9. The Grand Finale Before serving, whip your heavy cream with a little powdered sugar and vanilla until stiff peaks form. Pipe or pile it onto the chilled cheesecake. Garnish with fresh banana slices and more Nilla Wafers.
Common Mistakes to Avoid
Even the best of us trip up sometimes. Here is how to avoid looking like a novice:
- Using Cold Ingredients: I cannot stress this enough. If your cream cheese is cold, it won’t blend. You will beat it to death trying to get the lumps out, introduce too much air, and end up with a cracked, lumpy mess. IMO, leave ingredients out for at least 2 hours before starting.
- Skipping the Water Bath: “It’s too much work,” you say. “I don’t have a roasting pan,” you say. Listen, if you skip the water bath, the edges will overcook and the texture will be gritty. Just do the water bath. It’s worth the extra 3 minutes of effort.
- Opening the Oven Door: Do not peek! Every time you open that door, the temperature drops, and the delicate rise of the cheesecake collapses. Use the oven light. Trust the timer.
- Decorating Too Early: Do not put fresh banana slices on top until you are ready to serve. They will turn brown and slimy in the fridge. Nobody wants a slime-cake.
Alternatives & Substitutions
Cooking is about adaptation (and realizing you forgot to buy something halfway through).
- The Crust: Not a fan of Nilla Wafers? You’re wrong, but okay. You can swap them for Graham Crackers for a more traditional vibe, or Golden Oreos (remove the filling first) for an extra sweet kick.
- The Dairy: No sour cream? You can use full-fat Greek yogurt. It’s a little tangier, but it works. Do not use low-fat yogurt unless you want a watery cheesecake.
- Gluten-Free: This is actually an easy swap! Just use gluten-free vanilla wafers or gluten-free graham crackers for the crust. The filling is naturally gluten-free (just swap the teaspoon of cornstarch for GF cornstarch or tapioca flour to be safe).
- Caramel Drizzle: If you really want to hurt your diet, drizzle salted caramel over the top before serving. It pairs insanely well with the banana flavor.
FAQ (Frequently Asked Questions)
Can I freeze this cheesecake? Absolutely. In fact, cheesecake freezes beautifully. Wrap the whole cheesecake (without the whipped cream topping) in plastic wrap, then foil. It lasts for up to 3 months. Thaw it in the fridge overnight before serving.
My cheesecake cracked! Is it ruined? First of all, calm down. It tastes exactly the same. Second, that is literally why we cover it in whipped cream and crushed cookies. It’s called “rustic charm.” Hide the evidence and eat it.
Can I use unripe bananas? Please don’t. Green or yellow bananas lack the sugar and soft texture needed to blend into the batter. They will leave weird chunks and taste starchy. If your bananas aren’t ready, roast them in their skins at 300°F for 20 minutes until they turn black and soft.
Do I really have to wait 6 hours to eat it? Yes. Warm cheesecake has the texture of scrambled eggs. It needs the cold to set up into that dense, creamy texture you’re dreaming of. Eat a Nilla Wafer while you wait.
How long does it stay fresh? It will last about 4-5 days in the fridge, provided you cover it well so it doesn’t absorb the smell of that leftover onion from Tuesday.
Final Thoughts
And there you have it—a banana pudding cheesecake recipe that bridges the gap between Southern comfort and big-city dessert sophistication. It’s creamy, it’s crunchy, and it’s banana-y (is that a word? It is now).
Whether you are making this for a birthday, a holiday, or just because it’s a Tuesday and you deserve a treat, this recipe is going to deliver. Don’t be intimidated by the water bath or the cooling time; good things come to those who wait. Now go impress someone—or yourself—with your new culinary skills. You’ve earned it!