Chinese Fried Rice Recipe That Slaps: Crispy, Savory, and Ready in 12 Minutes
👩🍳 The Home Chef's Essential Kitchen
Consistently cooking incredible, healthy meals at home is so much easier when you aren't fighting with cheap tools. These are the 5 absolute powerhouse kitchen essentials that professional chefs and serious home cooks rely on every single day to get perfect results.
🍳 Lodge 10.25" Cast Iron Skillet
The single greatest value in all of cookware. It retains heat infinitely better than cheap non-stick pans, allowing you to get a restaurant-quality crust on steaks or perfect crispy edges on cornbread. With proper care, this $20 pan will literally outlive you.
🔪 Victorinox Fibrox Pro 8" Chef's Knife
A dull knife makes cooking a frustrating chore. This specific blade is the undisputed champion of the culinary world—it holds a terrifyingly sharp edge, features a comfortable non-slip grip, and performs identical to German knives that cost quadruple the price.
🌡️ ThermoPro Instant Read Thermometer
Never serve dry chicken or undercooked pork again. An instant-read thermometer is the secret difference between amateur cooks who 'guess' when protein is done, and professionals who know exactly when to pull meat off the heat for maximum juiciness.
🍲 Lodge Enameled Cast Iron Dutch Oven
The ultimate workhorse for soups, stews, braised short ribs, and baking crusty artisanal bread. The enameled interior provides incredible heat distribution for slow-cooking while eliminating the intense seasoning maintenance required by bare cast iron.
🥄 Bpa-Free Silicone Utensil Set
Throw away those melting plastic spatulas and bacteria-harboring wooden spoons. This pure silicone set is heat-resistant up to 600°F, won't scratch your expensive pans, and features seamless designs that make cleaning out thick sauces and batters effortless.
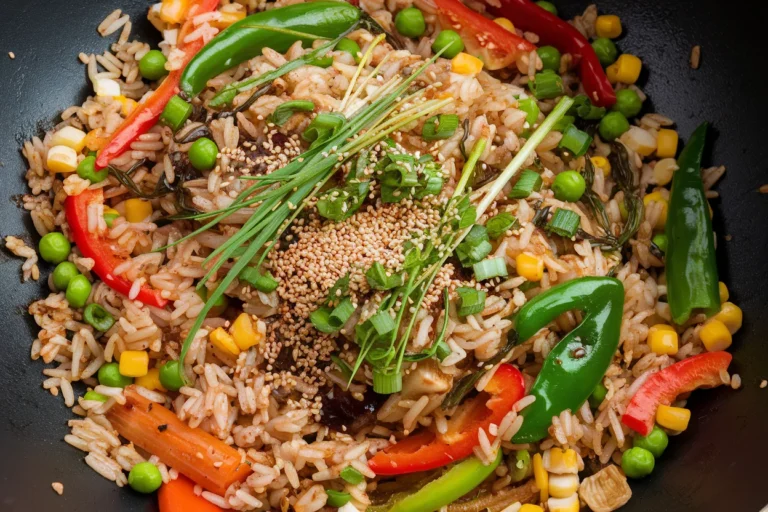
You don’t need a wok wizard badge to cook like a takeout legend. You just need cold rice, high heat, and the guts to let it char a little. This chinese fried rice recipe is your cheat code to big flavor with small effort—fast, cheap, and absurdly satisfying.
If your weeknight dinners feel like spreadsheets, this is the meal that breaks the monotony. Grab a pan, crank the flame, and watch humble leftovers turn into a flex.
What Makes This Special
Most fried rice recipes taste fine; this one tastes loud. We’re layering umami with a smart combo of soy sauce, oyster sauce, and a hit of sesame oil to nail that restaurant depth.
Cold day-old rice guarantees the signature bite—not gummy, not mushy, just right.
The technique is where the magic lives. High heat, minimal stirring, and sequencing ingredients so nothing gets soggy. Also, we’re keeping it flexible—veg-forward, protein-packed, or budget minimalism; it all works.
Ingredients Breakdown
- 3 cups day-old cooked rice (jasmine or medium-grain; refrigerated and loosened)
- 2 tablespoons neutral oil (canola, peanut, or avocado; high smoke point)
- 2 large eggs, lightly beaten
- 1 cup mixed vegetables (peas, carrots, corn; frozen is fine)
- 1/2 cup diced onion (yellow or white)
- 2 cloves garlic, minced
- 2 green onions, sliced (whites and greens separated)
- 1/2 cup protein (optional: diced ham, cooked chicken, shrimp, tofu)
- 2 tablespoons light soy sauce (or a mix of 1.5 tbsp light + 0.5 tbsp dark for color)
- 1 tablespoon oyster sauce (adds umami depth)
- 1 teaspoon sesame oil
- 1/2 teaspoon white pepper (or black if that’s what you’ve got)
- Salt to taste (taste at the end; sauces are salty)
- Optional boosters: 1 teaspoon Shaoxing wine, pinch of sugar, chili crisp, or a pat of butter for glossy finish
Step-by-Step Instructions
- Prep the rice like a pro. Break up cold rice with your hands or a fork.
Clumps are the enemy of even frying. Lay it out on a plate for 5 minutes to air out.
- Mix your sauce. In a small bowl, combine soy sauce, oyster sauce, sesame oil, and white pepper. Add Shaoxing wine if using.
This keeps the stir-fry fast and clean.
- Heat the pan properly. Preheat a wok or large skillet over high heat until it’s just shy of smoking. Add 1 tablespoon oil and swirl.
- Scramble the eggs. Pour in the eggs, let set for 10–15 seconds, then push and fold into soft curds. Remove to a plate.
Don’t overcook; they’ll finish in the rice.
- Aromatics in. Add the remaining 1 tablespoon oil. Toss in onion (and the white parts of the green onion). Stir-fry 45–60 seconds until fragrant and slightly charred.
Add garlic for the last 10 seconds.
- Cook the protein. If using raw shrimp or tofu, sear now until just cooked. If using pre-cooked meat, warm it briefly. Remove if the pan gets crowded.
- Vegetables go fast. Add peas and carrots.
Stir-fry 60–90 seconds. Keep them snappy; mushy veg is a vibe killer.
- Rice time. Add the rice in, spread it out, and let it sit undisturbed for 30–45 seconds to develop a slight crust. Then toss.
Repeat once.
- Sauce and season. Pour the sauce around the edges of the pan (helps it vaporize and coat evenly). Toss aggressively. Return eggs and protein.
Taste and adjust salt or a pinch of sugar if needed.
- Finish with flair. Add green onion tops. Optional: a pat of butter or a drizzle of chili crisp. Kill the heat.
Serve immediately while it’s still popping.
Storage Tips
- Fridge: Store in an airtight container for up to 3 days. Cool quickly to avoid condensation.
- Reheat: Best in a hot skillet with a splash of water to steam, then let it crisp. Microwave works; stir halfway.
- Freezer: Portion into bags, flatten, and freeze up to 2 months.
Reheat from frozen in a hot pan for best texture.
- Food safety FYI: Don’t leave cooked rice at room temp over 2 hours. Bacillus cereus is not your friend.
Benefits of This Recipe
- Fast and flexible: From fridge to table in ~12 minutes with pantry staples.
- Budget-friendly: Turns leftover rice and odds-and-ends into a legit meal.
- Balanced macros: Carbs from rice, protein from eggs/meat, fiber from veg. Easy to tweak for goals.
- High flavor, low stress: Minimal chopping, maximum umami.
Win-win.
- Meal prep friendly: Scales well and reheats like a champ.
Pitfalls to Watch Out For
- Using fresh, hot rice: It clumps and turns gummy. Day-old, cold rice only. If fresh, spread on a tray and chill 30–60 minutes.
- Low heat syndrome: If the pan isn’t hot, you’re steaming, not frying.
Crank it.
- Over-saucing: Too much liquid = mush. Measure sauces; you can always add a little more at the end.
- Crowding the pan: Batch cook if needed. Overloaded pans kill the char.
- Ignoring sequencing: Eggs out first, aromatics next, then veg, rice, sauces, and finishers.
Order matters.
Different Ways to Make This
- Classic Yangzhou-style vibes: Ham or BBQ pork (char siu), shrimp, peas, carrots, and egg. Light soy, no heavy coloring.
- Chicken fried rice: Diced chicken thigh marinated briefly with soy, cornstarch, and a splash of oil for tenderness.
- Egg fried rice (simple king): Skip the veg and meat. Load up green onions, eggs, and a hint of butter.
Shockingly good.
- Vegetarian/vegan: Use tofu or edamame. Swap oyster sauce for mushroom stir-fry sauce. Finish with toasted sesame seeds.
- Spicy edition: Add chili crisp, sambal, or diced fresh chilies at the end.
A squeeze of lime? Not traditional, but it slaps.
- Garlic-butter upgrade: Melt butter with garlic at the end for glossy richness. Yes, it’s indulgent.
No, you won’t regret it.
- Brown rice or cauliflower rice: Works fine—just dry it well. Expect a slightly chewier or lighter texture, respectively.
FAQ
Why does day-old rice work better?
Refrigeration dries the grains, so they fry instead of steam. Drier rice separates easily, giving you that signature chewy, non-gummy texture you want in fried rice.
Do I need a wok?
Nope.
A large, heavy skillet works great. The real key is high heat, room to toss, and not overcrowding the pan. Wok hei is a bonus, not a requirement.
What’s the best oil for frying rice?
Use a neutral, high-smoke-point oil like canola, peanut, or avocado.
Save extra-virgin olive oil for salads—its flavor and smoke point aren’t ideal here.
Can I make it gluten-free?
Yes. Use gluten-free tamari instead of soy sauce and a gluten-free oyster sauce alternative. Check labels, because sneaky gluten happens.
How do I keep the eggs fluffy?
Cook them first on high heat until just set, then remove.
They’ll finish gently when tossed back in with the rice, staying soft instead of rubbery.
What if my rice clumps?
Break it up with damp hands before cooking. In the pan, spread it out and let it sit to crisp before tossing. If it’s still clumpy, your rice was too wet—add a minute of pan time.
Is dark soy sauce necessary?
Not mandatory.
It adds color and a touch of malt sweetness. If you skip it, the fried rice will be lighter in color but still delicious with regular light soy.
Can I use leftover takeout rice?
Absolutely. As long as it’s been refrigerated and still smells/tastes fine, it’s perfect.
Break it up and you’re good to go.
The Bottom Line
This chinese fried rice recipe is fast, flexible, and way more satisfying than another boring salad. Keep the heat high, the rice cold, and the sauce measured. Lock in the technique once, and you’ve got a weeknight workhorse that never gets old.
Your fridge leftovers just found their purpose, IMO.