🍌 The Best Banana Smoothie Recipe Easy: Creamy & Quick
Let’s be real. It’s 8 AM (or maybe 2 PM, no judgment here), your brain feels like it’s wrapped in cotton wool, and the idea of actually cooking something involving heat and pans sounds like absolute torture. You want something healthy, sure, but you also want it to taste like a milkshake and take approximately three minutes to make.
So, you’re craving something tasty but too lazy to spend forever in the kitchen, huh? Same.
That is exactly why you need this banana smoothie recipe easy button in your life. It is the culinary equivalent of putting on dry shampoo and suddenly looking presentable. It’s fast, it’s creamy, and it creates the illusion that you have your life together. Let’s get blending.

Why This Recipe is Awesome
Look, I know what you’re thinking. “It’s a smoothie, how complex can it be?” But have you ever made a smoothie that tasted like watery disappointment? Or one that had weird, warm chunks in it because your blender is from 1998? Exactly. There is an art to this.
Here is why this specific method is a total game-changer:
1. It is legitimately “Idiot-Proof” I have burned toast. I have overcooked pasta until it became glue. But even I cannot mess this up. The ratios in this recipe are designed to be forgiving. If you accidentally dump in a little too much milk, you just add more ice or fruit. It’s a low-stakes relationship with food, which is exactly the vibe we are going for.
2. The Texture is Elite We aren’t aiming for “drinkable fruit juice” here. We are aiming for thick, velvety, soft-serve ice cream vibes. By prioritizing frozen ingredients over just throwing in ice cubes (which is a rookie move, by the way), we achieve a creaminess that feels indulgent. It coats the tongue in a way that signals “dessert” to your brain, even though you’re technically drinking vitamins.
3. It’s the ultimate canvas Think of this banana base as the “little black dress” of the smoothie world. You can dress it up with peanut butter for a protein kick, throw in spinach if you need to atone for last night’s pizza, or add cocoa powder if you’re emotionally fragile and need chocolate immediately.
4. It saves your wallet Have you been to a smoothie shop lately? Why are we paying $12 for a blended banana and some almond milk? This recipe costs pennies on the dollar. You can buy the “ugly” bananas at the store for cheap, freeze them, and live like royalty on a budget.
5. The “Sugar” Science We rely on the natural breakdown of starches in the banana. As a banana ripens and gets those brown spots (sugar spots!), the starch converts to simple sugars. This means we don’t need to add honey, maple syrup, or agave unless you have a serious sweet tooth. It’s nature’s candy, blended up.
Ingredients You’ll Need
Keep it simple. We aren’t trying to source rare Amazonian dust for this. Here is your starter pack:
- 2 Ripe Bananas (Frozen is best):
- Pro Tip: When I say ripe, I mean cheetah-spotted. If it’s green, don’t even look at it. If you use fresh bananas, it’ll be thinner. If you use frozen, it’ll be thick like a milkshake. Your call, but I’m right.
- 1/2 Cup of Liquid:
- This is the lubricant for your blender. You can use cow’s milk, almond milk, oat milk (for that trendy creaminess), or even coconut water if you want to feel tropical.
- 1/2 Cup Greek Yogurt:
- This adds protein and a nice tang to cut through the sweetness. If you hate yogurt, you can skip it, but don’t come crying to me when it’s not as creamy.
- 1 Tablespoon Honey or Maple Syrup (Optional):
- Only add this if your bananas weren’t ripe enough or if you just really love sugar. No judgment.
- 1/2 Teaspoon Vanilla Extract:
- This is the secret weapon. It makes the smoothie smell like a bakery and taste like vanilla ice cream.
- A pinch of Salt:
- Yes, salt. Just a tiny pinch makes the sweet flavors pop. Trust the process.
- Ice Cubes (Optional):
- Only needed if you are using fresh bananas. If your fruit is frozen, skip the ice to avoid watering down the flavor.
Step-by-Step Instructions
Ready to make some noise? Let’s do this.
Step 1: The Prep (Do this the night before if you’re smart) If you are planning ahead, peel your ripe bananas, slice them into coins, and throw them in a freezer bag.
- Why? Freezing them with the peel ON is a disaster waiting to happen. Trying to peel a frozen banana is like trying to peel a rock. Don’t do it.
Step 2: Liquid First (Physics Lesson) Pour your milk (or liquid of choice) into the blender canister first.
- Why? If you put the frozen solid chunks at the bottom, they get stuck under the blades, and your blender makes that sad, high-pitched whining noise. The liquid creates a “vortex” that pulls the solid stuff down into the blades.
Step 3: Add the Soft Stuff Drop in your yogurt, honey, vanilla, and that pinch of salt. These ingredients help lubricate the mix further.

Step 4: The Heavy Hitters Add your frozen banana slices (and ice, if you’re using it) on top. This weight helps push everything down into the blades once the blending starts.
Step 5: The Pulse and Blend Don’t just slam it to “High” immediately. Pulse the blender 3–4 times to break up the big chunks. Then, crank it up to medium-high.
- Visual Cue: You want to see a tornado forming in the center. If it gets stuck, stop the blender, shake it (safely), or use a tamper. Do not stick your hand in there. Please.
Step 6: The Texture Check Blend for about 45–60 seconds. Stop and look. Is it chunky? Blend more. Is it too thick? Add a splash more milk. Is it too thin? Add another frozen banana slice or an ice cube.
Step 7: The Pour Pour it into your favorite glass. Ideally, one that makes you feel fancy. Garnish with a slice of banana or a sprinkle of cinnamon if you’re taking a photo for Instagram. Otherwise, just chug it.
Common Mistakes to Avoid
Even though I said this is idiot-proof, people find creative ways to mess things up. Don’t be “people.”
- Using Under-Ripe Bananas:
- If the banana is green, your smoothie will taste like chalky vegetables and sadness. It won’t blend well, and it won’t be sweet. Wait for the spots!
- Over-icing:
- Ice is water. Water has no flavor. If you fill half the blender with ice, you are making a slushy, not a smoothie. Rely on the frozen fruit for the cold factor.
- Forgetting the Liquid Ratio:
- If you don’t use enough liquid, you’re just making banana puree (baby food). If you use too much, it’s banana milk. Start with less liquid; you can always add more, but you can’t take it out.
- The “Air Pocket” of Doom:
- This happens when frozen fruit bridges over the blades and nothing blends. If you hear the motor spinning fast but nothing is moving, stop. Stir. Add a splash of liquid. Resume.
- Thinking You Don’t Need to Preheat the Oven:
- Just kidding. Checking to see if you’re still awake. But seriously, don’t put hot ingredients in here.
Alternatives & Substitutions
Bored of plain vanilla-banana? I get it. Here is how to spice it up without ruining the vibe.
1. The “Chunky Monkey” (Dessert Mode) Add 1 tablespoon of peanut butter and 1 tablespoon of cocoa powder. This effectively turns your breakfast into a Reese’s cup. High recommendation.
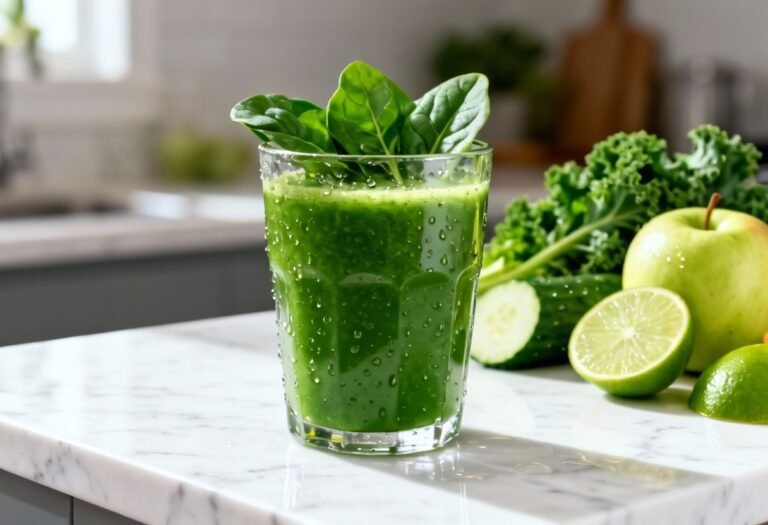
2. The “I Need Health” (Green Smoothie) Throw in a handful of baby spinach.
- Note: It will turn the smoothie a Shrek-green color, but you honestly cannot taste the spinach once it’s blended with the banana and vanilla. It’s the easiest way to eat greens without crying.
3. The Vegan Route Swap the Greek yogurt for a dairy-free coconut yogurt or silken tofu (adds crazy creaminess, IMO). Use oat milk or almond milk. Swap honey for maple syrup. Boom. Plant-based magic.
4. The Protein Pump Add a scoop of your favorite protein powder.
- Warning: Protein powder absorbs liquid like a sponge. You will likely need to add an extra splash of milk to keep the texture drinkable.
5. The Berry Blast Go half-banana, half-frozen strawberries or blueberries. The banana keeps it creamy, while the berries add that tart punch.
FAQ (Frequently Asked Questions)
1. Can I use water instead of milk? Well, technically yes, but why hurt your soul like that? Water makes it icy and thin. Milk (dairy or plant-based) adds the creaminess and mouthfeel that makes a smoothie enjoyable. If you’re calorie counting, try unsweetened almond milk—it’s mostly water but has just enough fat to emulsify.
2. Can I make this the night before? You can, but fresh is best. If you let it sit in the fridge overnight, the banana oxidizes (turns gray-ish) and the texture separates. If you must meal prep, blend it, pour it into an ice cube tray, freeze it, and then re-blend the cubes in the morning!
3. My blender is weak. What do I do? If your blender smells like burning rubber when it sees an ice cube, cut your frozen bananas into very small coins before freezing. The smaller the chunks, the less work your motor has to do. Also, let the frozen fruit sit on the counter for 5 minutes to soften slightly before blending.
4. Is this recipe healthy? “Healthy” is subjective, but yes! You’ve got potassium, fiber, protein (if using yogurt), and calcium. It’s a heck of a lot better than a sugary cereal or skipping breakfast entirely.
5. Can I add oats? Yes! Adding 1/4 cup of rolled oats makes the smoothie thicker and keeps you full longer. It adds a slight “cookie dough” texture that is honestly delightful.
6. Why is my smoothie foamy? This usually happens if you over-blend fresh milk or if your fruit wasn’t frozen enough. It’s just air bubbles. Let it sit for a minute or stir it gently, and the foam will subside.

Final Thoughts
There you have it. You are now a certified Smoothie Master. You have conquered the blender, you have mastered the ratio of frozen-to-liquid, and you have successfully avoided the tragic fate of drinking warm banana puree.
This banana smoothie recipe easy method is one of those back-pocket skills that makes adulting just a little bit easier. Whether you’re rushing out the door, recovering from a workout, or just want something sweet that won’t make you crash an hour later, this is your answer.
Now go impress someone—or yourself—with your new culinary skills. You’ve earned it!