This Best Gingerbread Cookie Recipe Will Make Your Kitchen Smell Like Pure Holiday Power
👩🍳 The Home Chef's Essential Kitchen
Consistently cooking incredible, healthy meals at home is so much easier when you aren't fighting with cheap tools. These are the 5 absolute powerhouse kitchen essentials that professional chefs and serious home cooks rely on every single day to get perfect results.
🍳 Lodge 10.25" Cast Iron Skillet
The single greatest value in all of cookware. It retains heat infinitely better than cheap non-stick pans, allowing you to get a restaurant-quality crust on steaks or perfect crispy edges on cornbread. With proper care, this $20 pan will literally outlive you.
🔪 Victorinox Fibrox Pro 8" Chef's Knife
A dull knife makes cooking a frustrating chore. This specific blade is the undisputed champion of the culinary world—it holds a terrifyingly sharp edge, features a comfortable non-slip grip, and performs identical to German knives that cost quadruple the price.
🌡️ ThermoPro Instant Read Thermometer
Never serve dry chicken or undercooked pork again. An instant-read thermometer is the secret difference between amateur cooks who 'guess' when protein is done, and professionals who know exactly when to pull meat off the heat for maximum juiciness.
🍲 Lodge Enameled Cast Iron Dutch Oven
The ultimate workhorse for soups, stews, braised short ribs, and baking crusty artisanal bread. The enameled interior provides incredible heat distribution for slow-cooking while eliminating the intense seasoning maintenance required by bare cast iron.
🥄 Bpa-Free Silicone Utensil Set
Throw away those melting plastic spatulas and bacteria-harboring wooden spoons. This pure silicone set is heat-resistant up to 600°F, won't scratch your expensive pans, and features seamless designs that make cleaning out thick sauces and batters effortless.
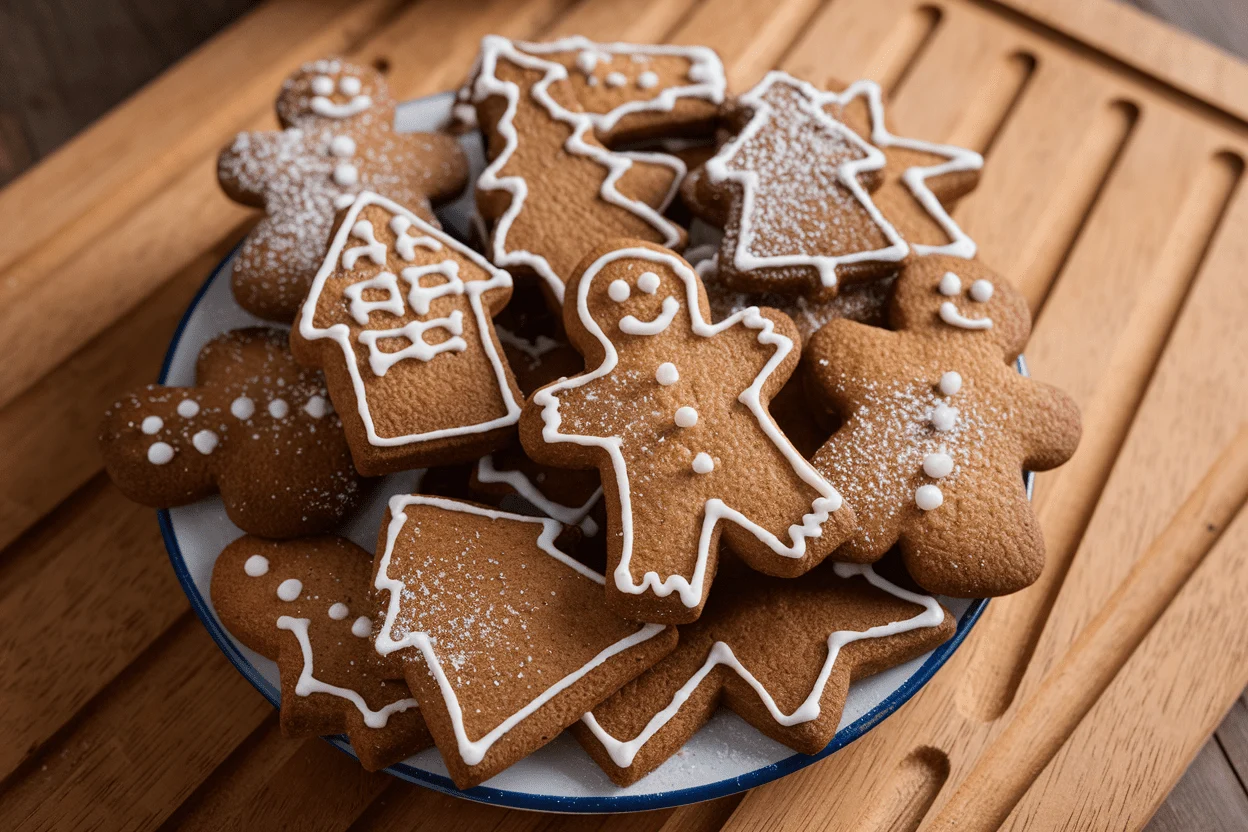
If your house doesn’t smell like ginger, cinnamon, and victory by the time you’re done, we’re starting over. These cookies are crisp at the edges, soft in the center, and unapologetically spicy—the kind that makes people ask, “Who made these?” and then steal the last one. No cookie-cutter nostalgia; this is a precision-tuned treat that bakes like a dream and decorates like a pro.
You’ll get bold flavor, perfect texture, and zero “meh.” Ready for cookies that actually deliver?
The Secret Behind This Recipe
The magic is in a ruthless balance: dark brown sugar for chew, molasses for depth, and a high spice-to-flour ratio so every bite punches above its weight. We chill the dough to hydrate the flour and lock in shape, which means cleaner edges and fewer spread-pancake disasters. A mix of baking soda and a splash of acid creates lift without puffing into cake-land.
Finally, butter is softened—not melted—so the dough creams properly and bakes with structure. It’s science, but delicious.
Ingredients Breakdown
- 2 3/4 cups (330g) all-purpose flour – The backbone. Enough to hold shape without going tough.
- 1 tablespoon ground ginger – The star.
Go fresh, potent, and fragrant.
- 2 teaspoons ground cinnamon – Warmth and comfort.
- 1/2 teaspoon ground cloves – Adds that unmistakable gingerbread edge.
- 1/4 teaspoon ground nutmeg – Subtle, rounds out the spice profile.
- 1/2 teaspoon fine sea salt – Flavor amplifier; don’t skip.
- 1 teaspoon baking soda – Lift without puffiness.
- 3/4 cup (170g) unsalted butter, softened – Structure and flavor; room temp is key.
- 3/4 cup (150g) dark brown sugar, packed – Moisture and molasses-rich sweetness.
- 1/2 cup (160g) unsulfured molasses – Dark, deep, and classic. Use robust, not blackstrap.
- 1 large egg, room temperature – Binds and tenderizes.
- 1 1/2 teaspoons pure vanilla extract – Aroma and flavor lift.
- 1 teaspoon apple cider vinegar or lemon juice – Activates soda, sharpens flavor.
- Optional: 1/4 teaspoon black pepper – For a subtle kick (try it, FYI).
- For rolling: granulated sugar or flour – Sugar for sparkly edges, flour for classic cutouts.
- Royal icing or simple glaze – For decorating if you’re feeling extra.
Step-by-Step Instructions
- Cream the butter and sugar: In a large bowl, beat softened butter with dark brown sugar until fluffy and slightly lightened, 2–3 minutes. This traps air and builds structure.
- Add wet ingredients: Beat in the egg, vanilla, molasses, and vinegar until smooth.
Don’t panic if it looks a bit split; the flour will fix it.
- Whisk dry ingredients: In a separate bowl, whisk flour, ginger, cinnamon, cloves, nutmeg, salt, baking soda, and optional black pepper.
- Combine: Add dry ingredients to the wet in two additions on low speed. Mix just until no dry streaks remain. The dough will be soft but not sticky.
- Chill: Divide dough in half, flatten into discs, wrap tightly, and chill at least 2 hours (up to 48).
This step is non-negotiable for clean shapes.
- Preheat and prep: Heat oven to 350°F (175°C). Line baking sheets with parchment. Lightly flour your surface or use sugar for rolling if you want sparkly edges.
- Roll and cut: Roll dough to 1/4 inch for soft centers or 1/8 inch for snappier cookies.
Cut shapes with sharp cutters, re-rolling scraps as needed.
- Bake: Transfer to trays, spacing 1 inch apart. Bake 8–10 minutes for softer cookies or 10–12 for crisp. Edges should be set; centers may look slightly soft.
- Cool: Let cookies rest on the sheet 5 minutes, then move to a rack.
They’ll firm up as they cool—don’t overbake.
- Decorate (optional): Once fully cool, decorate with royal icing or a quick powdered sugar glaze. Or keep them naked and let the flavor flex.
How to Store
- Room temperature: Keep in an airtight container for 5–7 days. Slip in a slice of bread to maintain softness.
- Freeze baked cookies: Freeze undecorated cookies up to 2 months.
Thaw at room temp and decorate later.
- Freeze dough: Wrap discs tightly and freeze up to 3 months. Thaw in the fridge overnight before rolling.
- Stacking with icing: Let icing dry fully (6–12 hours) before stacking with parchment between layers.
What’s Great About This
- Bold, balanced spice: You taste ginger, not just sugar.
- Shape-holding dough: Chill + correct flour ratio = crisp edges, zero blob cookies.
- Texture control: Roll thicker for soft, thinner for snap—same dough, your rules.
- Decorating-friendly: Flat tops and sturdy edges make piping a breeze.
- Holiday-proof: Makes 30–40 cookies depending on size, and scales well.
Common Mistakes to Avoid
- Skipping the chill: That’s how you get spread and heartbreak. The fridge is your friend.
- Using blackstrap molasses: Too bitter and overpowering.
Choose regular unsulfured.
- Overbaking: Dry, hard cookies are not festive. Pull them when edges set and centers are just soft.
- Over-flouring the surface: Excess flour toughens the dough. Dust lightly or roll between parchment.
- Warm dough while cutting: If it softens, chill 10 minutes.
Clean cutters for sharp edges, IMO.
- Old spices: Stale spices = sleepy flavor. Replace yearly.
Different Ways to Make This
- Chewy drop cookies: Skip rolling. Scoop dough into balls, roll in sugar, and bake 9–11 minutes for crackly tops.
- Espresso twist: Add 1 teaspoon instant espresso powder to the dry mix for mocha depth.
- Citrus zing: Add 1 tablespoon orange zest to the wet ingredients.
Ginger and orange are besties.
- Gluten-free: Use a 1:1 gluten-free baking flour with xanthan gum and chill longer (3–4 hours).
- Dairy-free: Swap butter for high-quality vegan butter sticks; keep dough extra cold.
- Maple glaze: Whisk 1 cup powdered sugar with 2–3 tablespoons maple syrup and a pinch of salt.
- Extra snappy: Reduce butter by 2 tablespoons and roll to 1/8 inch; bake until edges are deep golden.
FAQ
Can I make the dough ahead of time?
Yes. Chill for up to 48 hours, or freeze for up to 3 months. Let thaw in the fridge overnight, then roll as usual.
Why did my cookies spread?
Likely warm dough, too little flour, or over-creamed butter.
Ensure a full chill, measure flour correctly (ideally by weight), and stop creaming once fluffy—about 2–3 minutes.
Is blackstrap molasses okay?
Not recommended. It’s more bitter and less sweet, which can throw off the flavor. Use unsulfured robust molasses for that classic taste.
How thick should I roll the dough?
For soft centers, 1/4 inch.
For crisp, 1/8 inch. Keep thickness consistent so they bake evenly—no cookie left behind.
Can I halve or double the recipe?
Absolutely. Halve for small batches or double for gifting.
If doubling, chill in four smaller discs so it firms up faster.
What icing works best?
Royal icing if you want detailed designs that dry hard. For a softer, faster finish, use a simple powdered sugar and milk glaze with a touch of vanilla.
How do I get cleaner edges on cutouts?
Roll cold dough, dip cutters in flour, and trim away excess on the sheet before baking. Pop the tray into the fridge 10 minutes pre-bake for extra insurance.
Can I make them vegan?
Yes: use vegan butter sticks and replace the egg with 1 tablespoon ground flaxseed + 3 tablespoons water (rest 5 minutes).
Expect slightly less lift but great texture.
🍰 The Master Baker & Prep Kit
Baking is a science, and meal prep requires efficiency. If you want consistently flaky pie crusts, perfectly risen cakes, and healthy meals ready for the week, these are the 5 upgrade tools that take your execution to the next level.
⚖️ OXO Good Grips 11lb Food Scale
The secret to why bakery bread and cookies are always perfect while home batches vary wildly. Measuring by weight (grams) instead of volume (cups) guarantees precise hydration and flawlessly consistent results every single time you bake.
🧑🍳 KitchenAid Classic Stand Mixer
The undisputed holy grail of the kitchen. From aggressively kneading heavy pizza doughs to whipping meringues into stiff peaks, this powerful motor saves your arms from exhaustion and cuts your hands-on prep time in half.
🍪 Silpat Premium Silicone Baking Mats
Stop wasting money on rolls of parchment paper or agonizing over cookies permanently fused to your metal pans. These reusable, professional-grade silicone mats ensure completely even heat distribution and instantly release even the stickiest caramel.
🌪️ Braun MultiQuick Immersion Blender
The ultimate shortcut tool for creamy tomato soups, lump-free gravies, and rapid smoothies. Avoid the burns and mess of dangerously transferring boiling liquids in batches to a traditional blender by simply blending right inside your cooking pot.
🍱 Premium Glass Meal Prep Containers
If you want to bake and cook healthier, batch preparation is required. These durable glass containers transition safely from freezer to microwave, never absorb tomato sauce stains, and feature airtight seals to keep your hard work fresh all week.
In Conclusion
This best gingerbread cookie recipe nails the trifecta: big spice, perfect texture, and photo-ready edges. It’s reliable enough for a weekday bake and impressive enough for the holiday flex. Keep your dough cold, your spices fresh, and your bake times honest.
Then stand back and watch these disappear—because “just one more” was never going to happen, right?