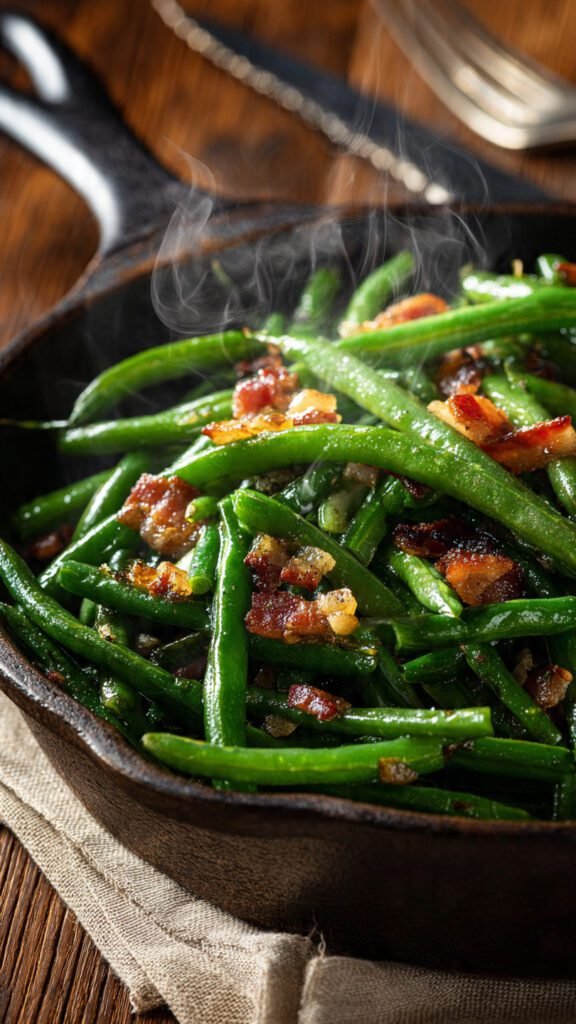
🥬 The Best Green Bean Recipe (Garlic & Bacon)
So, you’re staring at a bag of green beans, craving something tasty but too lazy to spend forever in the kitchen, huh? Same.
Listen, green beans have a serious PR problem. For too long, they’ve been the victim of lackluster boiling water, canned imprisonment, or that sad, gray mush served in school cafeterias. Most people think they tolerate green beans, but they don’t love them.
That ends today.
We are going to make the Best Green Bean Recipe of your life. We aren’t just heating vegetables here; we are chemically altering them into crispy, salty, garlicky addictive little sticks of joy. This is the side dish that accidentally steals the show from the steak. It’s low effort, high reward, and frankly, if you don’t like these, I can’t help you.
Ready to fix your relationship with vegetables? Let’s cook.
Why This Recipe is Awesome
Okay, I’m not prone to hyperbole (lie), but this recipe is life-changing. Here is exactly why this specific method works better than whatever your Aunt Linda brought to Thanksgiving last year.
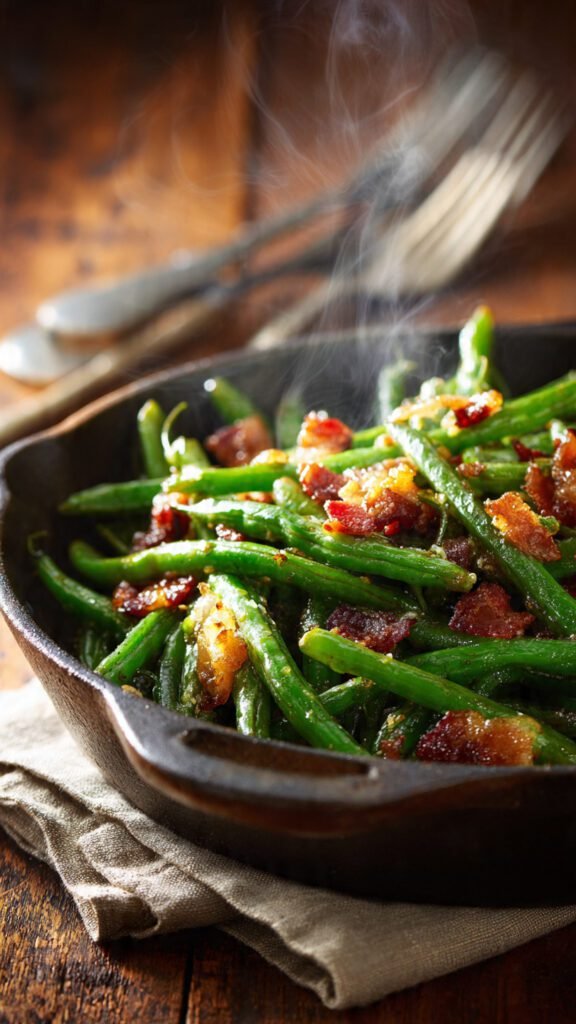
1. The Texture is King Most green bean recipes fail because of texture. They are either raw and squeaky against your teeth (gross) or boiled into oblivion until they are mushy strings. This recipe uses a pan-blistering technique. By using high heat and fat, we create a “char” or blister on the skin of the bean. This triggers the Maillard reaction—that beautiful chemical browning process that equals flavor. You get a snap, a crunch, and a tender inside without the squeak.
2. Bacon Fat is Liquid Gold We start this recipe by rendering bacon. Why? because cooking vegetables in water is fine, but cooking vegetables in rendered pork fat is transcendent. The smokiness of the bacon permeates the beans better than any seasoning shaker ever could.
3. It’s One Pan (Basically) I hate doing dishes. You hate doing dishes. This recipe respects our laziness. You fry the bacon, you sear the beans, you toss the garlic—all in the same skillet. It keeps the flavor concentrated and your sink empty.
4. It’s Idiot-Proof Seriously. Even if you get distracted scrolling TikTok and char the beans a little too much? It just adds “rustic flavor.” It’s very hard to mess this up unless you literally set the kitchen on fire.
5. The Garlic-Butter Finish We don’t add the garlic at the beginning (rookie mistake—we’ll get to that). We hit it at the end with a knob of butter. This creates a glossy, emulsified coating that clings to every single bean, ensuring you aren’t just eating dry veggies.
Ingredients You’ll Need
Here is your shopping list. Don’t worry, it’s short. If you have to go to a specialty store for a green bean recipe, you’re working too hard.
- Fresh Green Beans (1 lb): Please, for the love of all things holy, use fresh beans. French green beans (Haricots Verts) are the fancy, skinny ones and they are superior because they are tender. Standard string beans work too, just trim them. Do not use canned.
- Bacon (3-4 slices): Thick-cut is best. You want something that produces enough grease to fry the beans in.
- Butter (2 tbsp): Salted or unsalted, I don’t care. We are going for flavor here. This is the gloss factor.
- Garlic (3-4 cloves): Or 5. Or 6. I measure garlic with my heart, not a spoon. Minced finely so it sticks to the beans.
- Lemon Juice (Half a lemon): This is the secret weapon. The acid cuts through the heavy bacon fat and butter, brightening the whole dish up.
- Red Pepper Flakes (Optional): If you like a little kick. I highly recommend it.
- Salt & Cracked Black Pepper: To taste. Remember, bacon is salty, so taste before you go crazy with the salt shaker.
Step-by-Step Instructions
Let’s get down to business. Follow this flow, and you’ll be eating in about 15 minutes.
1. Prep Your Beans (The “Snap”) Wash your beans and pat them dry. Crucial Step: They must be dry. If they are wet, they will steam instead of sear, and we want that char. Trim the woody stem ends off. You can line them up and cut them with a knife, or snap them by hand if you need some therapeutic stress relief.
2. Render the Bacon Grab a large skillet (cast iron is amazing here if you have one). Cut your bacon into small bite-sized pieces. Toss them into the cold pan and turn the heat to medium-high. Why cold pan? It helps the fat render out slowly without burning the meat. Cook until the bacon is crispy and there is a pool of glorious grease in the pan. Remove the bacon bits with a slotted spoon and set them aside on a paper towel, but leave the grease in the pan. That is our cooking medium.
3. The Blister (The Science Part) Turn the heat up to medium-high. Toss your dry green beans into the hot bacon grease. Spread them out in a single layer as best as you can. Don’t touch them. Let them sit for about 2 minutes undisturbed. We want the skin to blister and turn golden brown. If you stir too much, they won’t char. Give them a toss and let them blister on the other side for another 2-3 minutes.

4. The Steam Once the beans look blistered and sexy (yes, beans can look sexy), they might still be a bit raw in the middle. Add about 2 tablespoons of water to the hot pan and immediately cover it with a lid (or a baking sheet if you can’t find the lid). Let them steam for about 2 minutes. This softens the inside perfectly while keeping the outside texture. Remove the lid and let any remaining water evaporate off.
5. The Flavor Bomb Turn the heat down to medium-low. Push the beans to the side of the pan. Add your butter to the center. Once it melts, toss in the minced garlic and red pepper flakes. Sauté the garlic in the butter for 30 seconds until it smells amazing. Do not burn the garlic. Then, toss everything together—coat those beans in the garlic butter.
6. The Finish Throw your crispy bacon bits back into the pan. Squeeze the juice of half a lemon over everything. Season with plenty of cracked black pepper and a pinch of salt (taste first!). Give it one final toss and serve immediately.
Common Mistakes to Avoid
Look, I believe in you, but I’ve also seen some kitchen disasters. Here is how to avoid ruining the Best Green Bean Recipe.
- The “Crowded Elevator” Effect: If you dump too many beans into a small pan, they will steam in their own juices rather than frying. They’ll turn out soggy and gray. If you have a small pan, cook in two batches. Give them room to breathe!
- Burning the Garlic: Garlic burns faster than a vampire in the Sahara. If you add the garlic at the same time as the beans, the garlic will be black charcoal by the time the beans are cooked. Always add aromatics at the very end.
- Using Wet Beans: I said it before, I’ll say it again. Water is the enemy of the sear. Dry those bad boys off.
- Undercooking (The Squeak): Al dente is good. Raw is bad. If the beans squeak against your teeth, they need that extra “steam” step I mentioned.
- Using Canned Beans: Just… don’t. Canned beans are already cooked to death. If you try to blister them, they will disintegrate into a mushy paste. Save the canned stuff for the apocalypse bunker.
Alternatives & Substitutions
Missing an ingredient? Or maybe you just want to get weird with it? Here are some swaps.
- Vegetarian/Vegan: “But I don’t eat bacon!” First of all, I’m sorry. Second, you can use olive oil or avocado oil instead of bacon fat. To replicate the smokiness, add a pinch of smoked paprika or a dash of liquid smoke. Use vegan butter at the end.
- Nutty Crunch: If you want to feel fancy, toss in some toasted almond slivers or crushed walnuts at the end. It adds a nice earthy crunch that pairs well with the garlic.
- Cheese It Up: Grated Parmesan cheese or crumbled Feta thrown on top right before serving? absolute fire. IMO, cheese improves everything.
- The Asian Twist: Swap the butter for sesame oil, swap the lemon for soy sauce, and add ginger with the garlic. Boom. totally different flavor profile, same technique.
- Spice Lovers: Add sliced jalapeños in with the garlic step if red pepper flakes aren’t doing it for you.
FAQ (Frequently Asked Questions)
1. Can I use frozen green beans? Technically, yes. But you have to thaw them completely and dry them aggressively before cooking. Frozen beans release a lot of water, so you’ll have to cook them longer to get the water out before they will blister. Fresh is 100x better, just saying.
2. Can I make this ahead of time? You can blanch the beans ahead of time, but this recipe is best served fresh from the pan. If you reheat them, they lose that crispy “blister” and the bacon gets chewy. If you must, reheat them in a skillet or air fryer, not the microwave (the microwave is where texture goes to die).
3. Is this recipe keto-friendly? Is the Pope Catholic? Yes! It’s basically fiber, fat, and protein. It’s a keto dream.
4. Why are my beans turning gray? Overcooking. Green beans contain chlorophyll (remember 4th-grade biology?). Acid and heat break it down. If you cook them too long or let them sit in the lemon juice for an hour, they turn olive-drab. Cook fast, serve fast.
5. Can I use margarine instead of butter? Well, technically yes, but why hurt your soul like that? Margarine is oil trying to be butter. Just use the real stuff or stick to olive oil.
6. What do I serve this with? Literally anything. Steak, roast chicken, salmon, or just eat a bowl of them while standing over the stove like a goblin. No judgment here.
7. Do I really have to trim the ends? Yes. That little stem part is woody and tough. Unless you enjoy flossing your teeth with vegetable fibers mid-dinner, take the 2 minutes to trim them.
Final Thoughts
See? That wasn’t so painful. You have successfully taken a humble, boring vegetable and turned it into something that actually sparks joy. Cooking doesn’t have to be complicated to be impressive. It’s just about understanding heat, fat, and acid.
Now go impress someone—or yourself—with your new culinary skills. You’ve earned it! And hey, if you eat the whole pound of beans by yourself, it still counts as a salad. I don’t make the rules.