Butter Pie Crust Recipe That Never Fails: Flaky, Buttery, and Foolproof (Even If You’ve Messed It Up Before)
You don’t need fancy gear, a culinary degree, or fairy dust to make a flaky crust. You need cold butter, a plan, and a little attitude. Most people overwork the dough, panic, and end up with cardboard.
Not you—not today. This butter pie crust recipe is crisp at the edges, tender to the bite, and tastes like a bakery did the heavy lifting. Stick with me for 10 minutes and your pies will never be the same.
The Secret Behind This Recipe
It’s all about temperature and texture.
Cold butter creates steam as it melts in the oven, which gives you those flaky, layered pockets everyone brags about. Keep the butter cold, the water colder, and your hands off the dough as much as possible. Second, the flour matters.
Use all-purpose flour for structure, but don’t pack it when measuring. Light, fluffy scoops prevent a tough crust. And for extra insurance, a touch of acid—like vinegar or lemon juice—relaxes the gluten so the dough rolls out like a dream.
No cracking, no cursing.
Shopping List – Ingredients
- 2 1/2 cups (300 g) all-purpose flour
- 1 cup (226 g) unsalted butter, very cold and cut into 1/2-inch cubes
- 1 tsp fine sea salt
- 1 tbsp granulated sugar (optional, but ideal for sweet pies)
- 6–8 tbsp ice water (start with 6 tbsp, add more as needed)
- 1 tsp apple cider vinegar or lemon juice (optional, for tenderness)
- Extra flour for dusting
- Optional: 1 egg + 1 tbsp water for egg wash, if pre-baking
Cooking Instructions
- Chill everything first. Pop the butter cubes in the freezer for 10 minutes. Mix your ice water with vinegar and keep it ice-cold. Cold ingredients = flaky layers.
- Combine dry ingredients. In a large bowl, whisk flour, salt, and sugar.
Keep it airy—don’t compact the flour.
- Cut in the butter. Add cold butter to the flour. Use a pastry cutter or your fingertips to work the butter into pea-sized bits—with a few larger marble-sized pieces. Those bigger chunks are flake insurance.
- Add ice water gradually. Sprinkle in 6 tbsp ice water mixed with vinegar.
Toss with a fork until the dough starts to clump. If it’s still dry and sandy, add more water 1 tbsp at a time. Stop when it holds together when squeezed.
- Bring it together gently. Dump onto a clean surface.
Press and fold the shaggy mass just a few times to bring it together. Don’t knead it like bread—overworking = tough crust.
- Divide and chill. Shape into two discs (for a double crust) or keep as one thicker disc (for one deep dish). Wrap tightly and chill for at least 1 hour, up to 3 days.
Resting equals easier rolling and better texture.
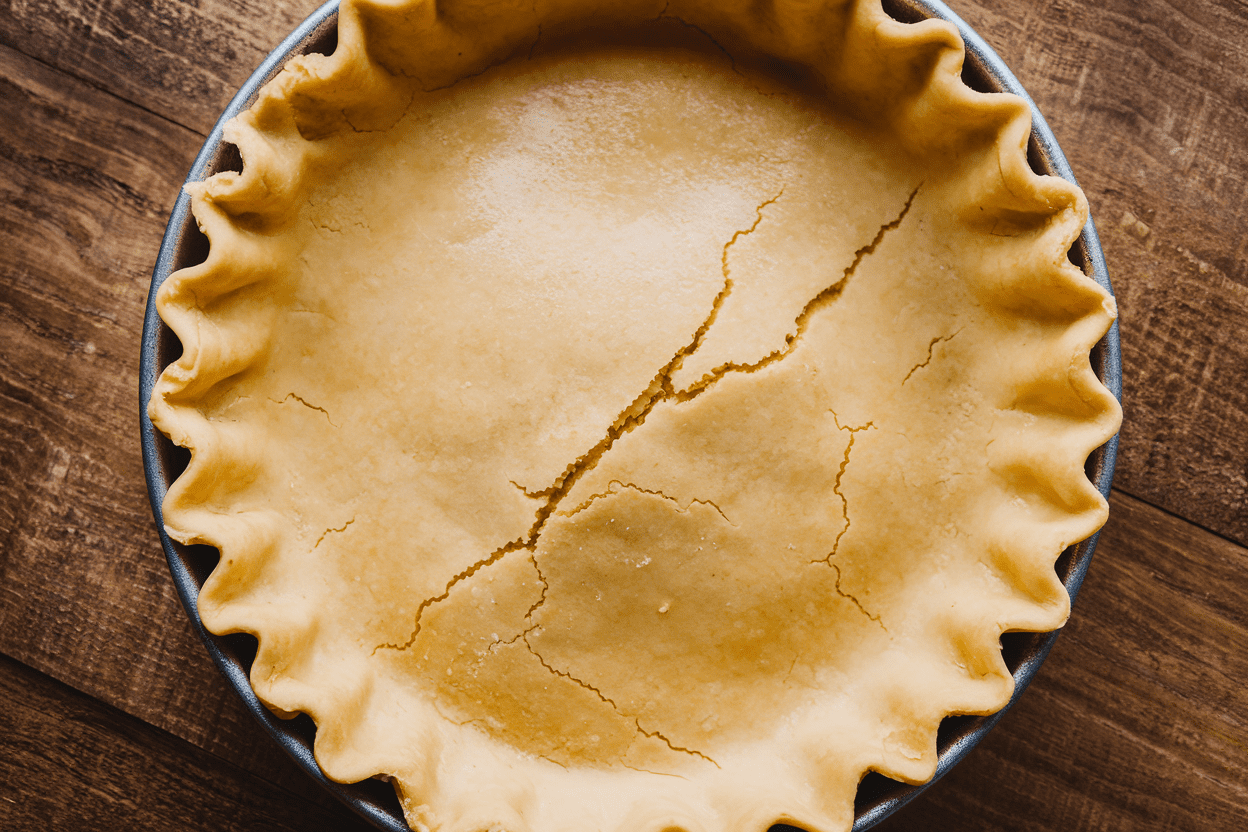
- Roll it out. Flour your surface and rolling pin. Roll from the center outward, rotating the dough 90 degrees every few strokes to keep it even. Aim for about 1/8 inch thick and 2 inches wider than your pie dish.
- Fit the crust. Gently drape into the pie plate.
Lift the edges to let the dough settle into the corners—don’t stretch it. Trim leaving a 1-inch overhang.
- Crimp and chill again. Fold the overhang under itself and crimp however you like. Chill the lined pie plate 20–30 minutes to prevent shrinking.
Yes, chilling again is worth it.
- If blind baking: Preheat oven to 400°F (205°C). Line the crust with parchment and fill with pie weights or dried beans. Bake 15 minutes, remove weights, brush with egg wash if desired, and bake 10–15 more minutes until golden.
For a fully baked shell, go 15–20 additional minutes.
- If baking with filling: Add filling to the chilled shell. For a double-crust pie, roll the second disc and place on top. Cut vents, brush with egg wash, and bake per your pie recipe’s directions.
Storage Tips
- Fridge: Wrapped dough discs keep 3 days.
If they crack a bit, mist lightly with water and press back together when rolling.
- Freezer: Freeze dough discs up to 3 months. Thaw overnight in the fridge before rolling. You can also freeze a lined pie shell (unbaked) for 1–2 months.
- Pre-baked shells: Store at room temp, tightly wrapped, for 24 hours or freeze for up to 2 months.
Crisp in a 350°F oven for 5–8 minutes before filling.
What’s Great About This
- All-butter flavor: Rich, clean taste that beats shortening blends, IMO.
- Reliable flake: The cold-butter method and double chill practically guarantee layers.
- Versatile: Works for sweet or savory, single or double crust, galettes, tarts—you name it.
- Beginner-friendly: Minimal steps, clear checkpoints, and forgiveness built in.
Don’t Make These Errors
- Using warm butter: Melty butter equals dense crust. If it smears, chill it.
- Adding too much water: Dough should look shaggy, not wet. Add just enough to hold together.
- Overworking the dough: The more you knead, the tougher it gets.
Touch it less than you think.
- Skipping the rest: Chilling relaxes gluten and prevents shrinkage. Your future self will thank you.
- Stretching into the pan: Dough shrinks back in the oven if stretched. Lift and settle instead.
Different Ways to Make This
- Food processor method: Pulse dry ingredients, then butter, then water.
Stop as soon as it clumps. Great for hot kitchens—just don’t overdo it.
- Rough puff vibe: After mixing, do 2–3 gentle letter folds with the dough. Chill between folds.
You’ll get exaggerated layers for extra flake. Fancy, but fun.
- Brown butter aroma: For a nutty twist, brown half the butter, chill it until solid, then cube. Slightly less flaky, insanely good with pumpkin or pecan pies.
- Whole wheat blend: Swap 1/2 cup all-purpose for whole wheat pastry flour.
Add 1 extra tbsp water as needed. Earthier flavor, still tender.
- Savory upgrade: Skip sugar, add 1 tsp chopped thyme or rosemary and a pinch of black pepper. Perfect for quiches and pot pies.
FAQ
How do I keep the crust from getting soggy?
Brush the bottom with a thin egg wash after par-baking and return it to the oven for 2–3 minutes to seal.
You can also sprinkle a little fine breadcrumb or ground nut layer before adding juicy fillings. Baking on a preheated sheet pan helps too.
Can I make this dairy-free?
You can swap the butter for a high-quality vegan butter with a high fat content. Keep it very cold and treat it the same way.
The flavor won’t be identical, but you’ll still get flake if the fat stays cold.
Why is my dough cracking when I roll it?
It’s either too cold or slightly under-hydrated. Let it sit at room temp for 3–5 minutes to soften, then lightly mist with water and press the cracks together. Roll from the center outward with gentle strokes.
Do I have to use vinegar?
No, but it helps.
The small amount of acid keeps gluten relaxed for a tender bite. If you don’t have vinegar, lemon juice works; if you skip it, just don’t overwork the dough.
How thick should I roll the crust?
Aim for about 1/8 inch. Too thin and it tears; too thick and it turns bready.
Use your pie plate as a guide—2 inches wider than the rim is the sweet spot for a single crust.
Is sugar necessary in the dough?
Optional. Sugar adds a hint of sweetness and better browning for fruit pies. For savory pies, omit it.
The crust will still bake beautifully.
Can I patch tears?
Absolutely. Use scraps, press gently, and brush with a touch of water to glue it. Once baked, no one will notice—promise.
My Take
A great butter pie crust isn’t magic; it’s systems and discipline.
Keep the ingredients cold, stop mixing the moment it comes together, and give the dough time to rest. Do that, and you’ll get shatter-flaky layers with a rich, buttery snap every time. If pie has ever stressed you out, this recipe is your reset button.
Now go make a crust so good it steals the show from the filling.