Cake Pop Recipe Easy: 20-Minute Bites That Make You Look Like a Dessert Genius
Think cake is fun? Put it on a stick and watch your kitchen turn into a party. These cake pops are quick, ridiculously cute, and so foolproof your future self will thank you.
No pastry degree required—just a bowl, a microwave, and a willingness to impress. And yes, they taste as good as they look. Ready to turn leftover cake into instant “OMG, you made these?!” energy.
The Secret Behind This Recipe
The trick is moisture management.
Too dry and your pops crumble; too wet and they slide off the stick like a sad lollipop. The sweet spot? A baked cake crumbled finely and bound with just enough frosting to hold a ball.
Chill time does the heavy lifting: it firms the pops so dipping is clean and the coating sets flawlessly. Another secret: thin your candy coating. A teaspoon or two of neutral oil transforms thick melts into a glossy dip that doesn’t rip your pop apart.
Finally, pre-dip the stick—this tiny dot of chocolate acts like glue and keeps the pop anchored. Small steps, huge results.
What You’ll Need (Ingredients)
- 1 boxed cake (any flavor, baked and fully cooled) or about 4 cups of leftover cake
- 1/3 to 1/2 cup frosting (buttercream or cream cheese; adjust as needed)
- 12–16 oz candy melts or chocolate (white, milk, or dark)
- 1–2 teaspoons neutral oil (coconut, canola, or vegetable) to thin coating, if needed
- Lollipop sticks (20–30, depending on size)
- Sprinkles or crushed toppings (optional but highly encouraged)
- Pinch of salt (optional, to balance sweetness)
Step-by-Step Instructions
- Bake the cake (or use leftovers). If starting from a boxed mix, bake as directed and cool completely. Day-old cake works beautifully.
- Crumble the cake finely. Remove any super-browned edges.
Rub between your fingers until it looks like moist breadcrumbs—no big chunks.
- Add frosting gradually. Start with 1/3 cup. Mix with clean hands until the mixture holds when pressed. Add more frosting a tablespoon at a time. Goal: Play-Doh texture, not sticky.
- Roll into balls. Use a tablespoon or small scoop.
Aim for 1–1.25-inch balls for best stability. Place on a parchment-lined tray.
- Chill briefly. Freeze for 10 minutes or refrigerate 30 minutes. You want them firm, not frozen solid.
- Melt the coating. Microwave candy melts in 20–30 second bursts, stirring between.
Add 1–2 teaspoons oil until it flows like warm honey.
- Anchor the sticks. Dip the tip of each stick into the melted coating, then insert halfway into a cake ball. Chill 5–10 minutes to set the “glue.”
- Dip the pops. Submerge at a slight angle and turn gently to coat. Don’t stir or shake too aggressively.
Let excess drip off; tap the wrist lightly, not the stick.
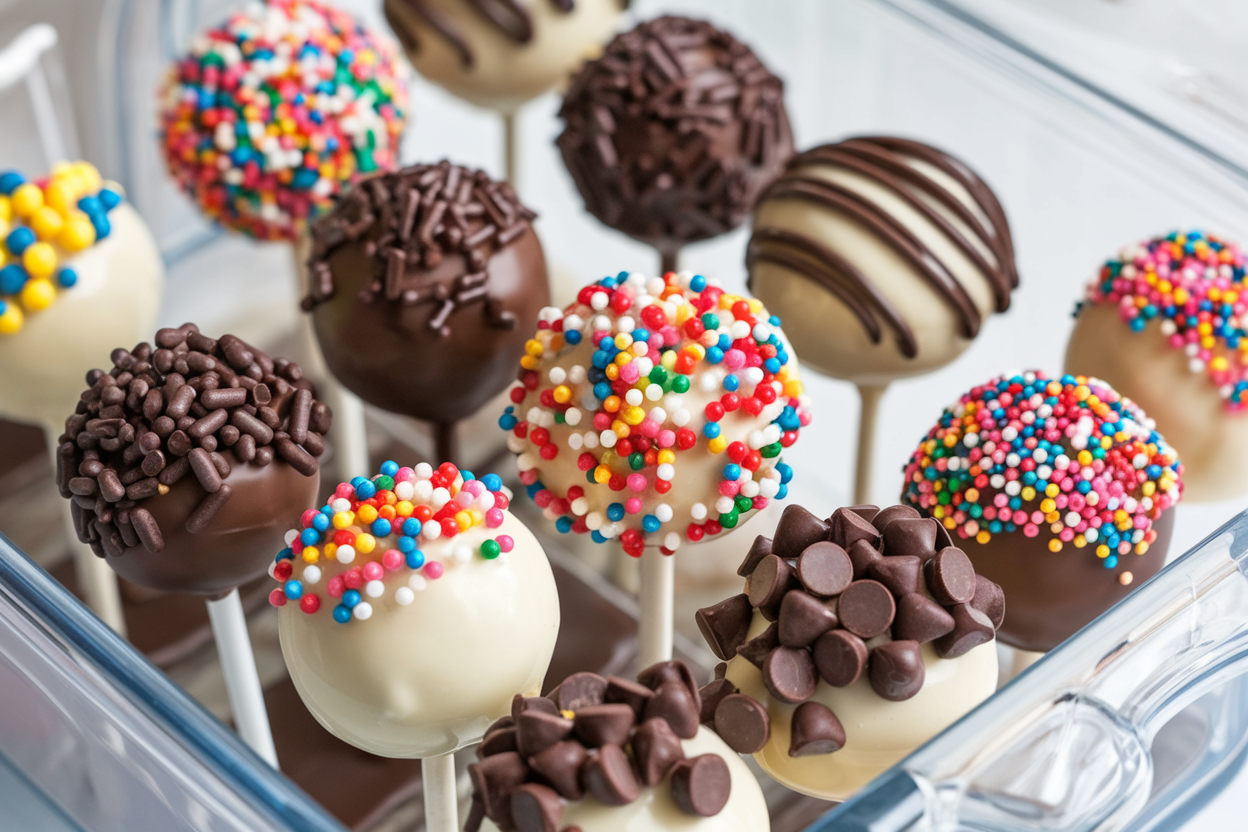
- Decorate fast. While still wet, add sprinkles, crushed cookies, or a drizzle of contrasting chocolate. Set pops upright in a styrofoam block or upside-down on parchment.
- Let them set. At room temp, coating firms in about 15 minutes. In the fridge, 5–10 minutes.
Then serve and accept compliments graciously (or smugly, your call).
Keeping It Fresh
These pops are happiest at cool room temperature. Store in an airtight container for up to 3 days. If your kitchen runs hot, refrigerate them, but let them sit out for 10 minutes before serving to avoid condensation.
For longer storage, freeze undipped cake balls (no sticks) for up to 2 months. Thaw in the fridge overnight, then insert sticks and dip. Dipped pops can also be frozen, but wrap individually to avoid smudges.
FYI: dark chocolate handles temperature swings better than white.
Health Benefits
Let’s be honest: these are treats, not kale. That said, portion control is built-in—each pop is a small indulgence. You’ll likely eat one or two, not a quarter of a cake.
That’s a win. If you want to nudge the nutrition, use reduced sugar cake mix, Greek yogurt frosting, or dark chocolate coating for antioxidants. Add-ins like crushed nuts or freeze-dried berries provide texture and a few micronutrients.
Tiny upgrades, zero fun lost.
What Not to Do
- Don’t over-frost the cake crumbs. A sticky, wet mix will slide off sticks and crack under coating.
- Don’t skip chilling. Warm cake pops meet melted chocolate equals chaos. Chill for clean dips.
- Don’t use thick coating. Thin it with a little oil. Thick coating drags and causes cracks.
- Don’t make jumbo pops. Heavy pops fall.
Keep them small for stability and better bite ratio.
- Don’t rush drying. Stacking or wrapping before they set leads to smudges and heartbreak.
Variations You Can Try
- Birthday Confetti: Funfetti cake + vanilla frosting + rainbow sprinkles in and on top.
- Red Velvet Dream: Red velvet cake + cream cheese frosting + white chocolate dip.
- Mocha Buzz: Chocolate cake + coffee buttercream + dark chocolate dip + cocoa dust.
- Cookies & Cream: Vanilla cake + crushed Oreos + white coating + Oreo crumble finish.
- Lemon Pop: Lemon cake + lemon curd buttercream + white dip + zest sprinkle.
- Peanut Butter Cup: Chocolate cake + peanut butter frosting + milk chocolate dip + chopped peanuts.
- Salted Caramel: Vanilla cake + caramel frosting + dark dip + flaky salt.
- Vegan Swap: Dairy-free cake + coconut whip frosting + vegan chocolate coating. Easy.
FAQ
Why are my cake pops cracking?
Temperature mismatch. If the cake balls are too cold and the coating is warm, the shell contracts and cracks.
Let chilled balls sit 5 minutes before dipping and thin your coating slightly.
How do I keep cake pops from falling off the sticks?
Use smaller balls, pre-dip the stick in melted coating before inserting, and chill to set. If the mixture is too soft, add more cake crumbs. Balance is everything.
Can I use real chocolate instead of candy melts?
Yes, but temper it or it may bloom (those white streaks).
If you don’t want to temper, candy melts are more forgiving. For real chocolate, add a bit of cocoa butter or neutral oil for easier dipping.
How many cake pops does one cake make?
Typically 20–30, depending on size. Smaller pops stretch your batch and hold better on sticks—also better for parties, IMO.
Do I need a stand?
A block of styrofoam, a cardboard box with punched holes, or an upside-down colander makes a great DIY stand.
No fancy gear required.
Can I color white chocolate?
Use oil-based candy colors. Water-based gel colors can seize the chocolate. If it thickens, add a splash of neutral oil to recover.
What’s the best way to package them for gifts?
Let them fully set, then wrap each pop in a small cellophane bag and tie with ribbon.
Store upright in a box so the tops don’t smudge. They’ll look bakery-level with almost no effort.
In Conclusion
Cake pops are the shortcut to party-level desserts with minimum stress and maximum applause. Keep the mix just moist, the coating thin, and the balls small—those three rules do 90% of the work.
From birthdays to “just because,” they never miss. Make a batch today and enjoy bite-size bliss on a stick. Your snack game?
Officially upgraded.