This Chocolate Cream Pie Recipe Is So Silky, Your Fork Will Need a Seatbelt
👩🍳 The Home Chef's Essential Kitchen
Consistently cooking incredible, healthy meals at home is so much easier when you aren't fighting with cheap tools. These are the 5 absolute powerhouse kitchen essentials that professional chefs and serious home cooks rely on every single day to get perfect results.
🍳 Lodge 10.25" Cast Iron Skillet
The single greatest value in all of cookware. It retains heat infinitely better than cheap non-stick pans, allowing you to get a restaurant-quality crust on steaks or perfect crispy edges on cornbread. With proper care, this $20 pan will literally outlive you.
🔪 Victorinox Fibrox Pro 8" Chef's Knife
A dull knife makes cooking a frustrating chore. This specific blade is the undisputed champion of the culinary world—it holds a terrifyingly sharp edge, features a comfortable non-slip grip, and performs identical to German knives that cost quadruple the price.
🌡️ ThermoPro Instant Read Thermometer
Never serve dry chicken or undercooked pork again. An instant-read thermometer is the secret difference between amateur cooks who 'guess' when protein is done, and professionals who know exactly when to pull meat off the heat for maximum juiciness.
🍲 Lodge Enameled Cast Iron Dutch Oven
The ultimate workhorse for soups, stews, braised short ribs, and baking crusty artisanal bread. The enameled interior provides incredible heat distribution for slow-cooking while eliminating the intense seasoning maintenance required by bare cast iron.
🥄 Bpa-Free Silicone Utensil Set
Throw away those melting plastic spatulas and bacteria-harboring wooden spoons. This pure silicone set is heat-resistant up to 600°F, won't scratch your expensive pans, and features seamless designs that make cleaning out thick sauces and batters effortless.
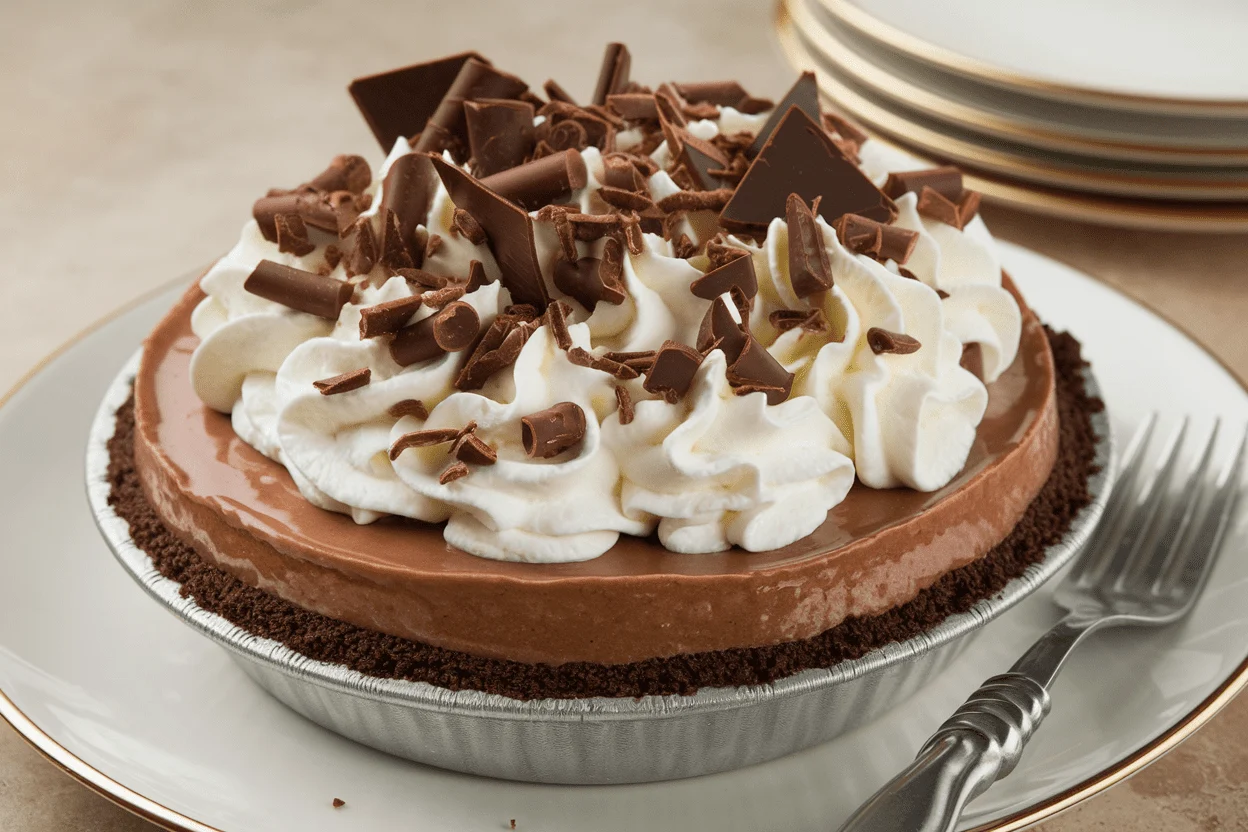
You want a dessert that shuts down conversation? This is it. Silky chocolate custard, buttery crust, and clouds of whipped cream—basically a mic drop in pie form.
No weird tricks, no pricey gadgets, just smart technique and a flavor that punches way above its weight class. Make this once and you’ll be the “bring the pie” person forever. Consider yourself warned.
Why This Recipe Works
This chocolate cream pie nails the balance of lush texture and deep flavor.
We bloom cocoa and melt real chocolate for layers of taste—bittersweet, rich, and not cloying. A little cornstarch and egg yolks team up to create a custard that’s sliceable yet silky, so it stands tall without being gummy.
The crust? You get options.
A classic flaky pie shell for structure or a chocolate cookie crust for maximum indulgence. Either one holds the filling like a champ. Finally, stabilized whipped cream (don’t worry, it’s easy) means your gorgeous topping doesn’t collapse before dessert time.
You’re welcome.
What You’ll Need (Ingredients)
- For the crust (choose one):
- Flaky pie shell: 1 unbaked 9-inch pie crust, blind-baked and cooled
- Chocolate cookie crust: 2 cups chocolate wafer cookie crumbs, 6 tbsp unsalted butter (melted), 2 tbsp sugar, pinch of salt
- Chocolate custard filling:
- 2 1/2 cups whole milk
- 1/2 cup heavy cream
- 1/2 cup granulated sugar
- 1/3 cup unsweetened cocoa powder (Dutch-process preferred)
- 4 large egg yolks
- 1/4 cup cornstarch
- 1/4 tsp fine sea salt
- 6 oz bittersweet chocolate, chopped (60–70% cacao)
- 2 tbsp unsalted butter, room temperature
- 1 1/2 tsp pure vanilla extract
- Whipped cream topping:
- 1 cup heavy cream, very cold
- 2 tbsp powdered sugar
- 1/2 tsp vanilla extract
- Optional: 1 tsp powdered gelatin + 1 tbsp cold water (for stabilized cream)
- Garnish: Chocolate shavings or cocoa for dusting
Instructions
- Prep the crust: For a flaky crust, blind-bake a 9-inch shell at 400°F (205°C) with weights for 15 minutes, then without weights for 10–12 minutes until golden. Cool completely. For a cookie crust, combine crumbs, sugar, salt, and melted butter.
Press into a 9-inch pie dish. Bake at 350°F (175°C) for 8–10 minutes. Cool.
- Whisk the dry ingredients: In a medium saucepan (off heat), whisk sugar, cocoa powder, cornstarch, and salt until lump-free.
This prevents clumps later.
- Add the liquids: Whisk in milk and heavy cream gradually until smooth. No grainy bits allowed.
- Temper with yolks: In a separate bowl, whisk egg yolks. Ladle in 1/2 cup of the milk mixture, whisking constantly.
Repeat once more. Pour yolk mixture back into the saucepan while whisking.
- Cook the custard: Set over medium heat, whisking constantly. When it starts to bubble, cook 1–2 more minutes until thick and glossy.
If your arm’s not slightly tired, you didn’t whisk enough.
- Add chocolate and butter: Remove from heat. Immediately add chopped chocolate, butter, and vanilla. Whisk until fully melted and smooth.
Taste for balance—add a pinch of salt if needed.
- Strain and fill: For ultra-smooth filling, pass the custard through a fine-mesh sieve into a bowl. Pour into the cooled crust and smooth the top.
- Chill properly: Press plastic wrap directly on the surface to prevent a skin. Chill at least 4 hours (overnight is best) until set.
- Make the whipped cream: If stabilizing, sprinkle gelatin over cold water; let bloom 5 minutes.
Microwave 5–7 seconds to dissolve; cool to lukewarm. Whip cream with powdered sugar and vanilla to soft peaks. If using gelatin, stream it in while mixing to medium peaks.
- Finish and serve: Top the pie with whipped cream.
Garnish with chocolate shavings or a dusting of cocoa. Slice with a warm knife for clean edges and try not to brag (too much).
How to Store
Keep the pie covered and refrigerated for up to 3 days. If using stabilized whipped cream, the topping will hold its shape the whole time.
Without stabilization, expect the loft to soften after day two—still delicious, just less “runway ready.”
Do not freeze the assembled pie; the custard can turn grainy. If you must plan ahead, freeze the baked crust only, then fill and chill the day you serve.
Benefits of This Recipe
- Restaurant-level texture: The cornstarch-yolk combo gives a smooth, sliceable custard without fuss.
- Balanced chocolate flavor: Cocoa plus real chocolate means depth, not just sweetness.
- Flexible crust options: Classic or cookie—choose your mood (or your pantry situation).
- Make-ahead friendly: The pie needs chill time, which is code for “dessert’s already done.”
- Reliable for crowds: Holds up well at parties and potlucks. FYI: it disappears fast.
Pitfalls to Watch Out For
- Under-thickened custard: If you stop cooking at the first bubble, it won’t set firmly.
Keep whisking for 1–2 minutes of gentle bubbling.
- Scorched chocolate: Don’t add chocolate over high heat. Remove the pan from heat first, then stir it in.
- Soggy crust: Always cool crust completely before adding filling. For flaky crust, don’t skip blind-baking.
- Weepy whipped cream: Warm kitchens melt peaks.
Use cold cream, chilled bowl, and stabilize if holding more than a few hours.
- Lumpy custard: Whisk thoroughly and strain. A sieve is the difference between “homemade” and “homemade but dangerously smooth.”
Recipe Variations
- Mocha Cream Pie: Add 1–2 tsp espresso powder to the dry mix. Garnish with chocolate-covered espresso beans.
Caffeinated bliss.
- Salted Caramel Layer: Spread 1/2 cup thick caramel on the cooled crust before the chocolate filling. Finish with flaky sea salt.
- Peanut Butter Ribbon: Swirl 1/3 cup warmed peanut butter into the custard after pouring into the crust. Cue the applause.
- Mint-Chocolate: Replace vanilla with 3/4 tsp peppermint extract.
Garnish with crushed mint candies (sparingly, IMO).
- Dairy-Light Version: Use 2 cups whole milk + 1 cup lactose-free half-and-half; top with coconut whipped cream.
- Gluten-Free Option: Use gluten-free chocolate cookies for the crust or a GF pie shell.
FAQ
Can I use milk chocolate instead of bittersweet?
Yes, but reduce the sugar by 2–3 tablespoons to avoid an overly sweet pie. Milk chocolate also softens the set slightly, so chill the full overnight for clean slices.
What if I don’t have cornstarch?
Use 1/3 cup flour instead, whisked with the cocoa and sugar. Cook an extra minute after bubbling to remove any raw flour taste.
How do I prevent a skin on the custard?
Press plastic wrap directly on the surface while chilling.
If a skin still forms, gently whisk the top before pouring into the crust, or just embrace it—then cover with whipped cream like a magician.
Can I make it ahead?
Absolutely. Make the crust and filling the day before. Add whipped cream up to 6 hours before serving (stabilized if you’re playing the long game).
My custard looks grainy—what happened?
Likely overheated or not whisked constantly.
Try blending with an immersion blender for 10–15 seconds while warm, then strain. It won’t be perfect, but it’ll be tasty.
Do I need Dutch-process cocoa?
Not required, but it gives a smoother, darker chocolate flavor. Natural cocoa works; just expect a slightly lighter color and a bit more acidity.
🍰 The Master Baker & Prep Kit
Baking is a science, and meal prep requires efficiency. If you want consistently flaky pie crusts, perfectly risen cakes, and healthy meals ready for the week, these are the 5 upgrade tools that take your execution to the next level.
⚖️ OXO Good Grips 11lb Food Scale
The secret to why bakery bread and cookies are always perfect while home batches vary wildly. Measuring by weight (grams) instead of volume (cups) guarantees precise hydration and flawlessly consistent results every single time you bake.
🧑🍳 KitchenAid Classic Stand Mixer
The undisputed holy grail of the kitchen. From aggressively kneading heavy pizza doughs to whipping meringues into stiff peaks, this powerful motor saves your arms from exhaustion and cuts your hands-on prep time in half.
🍪 Silpat Premium Silicone Baking Mats
Stop wasting money on rolls of parchment paper or agonizing over cookies permanently fused to your metal pans. These reusable, professional-grade silicone mats ensure completely even heat distribution and instantly release even the stickiest caramel.
🌪️ Braun MultiQuick Immersion Blender
The ultimate shortcut tool for creamy tomato soups, lump-free gravies, and rapid smoothies. Avoid the burns and mess of dangerously transferring boiling liquids in batches to a traditional blender by simply blending right inside your cooking pot.
🍱 Premium Glass Meal Prep Containers
If you want to bake and cook healthier, batch preparation is required. These durable glass containers transition safely from freezer to microwave, never absorb tomato sauce stains, and feature airtight seals to keep your hard work fresh all week.
In Conclusion
This chocolate cream pie recipe hits that rare sweet spot: impressive yet simple, luxurious yet weeknight-friendly.
It’s engineered for success with smart techniques and ingredients that do the heavy lifting. You get clean slices, mega-chocolate flavor, and whipped cream that doesn’t ghost you. Make it once, and your future self—plus everyone you feed—will send thank-you notes.