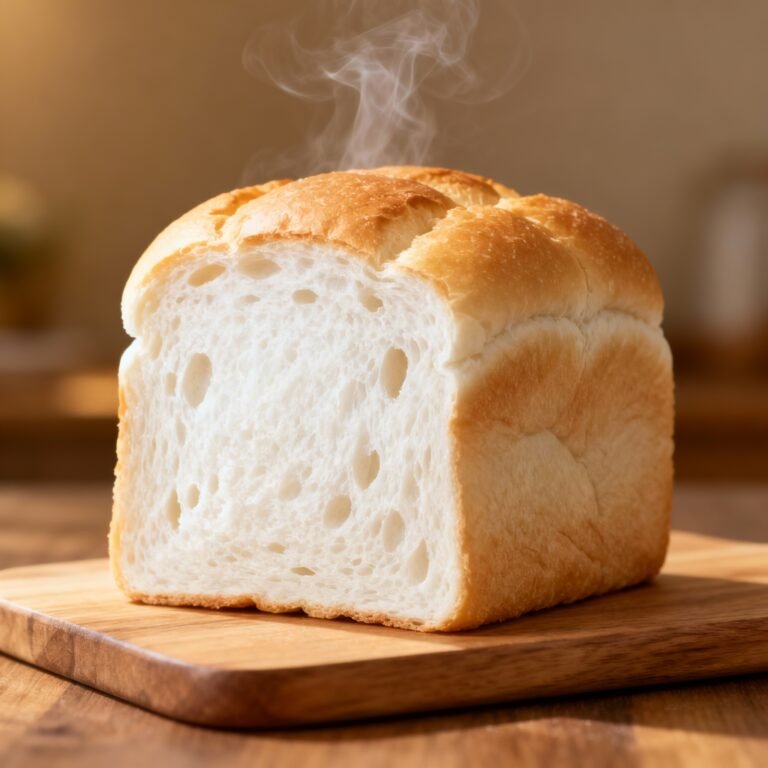
Crusty Italian Bread Recipe That Shatters (In the Best Way) — Bakery-Level Loaf at Home
Imagine tearing into a loaf so crackly it sings when it cools, with a chewy, steamy crumb that makes butter melt on contact. That’s the kind of bread that upgrades a Tuesday into an event. You don’t need a brick oven, a PhD in sourdough, or a second mortgage on specialty gear.
You just need patience, salt, and a plan. This crusty Italian bread recipe delivers big flavor, big texture, and big “you made that?!” energy.
What Makes This Special
High hydration = airy crumb. We use more water than typical sandwich loaves, which creates those beautiful irregular holes and a moist interior. It’s rustic on purpose.
Slow fermentation for flavor. A longer, cooler rise develops complex notes—nutty, slightly sweet, and deeply wheaty—without added sugar.
Your future self will thank you.
Steam for crackle. That signature shattering crust isn’t magic—it’s moisture. We’ll trap steam with a Dutch oven or create it manually. Either way, you get that unmistakable Italian-style snap.
Olive oil accent (optional). A touch of oil boosts tenderness and aroma without turning this into focaccia territory.
Just enough to whisper “Italy,” not shout it.
What Goes Into This Recipe – Ingredients
- 500 g (about 4 cups) bread flour (or a 50/50 blend of bread flour and all-purpose for a slightly softer crumb)
- 380–400 g water (about 1 2/3 cups), room temperature
- 10 g fine sea salt (about 1 3/4 tsp)
- 2 g instant yeast (about 1/2 tsp) or 3 g active dry yeast
- 10 g olive oil (about 2 tsp) (optional, for subtle softness and aroma)
- Semolina or flour for dusting
Optional flavor boosters:
- 1 tsp honey (for slightly quicker fermentation and gentle sweetness)
- 1 tsp malt powder (bakery vibe, deeper browning)
Step-by-Step Instructions
- Mix the dough (no mixer required). In a large bowl, whisk flour and salt. In a separate cup, stir water and yeast (add honey if using). Pour wet into dry.
Mix with a spoon or hand until no dry bits remain. The dough should be shaggy and sticky. Add olive oil and fold it in.
- Rest and hydrate (autolyse-ish). Cover and rest 20–30 minutes.
This short break lets the flour absorb water, making the dough easier to handle and boosting gluten formation without effort. Low work, high payoff.
- Strengthen the dough. Perform 3–4 rounds of stretch-and-folds over 60–90 minutes: every 20–30 minutes, wet your hand, grab one edge, stretch up, and fold over. Rotate the bowl and repeat 4–6 times.
The dough will go from slouchy to bouncy.
- First rise (bulk ferment). Cover and let rise at room temp until puffy and roughly doubled, 1.5–3 hours depending on temperature. It should jiggle when you shake the bowl and show bubbles at the surface.
- Chill for flavor (optional but recommended). For deeper taste and easier shaping, refrigerate the dough 8–12 hours. If skipping, proceed to shaping once doubled.
- Pre-shape. Turn the dough onto a lightly floured surface.
Gently pat into a rough rectangle, then fold like a letter. Roll lightly into a loose ball. Rest 15–20 minutes, uncovered.
This relaxes the gluten—think of it as a spa day.
- Final shape. For a classic Italian loaf (filone), flatten gently into a rectangle. Fold the top third down, bottom third up, then roll into a tight log, sealing the seam. Create surface tension by rolling gently with your palms.
Alternatively, shape into a round (pagnotta).
- Proof. Place seam-side up in a floured banneton or a bowl lined with a well-floured towel. Cover and proof 45–75 minutes at room temp, or until the dough slowly springs back when poked. If it springs back instantly, it’s under; if it doesn’t recover, it’s over.
- Preheat with steam plan. Place a Dutch oven with lid in your oven and preheat to 475°F (245°C) for 30–45 minutes.
No Dutch oven? Preheat a baking steel/stone and set a metal pan on the lower rack for water to create steam.
- Score. Gently invert the dough onto parchment. Dust lightly with flour or semolina.
Using a sharp lame or knife, make 1–3 confident slashes about 1/2 inch deep along the length to control expansion. Channel your inner sculptor.
- Bake with steam. Dutch oven method: transfer the dough on parchment into the hot pot, cover, and bake 20 minutes. Uncover, reduce temp to 450°F (230°C), and bake 18–25 minutes until deep golden-brown with crackly splits.
No Dutch oven: pour 1 cup hot water into the preheated pan to steam, slide dough onto the stone/steel, and bake 35–45 minutes, venting steam after 15 minutes.
- Check doneness. Internal temp should be ~208–212°F (98–100°C). The loaf should feel light for its size and sound hollow when tapped. If it looks pale, keep going—color equals flavor.
- Cool properly. Rest on a rack at least 60 minutes before slicing.
Yes, waiting is torture. Also yes, it’s non-negotiable if you want the crumb to set and stay moist.
Storage Instructions
- Room temp: Keep in a paper bag or wrapped in a clean towel for 1–2 days. Avoid plastic—unless you like your crust going soft and sad.
- Short-term crisp revival: If the crust softens, re-crisp in a 375°F (190°C) oven for 8–10 minutes.
- Freezing: Slice, then freeze in a zip-top bag with as much air removed as possible.
Toast from frozen or reheat at 350°F (175°C) for 12–15 minutes.
- Do not refrigerate. The fridge accelerates staling due to starch retrogradation. Science says no; flavor agrees.
Health Benefits
- Simple, clean ingredients. Flour, water, salt, yeast—no preservatives or mystery syrups.
- Fermentation perks. Longer rises may improve digestibility and reduce perceived bloating for some people. Not a medical claim—just a frequent win.
- Lower sugar, balanced energy. No added sugar necessary, steady carbs, especially if paired with protein and healthy fats.
- Olive oil option. A touch of heart-friendly monounsaturated fat adds aroma and mouthfeel without heaviness.
Avoid These Mistakes
- Using cold or hot water blindly. Extreme temperatures can stall or shock yeast.
Aim for cool to mildly warm, ~68–78°F (20–26°C).
- Over-flouring the surface. Excess flour makes seams slip and prevents proper shaping. Light dusting only; keep tacky for tension.
- Skipping steam. No steam = dull crust and poor oven spring. Use a Dutch oven or build steam manually.
- Underproofing or overproofing. Under = tight crumb and blowouts.
Over = flat loaf and weak structure. The poke test is your friend, FYI.
- Slicing too soon. The crumb will gum up and seem underbaked. Wait the hour.
Patience tastes better.
Different Ways to Make This
- Sourdough version. Replace yeast with 100 g active starter (100% hydration). Use 475 g flour and 340–360 g water to start. Bulk ferment longer (3–6 hours), then cold proof overnight.
Bake as directed.
- Semolina blend. Swap 20–30% of the flour for fine semolina (durum) for a golden hue and slightly nutty, sweet flavor. Add 10–20 g extra water if needed.
- Herb-garlic aroma. Add 1–2 tsp chopped fresh rosemary or oregano and 1 grated garlic clove during mixing. Don’t go wild—this is bread, not a spice rack.
- Olive-studded. Gently fold in 3/4 cup chopped, well-drained olives after the first round of stretch-and-folds.
- Baguette-style. Divide dough into two pieces after bulk, shape into batards, proof in a floured couche, and bake on a stone with steam for slimmer, snappier loaves.
FAQ
Can I use all-purpose flour instead of bread flour?
Yes.
All-purpose will yield a slightly softer crumb and less chew, but the loaf will still be fantastic. If using AP, aim toward the lower end of the water range and adjust as needed.
How do I know when the dough is proofed enough?
Use the poke test: press a floured finger into the dough about 1/2 inch. If it springs back slowly and leaves a slight indentation, it’s ready.
Immediate bounce-back means underproofed; a collapse means overproofed.
What if I don’t have a Dutch oven?
Preheat a stone or steel and place a metal pan on a lower rack. Pour in hot water right after loading the loaf to create steam. Vent the oven after 15 minutes by briefly opening the door.
Works like a charm, IMO.
Why is my crust too pale?
Increase bake time and ensure a hot start (fully preheated oven). A pinch of malt powder or a drizzle of honey in the dough also encourages browning. And don’t be afraid of deep color—that’s flavor.
Can I make this same-day?
Absolutely.
Skip the cold proof and extend the room-temperature bulk until well doubled, then shape, proof, and bake. Flavor will be milder but still delicious.
How do I get bigger holes in the crumb?
Use slightly higher hydration, handle the dough gently during shaping, and avoid degassing too much. Strong gluten development and proper proofing are key.
Also, bake hot with steam for maximum oven spring.
Final Thoughts
This crusty Italian bread recipe is proof that “artisan” doesn’t mean “complicated.” With a few simple techniques—hydration, time, and steam—you’ll pull a bakery-level loaf from a standard oven. Pair it with olive oil and flaky salt, slice for sandwiches, or just tear and swipe through sauce like a pro. The only real problem?
One loaf disappears fast. Better make two.