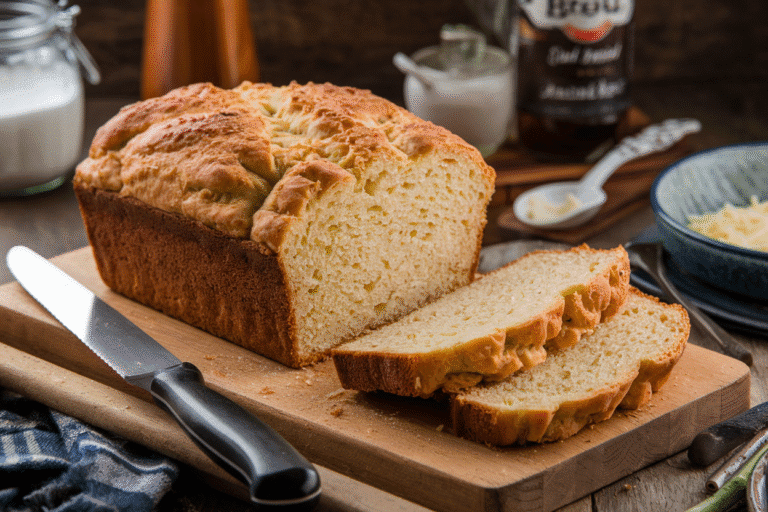
Easy Challah Bread Recipe: The Beginner’s Guide to Braided Perfection
Challah bread, with its rich flavor, soft crumb, and beautiful braided crust, is a staple for Jewish holidays and a welcome addition to any weekend brunch. But the thought of making it from scratch can seem daunting. Fear not! This recipe takes the intimidation out of challah, offering a simplified, foolproof method that guarantees a delicious and impressive loaf, even for baking novices. Get ready to impress your friends and family with this easy challah bread recipe that will have them begging for more.
Why This Recipe Works
This recipe is designed for ease and success. Here’s why it works:
- Simple Ingredients: We use common pantry staples, eliminating the need for hard-to-find ingredients.
- Clear Instructions: Each step is clearly explained with detailed instructions and helpful visuals (if you’re watching a video alongside!).
- Foolproof Kneading: We provide options for both hand-kneading and using a stand mixer, catering to different skill levels and equipment availability.
- Optimized Rising Time: The rising times are carefully calibrated to ensure a light and airy texture without requiring constant monitoring.
- Easy Braiding Technique: We focus on a simple 3-strand braid, which is visually appealing yet easy to master. More advanced braids can be attempted later!
- Delicious Flavor: The balance of sweetness and richness creates a challah that’s perfect on its own or as a base for sandwiches and French toast.
Ingredients
- 1 cup (240ml) warm water (105-115°F): Essential for activating the yeast.
- 2 ¼ teaspoons (1 packet) active dry yeast: The key to a light and airy challah.
- ¼ cup (50g) granulated sugar, plus 1 teaspoon: Provides sweetness and helps activate the yeast.
- ½ teaspoon salt: Balances the sweetness and enhances the flavor.
- ¼ cup (60ml) vegetable oil: Adds moisture and richness.
- 2 large eggs, plus 1 for egg wash: Contribute to the dough’s structure and richness.
- 3 ½ – 4 cups (420-480g) all-purpose flour, plus more for dusting: The base of the bread. The amount may vary depending on humidity.
- Optional: Sesame seeds or poppy seeds, for topping: Adds a decorative touch and extra flavor.

Instructions
- Activate the Yeast: In a large bowl, combine the warm water and 1 teaspoon of sugar. Sprinkle the yeast over the water and let it sit for 5-10 minutes, or until foamy. This indicates that the yeast is active.
- Combine Wet Ingredients: Add the remaining ¼ cup of sugar, salt, vegetable oil, and 2 eggs to the yeast mixture. Whisk to combine.
- Add Flour: Gradually add the flour, 1 cup at a time, mixing well after each addition. Start with 3 ½ cups, and then add more as needed until the dough comes together and is slightly sticky but manageable.
- Knead the Dough (By Hand): Turn the dough out onto a lightly floured surface and knead for 8-10 minutes, or until smooth and elastic. Add more flour, 1 tablespoon at a time, if the dough is too sticky.
- Knead the Dough (Stand Mixer): If using a stand mixer, attach the dough hook. Knead on medium-low speed for 6-8 minutes, or until the dough is smooth and elastic.
- First Rise: Place the dough in a lightly oiled bowl, turning to coat. Cover with plastic wrap or a clean kitchen towel and let rise in a warm place for 1-1.5 hours, or until doubled in size.
- Divide the Dough: Gently punch down the dough to release the air. Divide the dough into 3 equal pieces.
- Shape the Strands: Roll each piece of dough into a long rope, about 12-14 inches long.
- Braid the Challah: Place the three ropes side by side. Pinch the tops of the ropes together. Braid the ropes together as you would braid hair. Pinch the ends together to seal.
- Second Rise: Place the braided challah on a baking sheet lined with parchment paper. Cover with plastic wrap or a clean kitchen towel and let rise for 30-45 minutes, or until slightly puffed.
- Prepare the Egg Wash: In a small bowl, whisk together the remaining egg with 1 tablespoon of water.
- Egg Wash and Topping: Brush the challah with the egg wash and sprinkle with sesame seeds or poppy seeds, if desired.
- Bake: Preheat oven to 350°F (175°C). Bake for 25-30 minutes, or until golden brown and the internal temperature reaches 190-200°F (88-93°C).
- Cool: Let the challah cool on a wire rack before slicing and serving.
Tips for Success
- Use a Thermometer: Ensuring your water is the right temperature is crucial for activating the yeast. Too hot will kill the yeast; too cold won’t activate it.
- Don’t Over-Knead: Over-kneading can result in a tough challah. Knead until the dough is smooth and elastic, but not excessively.
- Adjust Flour as Needed: The amount of flour needed can vary depending on humidity. Add flour gradually until the dough comes together and is slightly sticky but manageable.
- Warm Environment for Rising: A warm environment will help the dough rise properly. You can place the bowl in a turned-off oven with the light on, or near a warm stovetop.
- Baking Time Variations: Oven temperatures can vary. Check the challah for doneness by inserting a toothpick into the center. If it comes out clean, it’s done. If it’s still doughy, bake for a few more minutes.
- Prevent Burning: If the challah is browning too quickly, tent it with aluminum foil during the last 10-15 minutes of baking.
Storage Instructions
- Room Temperature: Store challah bread in an airtight container or wrapped tightly in plastic wrap at room temperature for up to 2-3 days.
- Freezing: For longer storage, freeze the challah bread. Wrap it tightly in plastic wrap and then in aluminum foil or place it in a freezer bag. It can be frozen for up to 2-3 months. Thaw at room temperature before serving.
- Reheating: To refresh day-old challah, wrap it in foil and warm it in a preheated oven at 300°F (150°C) for 10-15 minutes.

FAQ
- Can I use instant yeast instead of active dry yeast? Yes, you can. If using instant yeast, you can skip the proofing step and add it directly to the dry ingredients.
- Can I make this recipe gluten-free? While this recipe is not specifically designed for gluten-free baking, you can try substituting a gluten-free all-purpose flour blend. However, the texture and flavor may be different.
- Can I add raisins or other fillings to the challah? Yes, you can add raisins, chocolate chips, or other fillings to the dough before braiding. Simply knead them in after the first rise.
- Why is my challah dense and not airy? This could be due to several factors, including using old yeast, not kneading the dough enough, or not allowing it to rise properly. Make sure your yeast is fresh, knead the dough until smooth and elastic, and provide a warm environment for rising.
- Can I make this recipe ahead of time? Yes, you can prepare the dough ahead of time and let it rise in the refrigerator overnight. This will slow down the rising process and allow the flavors to develop further. Bring the dough to room temperature before braiding and baking.
Conclusion
With this easy challah bread recipe, you’ll be baking beautiful and delicious loaves in no time. Don’t be afraid to experiment with different toppings and braiding techniques to create your own signature challah. So, gather your ingredients, preheat your oven, and get ready to enjoy the satisfaction of homemade challah. Happy baking!