Easy Ice Cream Cake Recipe: The Ultimate No-Bake Dessert!
Summer parties, birthdays, or just a Tuesday night craving – there’s never a bad time for ice cream cake! But let’s be honest, the thought of making one can seem daunting. Visions of melting ice cream, soggy cake layers, and complicated frosting techniques might flash before your eyes. Fear not, dessert lovers! This recipe is here to banish those worries and prove that making a stunning and delicious ice cream cake can be incredibly easy. We’re talking no-bake, minimal effort, and maximum flavor. Get ready to impress your friends and family (and yourself!) with this foolproof recipe.
Why This Recipe Works
This ice cream cake recipe is designed for simplicity and success. Here’s why it’s a winner:
- No-Bake Bliss: That’s right, no oven required! This recipe relies on store-bought ingredients, eliminating the need for baking altogether.
- Adaptable Flavors: The beauty of this recipe lies in its versatility. You can easily customize the ice cream and toppings to suit your preferences. Chocolate, vanilla, strawberry, cookies and cream – the possibilities are endless!
- Simple Assembly: Forget complicated layering techniques. We’ll guide you through a straightforward assembly process that even kids can help with.
- Impressive Presentation: Despite its ease, this ice cream cake looks absolutely stunning. It’s perfect for special occasions or any time you want to add a touch of elegance to your dessert table.
- Make-Ahead Magic: You can assemble this ice cream cake well in advance of your event, freeing up your time and reducing stress on the day of.
Ingredients
Here’s what you’ll need to create this easy ice cream cake masterpiece:
- 1 box (14-16 oz) chocolate sandwich cookies (like Oreos), divided
- 6 tablespoons unsalted butter, melted
- 1/2 gallon (2 quarts) ice cream, softened (choose your favorite flavor!)
- 1/2 gallon (2 quarts) ice cream, softened (a different flavor for contrast is great!)
- 1 (12 oz) jar hot fudge sauce, warmed
- Whipped cream, for topping (optional)
- Sprinkles, for topping (optional)
- Chopped nuts, for topping (optional)
- Maraschino cherries, for topping (optional)
Instructions
Follow these simple steps to assemble your easy ice cream cake:
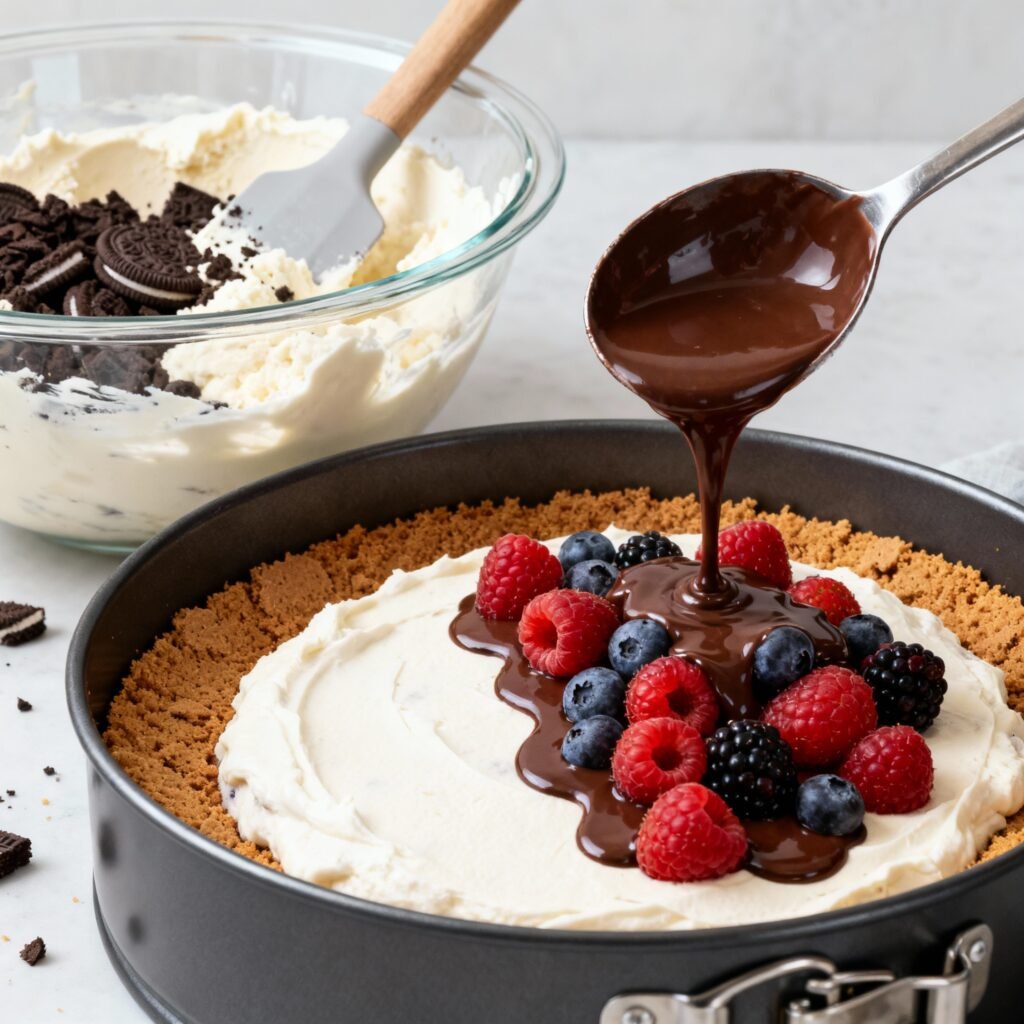
- Prepare the Cookie Crust: Place about 2/3 of the chocolate sandwich cookies in a food processor and pulse until finely crushed. If you don’t have a food processor, you can place the cookies in a large zip-top bag and crush them with a rolling pin.
- Combine Crust Ingredients: In a medium bowl, combine the crushed cookies and melted butter. Mix well until the crumbs are evenly moistened.
- Press into Pan: Press the cookie crumb mixture into the bottom of a 9-inch springform pan. Use the bottom of a measuring cup or your fingers to firmly pack the crumbs into an even layer.
- Freeze the Crust: Place the springform pan with the cookie crust in the freezer for at least 30 minutes to allow the crust to firm up. This will prevent it from crumbling when you add the ice cream.
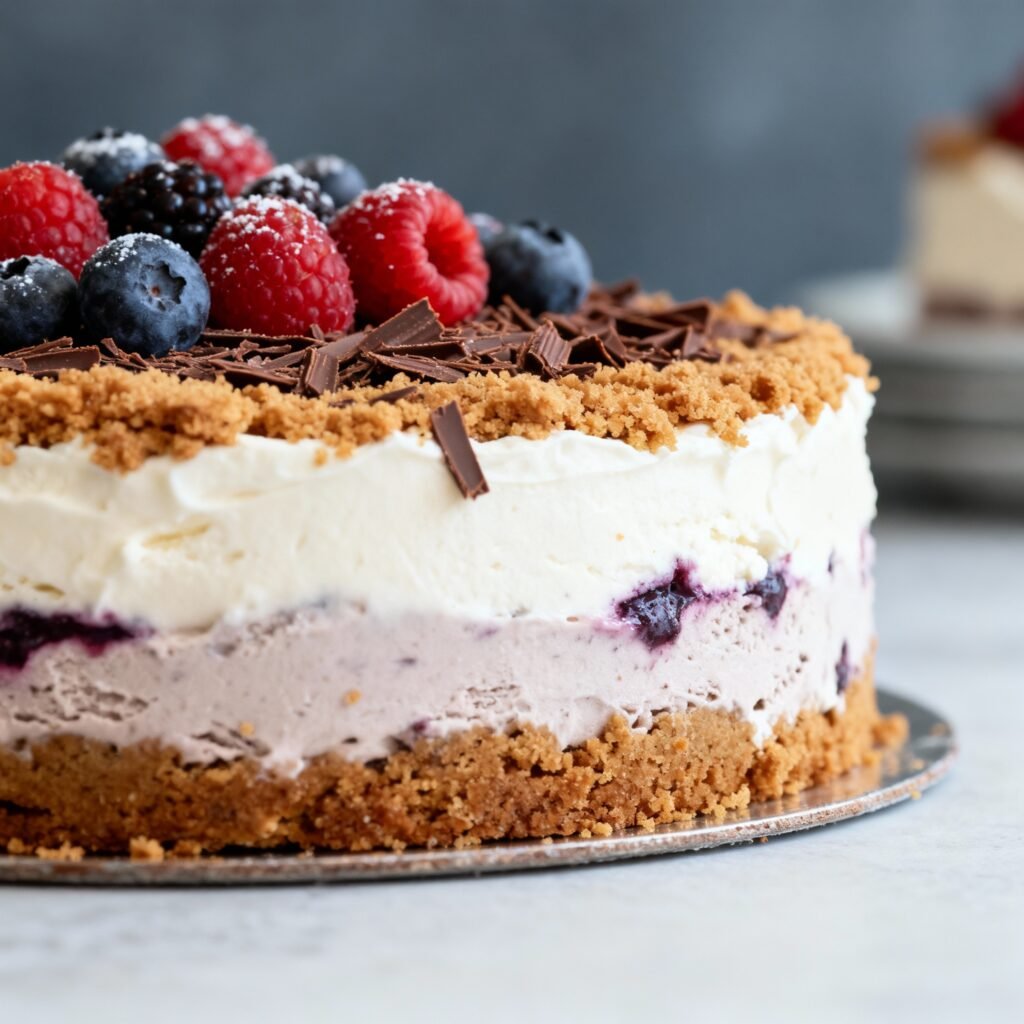
- Add the First Layer of Ice Cream: Remove the crust from the freezer. Spread the softened first flavor of ice cream evenly over the cookie crust. Make sure to fill in any gaps and create a smooth surface.
- Freeze Again: Return the springform pan to the freezer for at least 1 hour, or until the first layer of ice cream is firm. This is crucial to prevent the flavors from mixing.
- Add the Second Layer of Ice Cream: Remove the pan from the freezer. Spread the softened second flavor of ice cream evenly over the first layer. Again, ensure a smooth and even surface.
- Freeze Completely: Cover the springform pan with plastic wrap and freeze for at least 4 hours, or preferably overnight, to allow the ice cream to harden completely.
- Prepare the Hot Fudge: Gently warm the hot fudge sauce in the microwave or on the stovetop. Be careful not to overheat it.
- Release from Pan: When ready to serve, remove the ice cream cake from the freezer. Run a warm knife around the edge of the springform pan to loosen the cake. Carefully release the sides of the pan.
- Decorate: Drizzle the warmed hot fudge sauce over the top of the ice cream cake. Add whipped cream, sprinkles, chopped nuts, maraschino cherries, or any other toppings you desire.
- Slice and Serve: Slice the ice cream cake with a sharp knife and serve immediately. Enjoy!
Tips for Success
Here are a few tips to ensure your ice cream cake turns out perfectly:
- Softened Ice Cream is Key: Make sure your ice cream is softened enough to spread easily, but not so melted that it becomes soupy. Let it sit at room temperature for about 15-20 minutes before using.
- Firm Freezing is Essential: Don’t skip the freezing steps between layers. This prevents the ice cream flavors from blending together and ensures a clean, layered look.
- Warm Knife for Easy Slicing: Dip your knife in warm water and wipe it dry before each slice for clean, effortless cutting.
- Get Creative with Toppings: Don’t be afraid to experiment with different toppings! Crushed candy bars, chopped fruit, chocolate shavings, and caramel sauce are all great options.
- Customize the Crust: If you’re not a fan of chocolate sandwich cookies, you can use graham crackers or any other type of cookie for the crust.
- Use a Springform Pan: A springform pan is essential for easy removal of the ice cream cake. If you don’t have one, you can line a regular cake pan with plastic wrap, leaving enough overhang to lift the cake out after freezing.
Storage Instructions
Store leftover ice cream cake in the freezer, wrapped tightly in plastic wrap or in an airtight container. It’s best to consume it within a week for optimal flavor and texture.
FAQ
Here are some frequently asked questions about making ice cream cake:
- Can I use different flavors of ice cream? Absolutely! This recipe is all about customization. Choose your favorite flavors and experiment with different combinations.
- Can I make this cake ahead of time? Yes, you can assemble the ice cream cake several days in advance and store it in the freezer. Just be sure to wrap it tightly to prevent freezer burn.
- Can I use a different size pan? Yes, but you may need to adjust the ingredient amounts accordingly. If you use a smaller pan, you’ll need less ice cream. If you use a larger pan, you’ll need more.
- Can I add a layer of cake? While this recipe is no-bake, you certainly can add a layer of cake! Simply bake a thin layer of cake and let it cool completely before adding it to the ice cream cake.
- My ice cream is too hard to spread. What should I do? Let the ice cream sit at room temperature for a few more minutes to soften it further. You can also microwave it in 5-second intervals, being careful not to melt it too much.
Conclusion
There you have it – an incredibly easy and delicious ice cream cake recipe that’s perfect for any occasion. With its simple assembly, customizable flavors, and impressive presentation, this no-bake dessert is sure to become a family favorite. So, ditch the store-bought versions and whip up your own homemade ice cream cake. You’ll be amazed at how easy it is to create a show-stopping dessert that everyone will love! Happy baking (or rather, no-baking!)