This Frozen Hot Chocolate Recipe Will Ruin Boring Desserts Forever (In the Best Way)
👩🍳 The Home Chef's Essential Kitchen
Consistently cooking incredible, healthy meals at home is so much easier when you aren't fighting with cheap tools. These are the 5 absolute powerhouse kitchen essentials that professional chefs and serious home cooks rely on every single day to get perfect results.
🍳 Lodge 10.25" Cast Iron Skillet
The single greatest value in all of cookware. It retains heat infinitely better than cheap non-stick pans, allowing you to get a restaurant-quality crust on steaks or perfect crispy edges on cornbread. With proper care, this $20 pan will literally outlive you.
🔪 Victorinox Fibrox Pro 8" Chef's Knife
A dull knife makes cooking a frustrating chore. This specific blade is the undisputed champion of the culinary world—it holds a terrifyingly sharp edge, features a comfortable non-slip grip, and performs identical to German knives that cost quadruple the price.
🌡️ ThermoPro Instant Read Thermometer
Never serve dry chicken or undercooked pork again. An instant-read thermometer is the secret difference between amateur cooks who 'guess' when protein is done, and professionals who know exactly when to pull meat off the heat for maximum juiciness.
🍲 Lodge Enameled Cast Iron Dutch Oven
The ultimate workhorse for soups, stews, braised short ribs, and baking crusty artisanal bread. The enameled interior provides incredible heat distribution for slow-cooking while eliminating the intense seasoning maintenance required by bare cast iron.
🥄 Bpa-Free Silicone Utensil Set
Throw away those melting plastic spatulas and bacteria-harboring wooden spoons. This pure silicone set is heat-resistant up to 600°F, won't scratch your expensive pans, and features seamless designs that make cleaning out thick sauces and batters effortless.
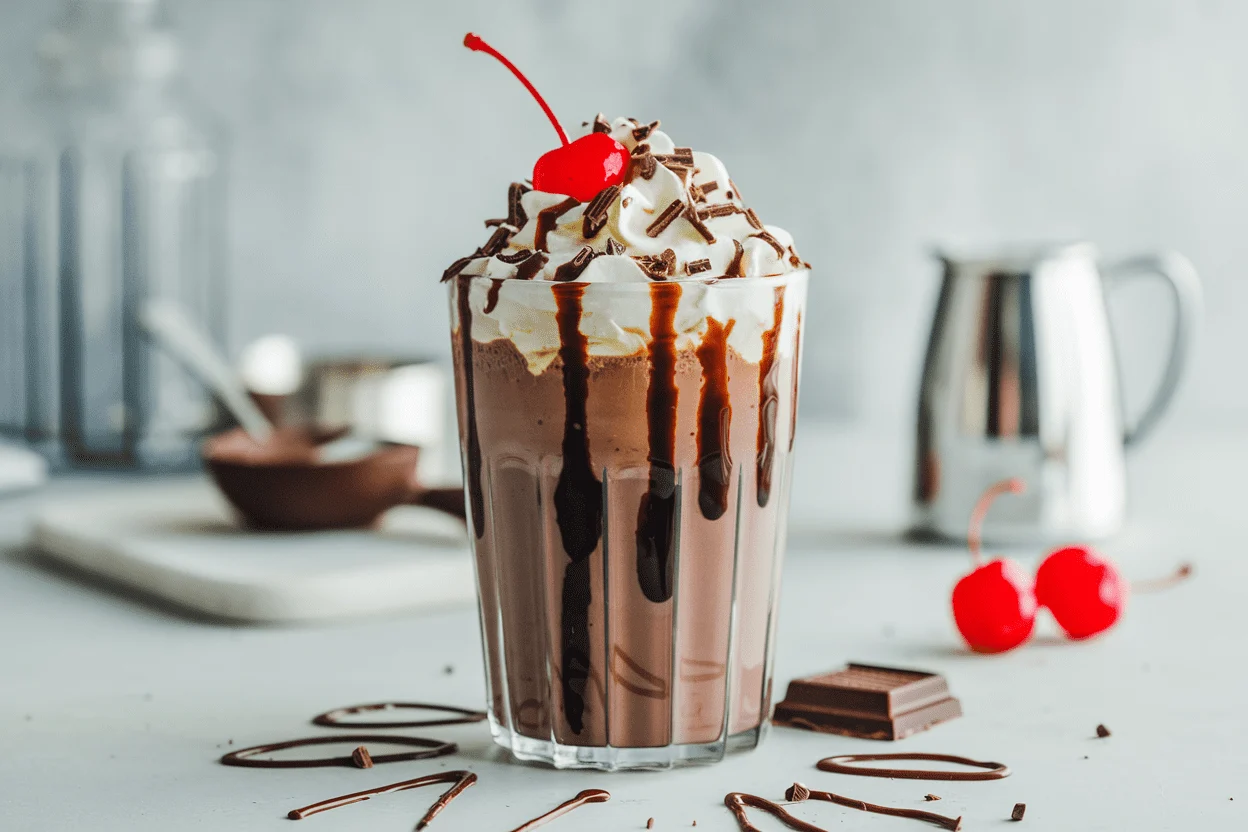
Imagine a milkshake and a mug of hot cocoa had a wildly delicious baby—that’s this frozen hot chocolate recipe. It’s the kind of treat that makes your inner child high-five your adult self. We’re talking frosty, chocolatey, creamy goodness that tastes like winter magic served in July.
No fancy equipment, no culinary diploma, just a blender and a craving. Warning: once you make it, every other dessert starts feeling… mid.
What Makes This Recipe Awesome
This recipe delivers that cozy hot chocolate flavor, but it’s refreshingly cold and ice-cream-level thick. You don’t need boutique chocolate bars or rocket science—just solid pantry staples and a blender.
The texture is luxurious, like a grown-up slushie with swagger. It’s customizable to your mood: extra rich, dairy-free, spicy, or protein-packed. And yes, it looks absolutely stunning with whipped cream, chocolate shavings, and a drizzle—because we eat with our eyes first, obviously.
Ingredients Breakdown
- Milk (1 cup) – Whole milk gives the creamiest result.
Use 2%, almond, or oat milk if you prefer.
- Heavy cream (1/4 cup) – For richness. Swap with coconut cream or skip for a lighter version.
- Hot cocoa mix (1/4 cup) – The flavor base. Choose a good-quality mix, not the ultra-sugary stuff.
- Unsweetened cocoa powder (2 tablespoons) – Deepens the chocolate flavor so it doesn’t taste like chocolate-flavored air.
- Semi-sweet chocolate (2 ounces), chopped – Melt-in factor that makes it luscious.
Chocolate chips work.
- Sugar or maple syrup (1–2 tablespoons) – Adjust to taste depending on your cocoa mix.
- Vanilla extract (1 teaspoon) – Rounds everything out.
- Pinch of salt – Makes the chocolate pop. Don’t skip it.
- Ice (2–3 cups) – Crushed is ideal, but cubes work with a strong blender.
- Optional toppings – Whipped cream, chocolate shavings, mini marshmallows, chocolate syrup, crushed cookies, or a pinch of cinnamon.
Cooking Instructions
- Warm a small portion of milk. In a microwave-safe cup or small saucepan, heat 1/4 cup of the milk until hot but not boiling. This helps dissolve the cocoa and chocolate smoothly.
- Make a chocolate base. Whisk the hot milk with the hot cocoa mix, cocoa powder, chopped chocolate, sugar/maple syrup, vanilla, and a pinch of salt.
Stir until the chocolate is fully melted and glossy.
- Cool it down. Add the remaining cold milk and heavy cream to the chocolate base. Give it a quick stir. You want this mixture cool before blending so it doesn’t melt the ice instantly.
- Load the blender. Add ice to the blender first, then pour in the chocolate mixture.
Starting with ice prevents clumping at the bottom.
- Blend until thick and frosty. Begin on low, then ramp up to high for 20–40 seconds. You’re aiming for a smooth, slushie-like texture. Too thick?
Add a splash of milk. Too thin? Toss in more ice.
- Taste-test like a pro. Need more sweetness or cocoa?
Adjust and pulse a few seconds. You’re the boss here.
- Serve immediately. Pour into chilled glasses. Top with whipped cream, chocolate shavings, a drizzle of syrup, maybe a few mini marshmallows if you’re feeling extra.
Straws recommended, spoon optional.
How to Store
Frozen hot chocolate is best fresh. If you somehow have leftovers (who are you?), transfer to a freezer-safe container and freeze up to 1 month. When ready to serve, let it sit at room temp for 10–15 minutes, then blitz in the blender with a splash of milk to revive the texture.
Don’t refrigerate for long; it separates and turns sad. If you want a make-ahead hack, pre-mix the chocolate base and chill it up to 3 days, then blend with ice on demand.
Nutritional Perks
- Antioxidants from cocoa – High-quality cocoa contains flavanols that support heart health.
- Calcium and protein – Using milk and cream ups the protein and bone-friendly calcium (FYI, dairy-free milk can be fortified too).
- Customizable macros – Go lighter with 2% milk or add a scoop of chocolate protein powder to turn this into a stealthy post-workout treat.
- Controlled sweetness – You choose the sweetener and amount. Avoid the sugar bomb by tasting as you go.
Avoid These Mistakes
- Using only cocoa mix – It can taste flat or overly sweet.
The combo of cocoa powder and real chocolate gives depth.
- Blending hot ingredients with ice – You’ll get watery slush. Cool the chocolate base first.
- Skimping on salt – A tiny pinch makes the chocolate shine. It won’t taste salty, promise.
- Overblending – Heat from friction melts the ice.
Blend just until smooth, then stop.
- Weak blender syndrome – If your blender struggles, use crushed ice or blend in batches to save its dignity.
Variations You Can Try
- Mocha Madness – Replace 1/4 cup of milk with cold brew or a shot of espresso. Chocolate + coffee = elite combo.
- Peppermint Patty – Add 1/4 teaspoon peppermint extract. Top with crushed candy canes in winter for festive vibes.
- Mexican Chocolate – Add 1/4 teaspoon cinnamon and a teeny pinch of cayenne.
Warm spice, cool drink—chef’s kiss.
- Dairy-Free Dream – Use almond or oat milk and coconut cream. Choose dairy-free chocolate and you’re golden.
- Protein Boost – Add 1 scoop of chocolate or vanilla protein powder and a touch more milk. Dessert that earns gym points?
Yes.
- Peanut Butter Cup – Blend in 1–2 tablespoons of peanut butter. Garnish with crushed peanuts or peanut butter drizzle.
- Cookies & Cream – Toss 2–3 chocolate sandwich cookies into the blender. Sprinkle more on top, because restraint is overrated.
FAQ
Can I make this without a blender?
Sort of.
You can whisk the chocolate base thoroughly and pour it over finely crushed ice, then stir like crazy. It won’t be as smooth or thick, but it still tastes fantastic.
What’s the best chocolate to use?
Semi-sweet is the sweet spot for balance. If you love intense flavor, go 60–70% dark.
Milk chocolate will be sweeter and lighter—great for kids or anyone with a sweet tooth.
How do I avoid a grainy texture?
Fully dissolve the cocoa and chocolate in warm milk first, then cool it down. Also, use fine-quality cocoa powder and blend just until smooth. Grainy usually means undissolved cocoa or over-warm blending.
Is there a sugar-free option?
Yes.
Use an unsweetened cocoa mix or make your own (cocoa powder + a zero-cal sweetener like erythritol or allulose). Choose sugar-free chocolate chips if you want to go all-in.
Can I make this ahead for a party?
Prep the chocolate base in a pitcher and chill it. When guests arrive, blend batches with ice.
Keep toppings ready in little bowls so everyone can customize. Easy, fast, and looks fancy.
What if my drink separates?
It happens if it sits too long. Just re-blend for a few seconds, adding a touch of ice or milk to re-emulsify.
Crisis averted.
Can I use hot chocolate packets?
Absolutely. Use 1–2 packets depending on brand strength and sweetness, then add cocoa powder to deepen flavor. Adjust sugar to taste.
Final Thoughts
This frozen hot chocolate recipe does what most desserts don’t: it feels indulgent without requiring a bakery-level skill set.
It’s fast, flexible, and fun to dress up with toppings or twists. Keep a stash of cocoa, chocolate, and ice on hand and you can turn any random Tuesday into a mini celebration. Make it once and you’ll “accidentally” host friends just to show it off.
Your blender’s about to become the MVP—use it wisely.