🍓 How To Make Chocolate Covered Strawberry Recipes That Melts in Your Mouth
👩🍳 The Home Chef's Essential Kitchen
Consistently cooking incredible, healthy meals at home is so much easier when you aren't fighting with cheap tools. These are the 5 absolute powerhouse kitchen essentials that professional chefs and serious home cooks rely on every single day to get perfect results.
🍳 Lodge 10.25" Cast Iron Skillet
The single greatest value in all of cookware. It retains heat infinitely better than cheap non-stick pans, allowing you to get a restaurant-quality crust on steaks or perfect crispy edges on cornbread. With proper care, this $20 pan will literally outlive you.
🔪 Victorinox Fibrox Pro 8" Chef's Knife
A dull knife makes cooking a frustrating chore. This specific blade is the undisputed champion of the culinary world—it holds a terrifyingly sharp edge, features a comfortable non-slip grip, and performs identical to German knives that cost quadruple the price.
🌡️ ThermoPro Instant Read Thermometer
Never serve dry chicken or undercooked pork again. An instant-read thermometer is the secret difference between amateur cooks who 'guess' when protein is done, and professionals who know exactly when to pull meat off the heat for maximum juiciness.
🍲 Lodge Enameled Cast Iron Dutch Oven
The ultimate workhorse for soups, stews, braised short ribs, and baking crusty artisanal bread. The enameled interior provides incredible heat distribution for slow-cooking while eliminating the intense seasoning maintenance required by bare cast iron.
🥄 Bpa-Free Silicone Utensil Set
Throw away those melting plastic spatulas and bacteria-harboring wooden spoons. This pure silicone set is heat-resistant up to 600°F, won't scratch your expensive pans, and features seamless designs that make cleaning out thick sauces and batters effortless.
There are few confections that capture the heart quite like a perfectly crafted chocolate-covered strawberry. It’s a symphony of flavors and textures – the crisp snap of rich, tempered chocolate giving way to the juicy, sun-ripened sweetness of a fresh strawberry. It’s an elegant dessert, a romantic gesture, and a surprisingly simple treat to whip up in your own kitchen. Forget store-bought versions; the magic truly happens when you select the freshest berries and melt down your favorite chocolate, creating a personalized masterpiece that’s far superior in taste and satisfaction.
Imagine biting into that glossy, dark shell, feeling it crackle just slightly before your teeth sink into the tender flesh of the berry, releasing a burst of natural sweetness and a delicate acidity that cuts through the decadent chocolate. The aroma alone is enough to transport you to a happy place – the deep, comforting scent of cocoa mingling with the bright, fruity perfume of strawberries. This isn’t just a dessert; it’s an experience, a moment of pure, unadulterated bliss that leaves a lingering, delightful taste on your palate. And the best part? Creating this culinary enchantment is much easier than you might think, making it an accessible luxury for any occasion, big or small.
Whether you’re celebrating a special anniversary, hosting a casual get-together, or simply treating yourself to a moment of indulgence, learning how to make chocolate covered strawberry recipes from scratch is a skill you’ll cherish. This guide is designed to empower you, transforming fresh produce and a few chocolate morsels into an irresistible treat that looks as impressive as it tastes. We’ll dive into the nuances that elevate a simple dip into a gourmet delight, ensuring every strawberry you create is a testament to flavor, texture, and pure joy.

Why This Recipe Works
This recipe for how to make chocolate covered strawberry recipes stands out because it focuses on a few critical elements that guarantee success and an absolutely divine end product. First and foremost, we emphasize the importance of quality ingredients. A truly exceptional chocolate-covered strawberry begins with vibrant, ripe, and firm strawberries – the kind that are bursting with natural sweetness and a hint of tang. Paired with high-quality chocolate, whether it’s a deep, bittersweet dark chocolate, a creamy milk chocolate, or a sweet, vanilla-kissed white chocolate, the foundation for flavor is unbeatable.
Secondly, our method prioritizes simplicity without compromising on perfection. We guide you through an easy melting process that helps achieve a smooth, glossy chocolate coating without the intimidating complexities of traditional tempering, yet still delivers a beautiful snap. We’ve honed the technique to ensure the chocolate adheres perfectly, creating a luscious shell that doesn’t crack or flake off when bitten into. The steps are intuitive, designed for home cooks of all skill levels, ensuring that even if you’ve never dipped a strawberry before, you’ll achieve professional-looking results.
Finally, this recipe excels because it empowers you with control over every detail, from the thickness of your chocolate layer to the choice of optional toppings. This customization allows you to tailor the treat precisely to your preferences, making each batch uniquely yours. By focusing on proper preparation, precise dipping techniques, and smart cooling, we ensure that every chocolate-covered strawberry is a harmonious blend of textures and tastes – a crisp, rich exterior yielding to a tender, juicy interior – making this recipe an absolute winner for consistently delicious, show-stopping results.
Ingredients

Gathering your ingredients is the first exciting step in learning how to make chocolate covered strawberry recipes. Quality truly shines through here, so opt for the best you can find!
- 1 pound (about 16-20 large) fresh Strawberries: Choose ripe, firm, vibrant red strawberries with their green caps and stems intact. They should be sweet-smelling and free of blemishes.
- 10-12 ounces (280-340g) High-Quality Chocolate:
- Dark Chocolate: For a rich, intense flavor, choose chocolate with 60-75% cacao. Chips, bars (chopped), or wafers work well.
- Milk Chocolate: For a sweeter, creamier, and more classic taste. Chips or chopped bars are ideal.
- White Chocolate: For a delicate, sweet, and vanilla-forward coating. Ensure it’s true white chocolate made with cocoa butter, not just white confectionery coating.
- Feel free to use a combination of chocolates for different batches!
- 1 tablespoon Coconut Oil or Vegetable Shortening (optional, but recommended): This helps thin the chocolate slightly for a smoother dip and a glossier finish.
- Optional Toppings (choose a few for variety and flair):
- Finely chopped nuts (pistachios, almonds, walnuts)
- Shredded coconut
- Sprinkles (rainbow, chocolate, metallic)
- Mini chocolate chips
- Crushed freeze-dried raspberries or strawberries
- Sea salt flakes (a tiny pinch on dark chocolate is divine!)
- Additional melted white or dark chocolate for drizzling
Instructions
Now, let’s dive into the simple yet satisfying process of how to make chocolate covered strawberry recipes. Follow these steps carefully for the most beautiful and delicious results.
- Prepare Your Strawberries:Gently wash the strawberries under cool, running water. It’s crucial not to remove the green caps or stems at this stage, as they act as a natural handle for dipping. Once washed, the most critical step for success is to dry them thoroughly. Lay them out on a clean kitchen towel or paper towels and let them air dry completely, or gently pat each one dry. Any moisture on the strawberries will cause the chocolate to seize or create a lumpy, unattractive coating. Patience here is key!
- Set Up Your Workspace:Line a baking sheet or a large platter with parchment paper or wax paper. This non-stick surface will be where your chocolate-covered strawberries will set without sticking. Have your optional toppings ready in small bowls, easily accessible for dipping immediately after the chocolate.
- Melt Your Chocolate (Double Boiler Method – Recommended):Chop your chocolate into small, uniform pieces if using a bar. Place the chocolate in a heatproof bowl (preferably glass or stainless steel). Set this bowl over a saucepan containing about an inch or two of simmering water, ensuring the bottom of the bowl does not touch the water. The steam from the simmering water will gently and evenly melt the chocolate. Stir occasionally with a clean, dry spatula until the chocolate is mostly melted and smooth. Remove from heat once only a few small lumps remain, and continue stirring until completely smooth. This gentle melting prevents scorching and keeps the chocolate in temper (or close to it for a good snap).Alternatively (Microwave Method): Place chopped chocolate (and optional coconut oil/shortening) in a microwave-safe bowl. Microwave in 30-second intervals, stirring thoroughly after each, until the chocolate is smooth and fully melted. Be very careful not to overheat, as chocolate can burn quickly in the microwave.
- Add Coconut Oil/Shortening (If Using):Once your chocolate is melted and smooth, stir in the optional tablespoon of coconut oil or vegetable shortening. This addition will help thin the chocolate slightly, making it easier to dip the strawberries and giving the finished product a beautiful, glossy sheen. Stir until fully incorporated and the chocolate is silky smooth.
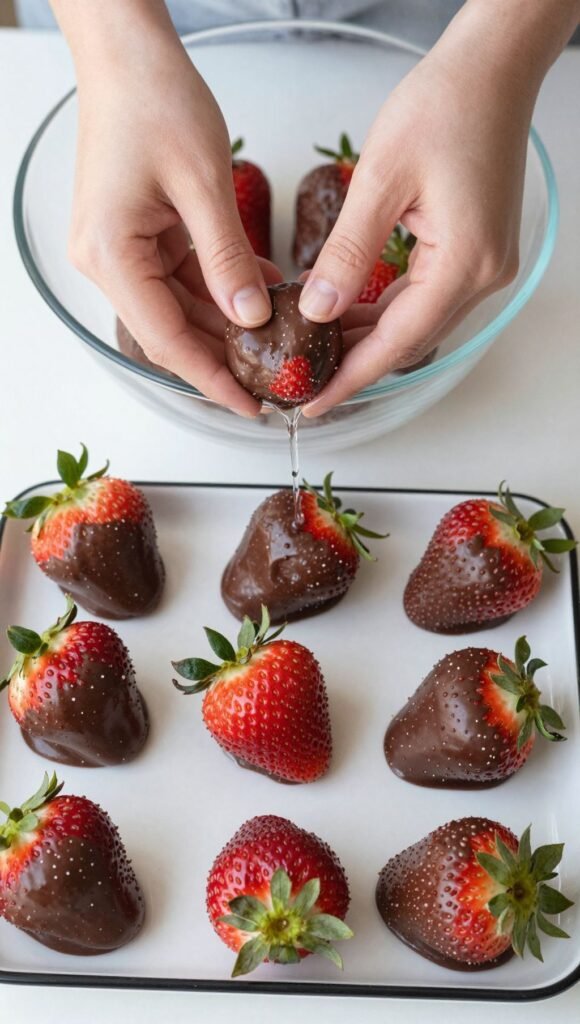
- Dip the Strawberries:Holding a strawberry by its green stem, dip it into the melted chocolate. Submerge the strawberry almost entirely, leaving a small collar of red showing at the top near the stem. Gently lift the strawberry from the chocolate. Allow any excess chocolate to drip back into the bowl by gently rotating the strawberry and tapping your wrist lightly against the edge of the bowl. This creates a clean, even coating and prevents a thick “foot” of chocolate at the base.
- Add Toppings (If Desired):If you’re adding toppings, do so immediately after dipping, while the chocolate is still wet. Gently roll the chocolate-covered portion of the strawberry into your chosen toppings, or sprinkle them over. For drizzling, wait until the first chocolate layer is set, then use a spoon or a piping bag with a very small hole to drizzle contrasting melted chocolate over the set berries.
- Place on Parchment Paper to Set:Carefully place each dipped strawberry onto the prepared parchment-lined baking sheet. Ensure there’s a little space between each berry so they don’t touch while setting.
- Chill to Set:Once all your strawberries are dipped, place the baking sheet into the refrigerator. Chill for at least 15-30 minutes, or until the chocolate is completely set and firm to the touch. The chocolate will become beautifully glossy and have a satisfying snap.
- Serve and Enjoy:Once set, your homemade chocolate-covered strawberries are ready to be devoured! Arrange them artfully on a platter and serve immediately for the best texture and flavor. They are truly best enjoyed fresh, when the chocolate is crisp and the strawberry is at its juiciest.
Tips for Success
Mastering how to make chocolate covered strawberry recipes is all about a few key details that elevate them from good to absolutely glorious. Here are some pro tips to ensure your success every single time:
- Dry Strawberries are Non-Negotiable: This is arguably the most critical tip. Any trace of water on your strawberries will cause your beautiful, smooth melted chocolate to “seize” – meaning it will instantly thicken, become grainy, and unusable for dipping. After washing, lay your strawberries on a clean towel and allow them to air dry completely, or meticulously pat each one dry with paper towels. You want them bone-dry before they even think about touching the chocolate.
- Choose the Right Chocolate: Not all chocolate is created equal for dipping. Opt for high-quality chocolate chips, baking bars, or couverture chocolate. These typically contain a higher percentage of cocoa butter, which contributes to a smoother melt, a glossier finish, and a better “snap” when set. Avoid chocolate syrups or confectionery coatings that aren’t true chocolate, as they often don’t set as well or taste as rich.
- Melt Chocolate Gently and Slowly: Overheating chocolate is a common pitfall. Using a double boiler (a heatproof bowl set over simmering water) is the gentlest and most forgiving method. If using a microwave, heat in short bursts (30 seconds at a time) and stir thoroughly after each. Chocolate retains its heat, so even if it looks like there are still a few lumps, remove it from the heat and continue stirring; the residual heat will melt them. This gentle approach helps maintain the chocolate’s temper, leading to a much better texture and shine.
- Use Coconut Oil or Shortening for Gloss and Smoothness: Adding a teaspoon or tablespoon of refined coconut oil or vegetable shortening to your melted chocolate is a game-changer. It slightly thins the chocolate, making it easier to achieve a smooth, even coating on your strawberries. It also contributes to a beautiful, professional-looking gloss and a delightful mouthfeel. Make sure to use refined coconut oil if you don’t want any coconut flavor to transfer to your chocolate.
- Chill Just Enough: While chilling is necessary for the chocolate to set, don’t over-chill your strawberries. Leaving them in the refrigerator for too long can cause condensation to form on the chocolate when they’re brought back to room temperature, which can make the chocolate look dull or “bloom” (develop a white, powdery film). Aim for 15-30 minutes, or just until the chocolate is firm to the touch. For best flavor and texture, serve them within an hour or two of setting.
Storage Instructions

Proper storage is key to maintaining the freshness and beauty of your chocolate-covered strawberries. While they are undoubtedly best enjoyed fresh, you can store them for a short period to savor them later.
Once the chocolate has fully set in the refrigerator, carefully transfer the strawberries from the parchment-lined baking sheet to an airtight container. Arrange them in a single layer if possible, or separate layers with additional parchment paper to prevent them from sticking together or damaging the chocolate coating. Store the container in the refrigerator.
Chocolate-covered strawberries are best consumed within 1-2 days. Beyond this timeframe, the strawberries can start to release moisture, which can cause the chocolate to become sticky or dull, and the berries themselves may soften too much. If you notice any condensation on the chocolate when taking them out of the fridge, let them sit at room temperature for about 10-15 minutes before serving to allow the condensation to evaporate naturally, which helps maintain the chocolate’s shine and snap.
FAQ
Q1: Can I use frozen strawberries for this recipe?
A1: Unfortunately, no. Frozen strawberries contain a much higher water content than fresh ones. When thawed, they release a significant amount of liquid, which will make them soggy and cause the chocolate to seize or slide right off. For truly delicious chocolate-covered strawberries, always opt for fresh, firm, and thoroughly dried berries.
Q2: Why did my chocolate seize or become lumpy when melting?
A2: Chocolate seizing, or becoming thick and grainy, is almost always due to the introduction of even a tiny drop of water or being overheated. Ensure your melting bowl, spatula, and any utensils are completely dry. If using a double boiler, make sure the bottom of the bowl does not touch the simmering water and that no steam escapes into the chocolate. If using a microwave, heat in short intervals and stir frequently to prevent scorching. If it does seize, sometimes adding a teaspoon of vegetable oil or shortening (not water!) and stirring vigorously can sometimes salvage it, but it may not be as smooth.
Q3: How long do chocolate-covered strawberries last, and how should I store them?
A3: Chocolate-covered strawberries are best enjoyed within 1-2 days of preparation. Store them in a single layer in an airtight container in the refrigerator. If you need to stack them, place a layer of parchment paper between them to prevent sticking and damage to the chocolate. Beyond two days, the strawberries tend to soften and release moisture, which can affect the chocolate’s texture and appearance.
Q4: What kind of chocolate is best for dipping?
A4: The “best” chocolate is largely a matter of personal preference! However, for optimal results, choose high-quality chocolate chips, baking bars, or couverture chocolate. These typically have a good cocoa butter content, which helps with smooth melting, a glossy finish, and a satisfying snap. Dark chocolate (60-75% cacao) offers a rich, intense contrast to the sweet berry. Milk chocolate provides a sweeter, creamier experience, while white chocolate offers a delicate, vanilla-forward flavor. Experiment with different types or even use a combination for a varied platter!
🍰 The Master Baker & Prep Kit
Baking is a science, and meal prep requires efficiency. If you want consistently flaky pie crusts, perfectly risen cakes, and healthy meals ready for the week, these are the 5 upgrade tools that take your execution to the next level.
⚖️ OXO Good Grips 11lb Food Scale
The secret to why bakery bread and cookies are always perfect while home batches vary wildly. Measuring by weight (grams) instead of volume (cups) guarantees precise hydration and flawlessly consistent results every single time you bake.
🧑🍳 KitchenAid Classic Stand Mixer
The undisputed holy grail of the kitchen. From aggressively kneading heavy pizza doughs to whipping meringues into stiff peaks, this powerful motor saves your arms from exhaustion and cuts your hands-on prep time in half.
🍪 Silpat Premium Silicone Baking Mats
Stop wasting money on rolls of parchment paper or agonizing over cookies permanently fused to your metal pans. These reusable, professional-grade silicone mats ensure completely even heat distribution and instantly release even the stickiest caramel.
🌪️ Braun MultiQuick Immersion Blender
The ultimate shortcut tool for creamy tomato soups, lump-free gravies, and rapid smoothies. Avoid the burns and mess of dangerously transferring boiling liquids in batches to a traditional blender by simply blending right inside your cooking pot.
🍱 Premium Glass Meal Prep Containers
If you want to bake and cook healthier, batch preparation is required. These durable glass containers transition safely from freezer to microwave, never absorb tomato sauce stains, and feature airtight seals to keep your hard work fresh all week.
Conclusion
There’s an undeniable magic that happens when the vibrant sweetness of a fresh strawberry meets the sophisticated richness of melted chocolate. Learning how to make chocolate covered strawberry recipes is more than just following steps; it’s about creating moments of pure delight, whether for a special occasion or simply to brighten an ordinary day. The process is a gentle dance of preparation and precision, resulting in a treat that looks as stunning as it tastes, captivating both the eyes and the palate.
From the careful selection of plump, juicy berries to the gentle art of melting chocolate into a glossy, velvety pool, every step in this journey is designed to bring you closer to perfection. The crisp snap of the chocolate, the tender burst of the strawberry, and the harmonious blend of sweet and tart – it’s a sensory experience that lingers, leaving you craving just one more. And with the tips and tricks shared, you now have all the knowledge to confidently create these irresistible confections in your own kitchen.
So, gather your ingredients, set aside a little time, and immerse yourself in the joyful process of crafting these edible jewels. You’ll not only impress your friends and family but also discover the immense satisfaction that comes from making something so utterly delicious with your own hands. Go ahead, treat yourself and your loved ones to the simple, decadent pleasure of homemade chocolate-covered strawberries. They’re a testament to the fact that sometimes, the most extraordinary treats are born from the simplest ingredients and a little bit of love.