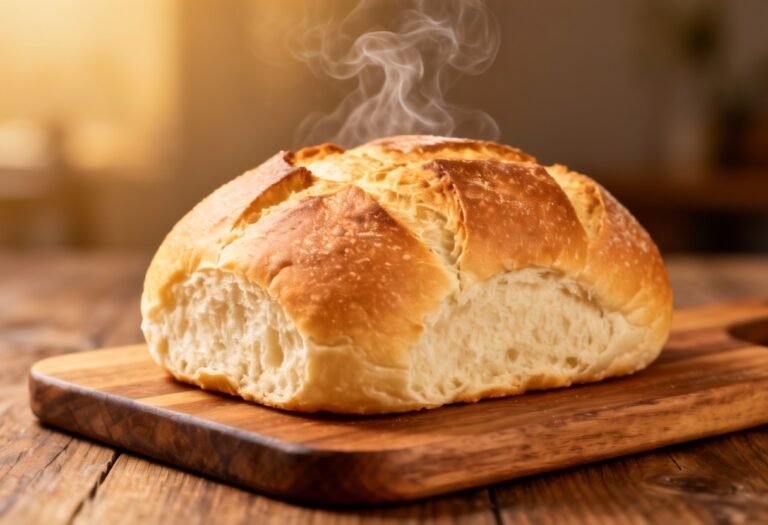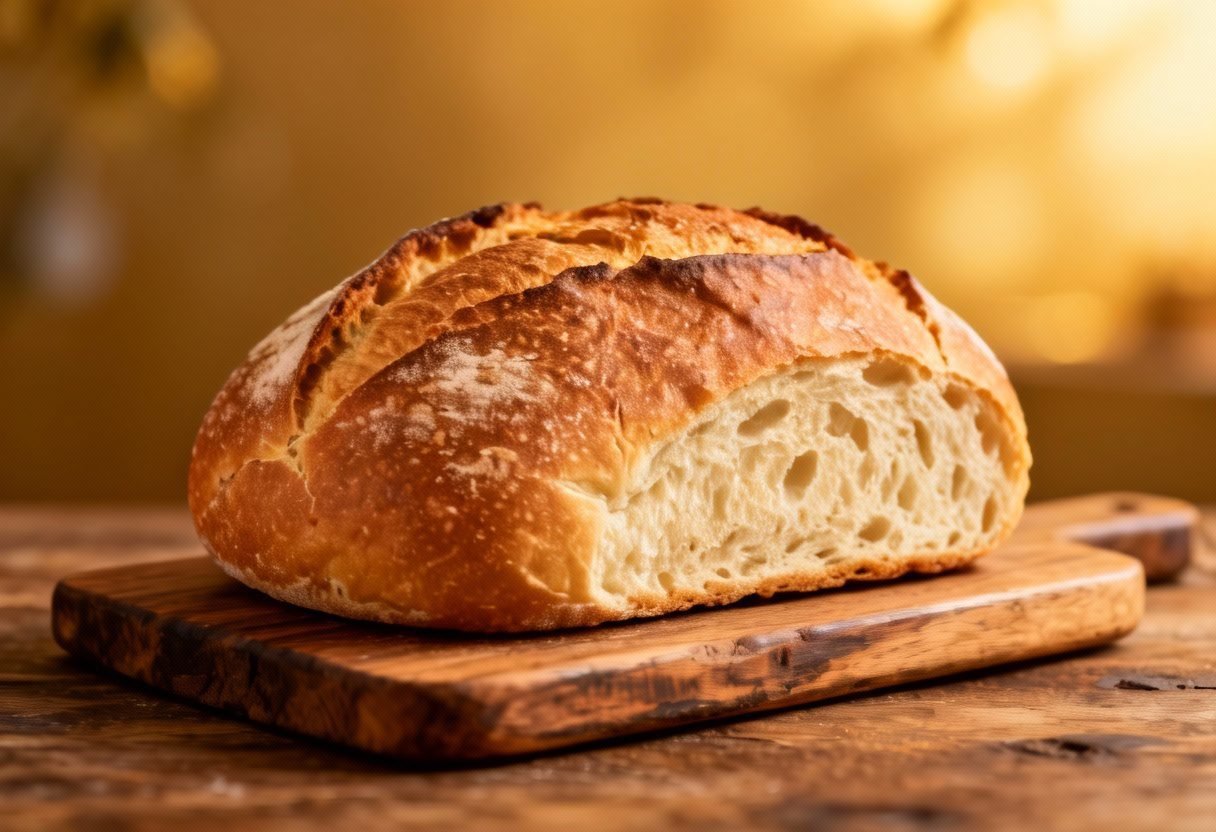
One Hour Bread Recipe: Freshly Baked Goodness in a Flash!
Craving the comforting aroma and satisfying taste of homemade bread but short on time? You’re not alone! Many of us dream of baking our own loaves, but the thought of hours spent kneading, proofing, and waiting can be daunting. That’s where this one-hour bread recipe comes to the rescue. Forget the all-day affair; this recipe delivers a delicious, crusty loaf in just 60 minutes, from start to finish. Get ready to impress your family and friends (and yourself!) with bread so good, they’ll think you spent all day in the kitchen.
Why This Recipe Works
The secret to this speedy bread lies in a few key techniques:
- Instant Yeast: Unlike traditional yeast that requires a lengthy proofing period, instant yeast can be added directly to the dry ingredients, significantly cutting down on preparation time.
- Warm Water: Using warm water activates the yeast quickly, jumpstarting the fermentation process.
- High Hydration: A higher water-to-flour ratio creates a looser dough that requires minimal kneading. This also results in a more open crumb structure and a chewier texture.
- Oven Temperature: Baking at a high temperature creates a crispy crust and allows the bread to rise quickly.
Ingredients
- 3 cups (375g) all-purpose flour, plus more for dusting
- 1 ½ teaspoons instant yeast
- 1 ½ teaspoons salt
- 1 ½ cups (360ml) warm water (around 110°F/43°C)
- 1 tablespoon olive oil, plus more for greasing the bowl

Instructions
- Combine Dry Ingredients: In a large bowl, whisk together the flour, instant yeast, and salt. Ensure the yeast is evenly distributed throughout the flour.
- Add Water: Pour the warm water into the dry ingredients. Use a wooden spoon or your hands to mix until a shaggy dough forms. The dough will be quite wet and sticky, and that’s perfectly fine.
- First Rise (30 Minutes): Lightly grease a large bowl with olive oil. Transfer the dough to the bowl, turning to coat it in the oil. Cover the bowl with plastic wrap or a clean kitchen towel. Let the dough rise in a warm place for 30 minutes. This rise, though short, is crucial for developing some flavor and structure.
- Shape the Dough: After 30 minutes, gently punch down the dough to release some of the air. Turn the dough out onto a lightly floured surface. Shape the dough into a round or oblong loaf. Don’t worry about being too precise; a rustic shape adds to the charm.
- Second Rise (10 Minutes): Place the shaped loaf on a baking sheet lined with parchment paper. Cover loosely with plastic wrap or a clean kitchen towel and let it rise for another 10 minutes. While the dough rests, preheat your oven to 450°F (232°C).
- Score the Dough: Using a sharp knife or a lame, score the top of the loaf with a few diagonal slashes or a single long slash down the center. This allows the bread to expand properly in the oven and prevents it from cracking unevenly.
- Bake: Place the baking sheet in the preheated oven. Bake for 20-25 minutes, or until the bread is golden brown and the internal temperature reaches 200-210°F (93-99°C). You can check the temperature using an instant-read thermometer.
- Cool: Remove the bread from the oven and transfer it to a wire rack to cool completely before slicing. This is important, as slicing hot bread can result in a gummy texture.
Tips for Success
- Water Temperature: The water temperature is crucial for activating the yeast. Too cold, and the yeast won’t activate; too hot, and you’ll kill the yeast. Aim for around 110°F (43°C).
- Don’t Over-Knead: This recipe is designed for minimal kneading. Over-kneading can result in a tough bread. Just mix the ingredients until they come together.
- Warm Place for Rising: Finding a warm spot for the dough to rise will help it rise faster. A slightly warm oven (turned off), a sunny windowsill, or even the top of your refrigerator can work well.
- Scoring is Important: Don’t skip the scoring step! It helps control the expansion of the bread in the oven and prevents unsightly cracks.
- Oven Variations: Ovens can vary in temperature, so keep an eye on the bread while it’s baking. If it starts to brown too quickly, you can tent it with foil.
- Experiment with Flavor: Feel free to add herbs, spices, or cheese to the dough for extra flavor. Rosemary, garlic powder, or shredded cheddar cheese are all great additions.
Storage Instructions
To keep your one-hour bread fresh, store it properly:
- Room Temperature: Store the bread in a bread box or a paper bag at room temperature for up to 2-3 days. Avoid storing it in a plastic bag, as this can trap moisture and cause it to become stale more quickly.
- Freezer: For longer storage, you can freeze the bread. Wrap it tightly in plastic wrap and then in foil, or place it in a freezer-safe bag. Frozen bread can be stored for up to 2-3 months. To thaw, let it sit at room temperature for a few hours or overnight. You can also reheat it in the oven to restore its crusty texture.

FAQ
Q: Can I use bread flour instead of all-purpose flour?
A: Yes, you can use bread flour. It will result in a slightly chewier and more structured loaf. You may need to add a little more water if the dough seems too dry.
Q: Can I use active dry yeast instead of instant yeast?
A: Yes, but you’ll need to activate the active dry yeast first. Dissolve it in the warm water with a teaspoon of sugar and let it sit for 5-10 minutes until it becomes foamy. Then, add it to the dry ingredients.
Q: My dough is too sticky. What should I do?
A: A sticky dough is normal for this recipe. Resist the urge to add more flour, as this can result in a dry bread. Just work with it gently on a lightly floured surface.
Q: My bread didn’t rise much. What went wrong?
A: Several factors can affect the rise of the bread. Make sure your yeast is fresh and active, the water is the correct temperature, and the dough is in a warm place. Also, avoid using expired yeast.
Q: Can I make this recipe gluten-free?
A: While this specific recipe is not designed for gluten-free baking, you can adapt it using a gluten-free flour blend and a gluten-free bread recipe as a guide for proportions and techniques.
Conclusion
This one-hour bread recipe is a game-changer for anyone who loves fresh bread but doesn’t have hours to spend in the kitchen. With just a few simple ingredients and a little bit of effort, you can enjoy a warm, crusty loaf of homemade bread in no time. So, ditch the store-bought bread and give this recipe a try. You’ll be amazed at how easy and rewarding it is to bake your own bread!