🔴 Red Velvet Cinnamon Rolls Recipe: Gooey, Fluffy & Tangy
So, you’re having an internal debate: Cake for breakfast, or actual breakfast food? Let me solve that for you.
Por que no los dos? Seriously, stop agonizing over it. We are adults, and we deserve nice things. And by nice things, I mean a giant, fluffy pastry that is essentially a slice of decadent red velvet cake disguised as a socially acceptable morning meal.
If you’ve ever looked at a regular cinnamon roll and thought, “This is good, but it could be more… dramatic,” then you have found your people. These aren’t just rolls; they are an event.
Why This Recipe is Awesome (Like, Seriously)
Look, I love a classic cinnamon roll as much as the next carb-enthusiast. But sometimes, basic just doesn’t cut it. Sometimes you need something that screams “I spent way too much time on Pinterest.”
This red velvet cinnamon rolls recipe is that thing. It’s the mashup you didn’t know you needed until right this second.
Here’s why this specific recipe is going to ruin you for all other breakfast pastries:
- The Flavor Profile is Wild: You might think cocoa and cinnamon are strange bedfellows, but trust me on this. The slight bitterness of the cocoa powder in the dough perfectly balances the aggressively sweet cinnamon-sugar filling. It’s complex, man.
- The Texture is Ridiculous: We are using buttermilk in the dough. Why? Because science. The acid in the buttermilk tenderizes gluten, meaning these rolls are insanely soft, pillowy, and practically melt in your mouth. None of that tough, chewy nonsense here.
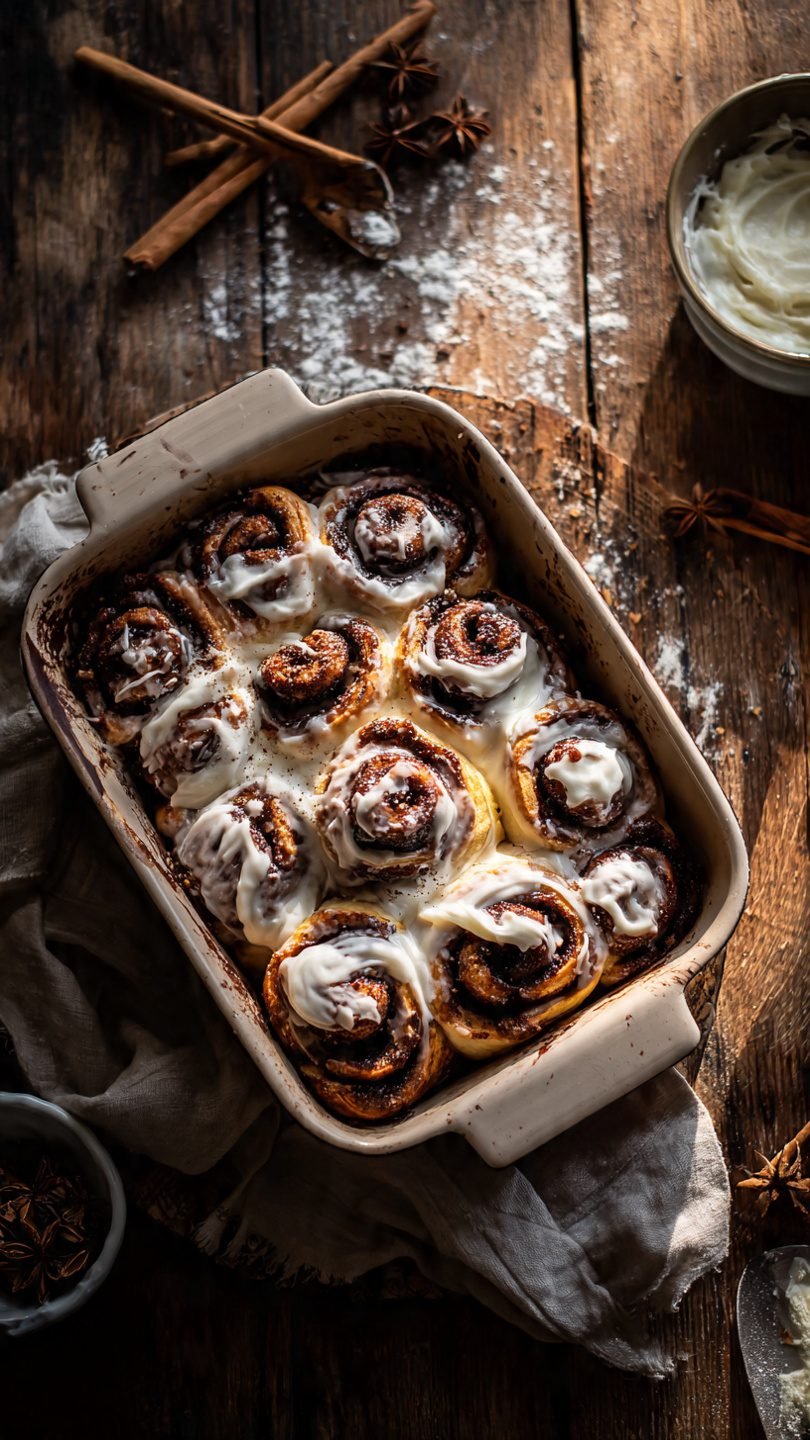
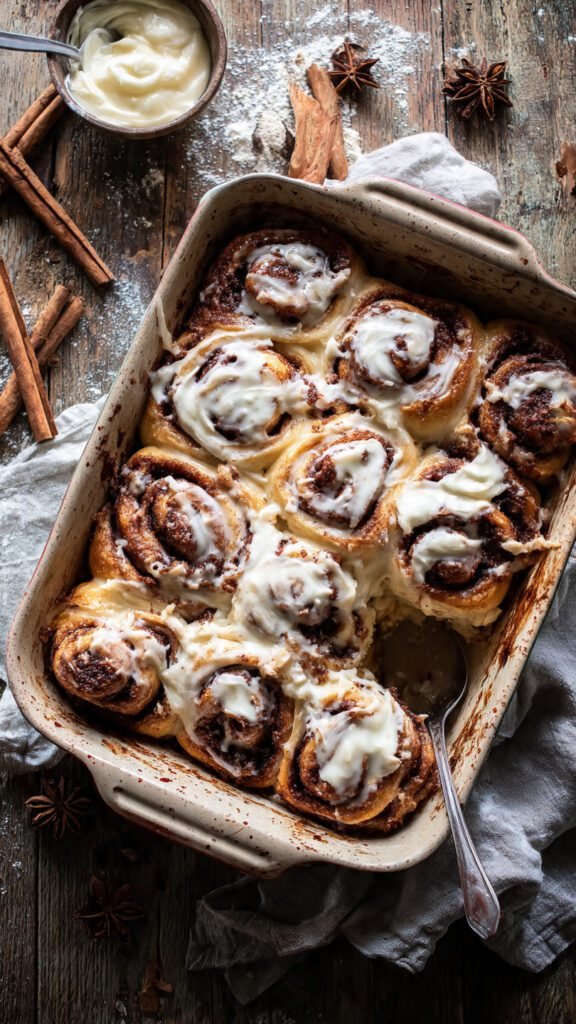
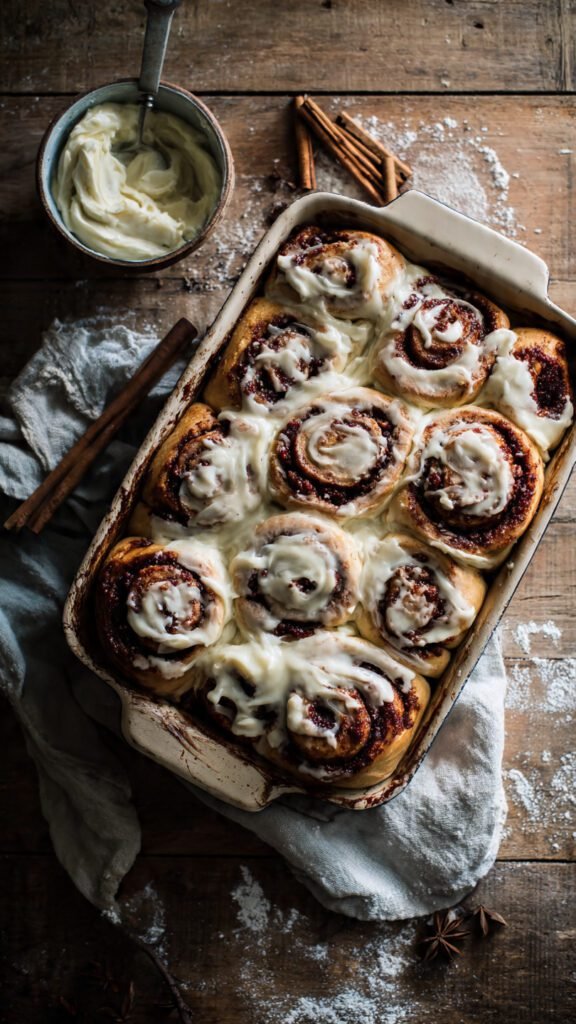
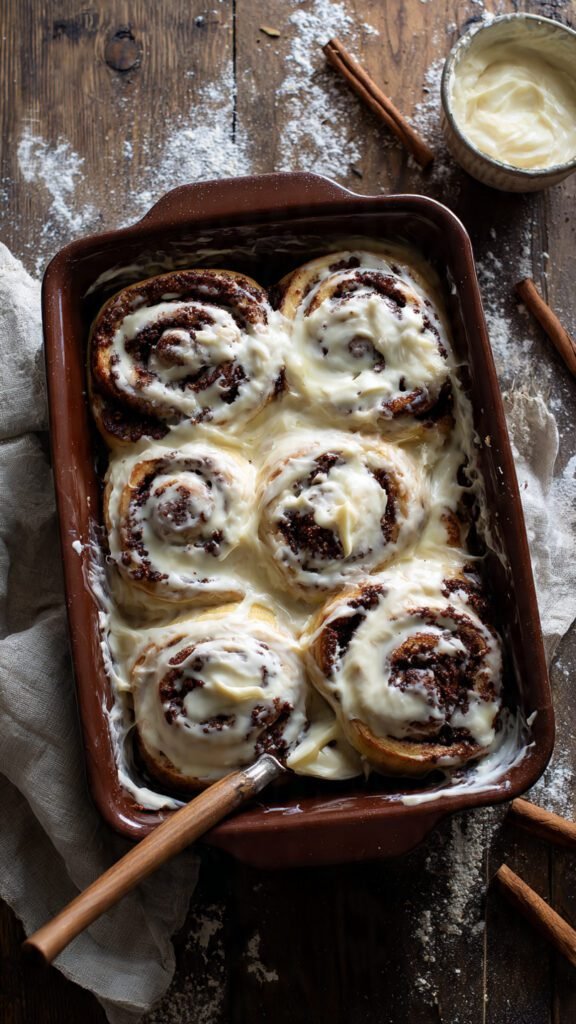
- That Color, Though: Let’s be vain for a second. They are gorgeous. The vibrant red dough swirled with the dark cinnamon filling creates a visual stunner that guarantees at least 50 likes on Instagram before you even take a bite.
- The Frosting Factor: A red velvet vehicle requires a cream cheese passenger. It’s non-negotiable. We aren’t using a thin glaze here; we are slathering on a thick, tangy, velvety cream cheese frosting that cuts through the richness of the roll. It’s messy, it’s glorious, and it’s mandatory.
Ingredients You’ll Need
Don’t panic; you probably have most of this stuff. It looks like a lot, but it’s mostly standard baking pantry staples.
For the Tangy Red Dough:
- Milk: Whole milk is best here. We want fat.
- Instant Yeast: Because who has time to wait for active dry yeast to proof? We want rolls now. (FYI: If you only have active dry, you’ll just need to let it sit in the warm milk for 5-10 mins until foamy first).
- Granulated Sugar: To feed the yeast and sweeten the deal.
- Unsalted Butter: Melted and slightly cooled so we don’t kill the yeast.
- An Egg: Room temperature, please. It helps bind everything together.
- Buttermilk: The secret weapon for tenderness. If you don’t have it, don’t fret (see the substitutions section below).
- Vanilla Extract: Measure with your heart, not a spoon.
- Red Food Coloring: Okay, listen up. Do NOT use those cheap little liquid drops from the grocery store aisle. You will need the whole bottle and your rolls will turn out a sad, dusty pink. Use gel food coloring. It’s concentrated and gives you that vibrant, dramatic red without watering down the dough.
- All-Purpose Flour: The backbone of the operation.
- Cocoa Powder: Unsweetened. Just enough to give it that authentic red velvet flavor hint, but not enough to make them chocolate rolls.
- Salt: To balance the sweet.
For the Gooey Filling:
- Unsalted Butter: Very soft, almost melty.
- Brown Sugar: Light or dark, doesn’t matter. This creates the caramel goo.
- Ground Cinnamon: The star of the show.
- Cocoa Powder: A tiny extra pinch in the filling bridges the gap between the dough and the swirl.
For the Mandatory Cream Cheese Frosting:
- Cream Cheese: Brick style, full fat, room temperature. Do not use tub cream cheese unless you want sweet soup poured over your rolls.
- Butter: Softened.
- Powdered Sugar: To make it sweet and fluffy.
- Vanilla & pinch of salt.
Step-by-Step Instructions
Let’s do this. Put on some tunes, maybe pour a mimosa. Baking should be fun.
Phase 1: The Dough
- Warm the Milk: Heat your milk in the microwave until it’s lukewarm (about 110°F if you’re a nerd with a thermometer). It should feel like warm bathwater. If it’s too hot, you’ll murder your yeast, and your rolls will be dense hockey pucks.
- Mix the Wets: In the bowl of your stand mixer (or a large bowl if you’re looking for an arm workout), whisk together the warm milk, sugar, melted butter, egg, buttermilk, vanilla, and the yeast.
- Make it Bleed: Add the red gel food coloring to the wet mixture. Whisk it in well. It should look alarmingly bright right now—that’s good.
- Add Dry Ingredients: Toss in the flour, cocoa powder, and salt.
- Knead It: Using the dough hook, mix on low until combined, then bump it to medium-low and let it knead for about 7–10 minutes. You want a smooth, elastic dough that pulls away from the sides of the bowl. It will still be slightly tacky to the touch, but shouldn’t be a sticky mess. Tip: If it’s way too sticky, add flour 1 tablespoon at a time. If it seems dry and tough, add a splash more warm milk.
- The First Rise (The Nap): Grease a large bowl. Shape your dough into a pretty red ball, place it in the bowl, and cover it tightly with plastic wrap or a clean kitchen towel. Stick it somewhere warm (like inside your turned-off oven with just the light on). Let it rise for 1 to 1.5 hours, or until it has doubled in size and looks puffy and proud.
Phase 2: The Fill & Roll
- Prep the Filling: While the dough naps, mix your brown sugar, cinnamon, and that pinch of cocoa powder in a small bowl. Have your soft butter ready.
- Roll It Out: Punch down the risen dough (very satisfying) to release air bubbles. Turn it out onto a lightly floured surface. Using a rolling pin, roll it into a large rectangle, roughly 12×16 inches. It doesn’t have to be perfect; rustic is charming.
- Slather & Sprinkle: Spread the softened butter all over the dough rectangle, right to the edges. Then, sprinkle your cinnamon-sugar mixture evenly over the butter. Pat it down gently so it sticks.
- The Roll Up: Starting from the long side closest to you, tightly roll the dough up into a log. Try to keep it tight so the filling doesn’t escape later. Pinch the seam at the end to seal it.
Phase 3: Cut, Rise, & Bake
- The Cut: Cut the log into 12 even rolls. Pro Tip: Do not use a knife to saw back and forth; you’ll squish your beautiful swirl. Use unflavored dental floss. Slide the floss under the log, cross it over the top, and pull tight to snip cleanly through the dough. It’s oddly satisfying.
- The Second Rise: Place your rolls into a greased 9×13 baking pan. Cover them back up and let them rise again for about 30–45 minutes while you preheat your oven to 350°F (175°C). They should look puffy and be touching each other snugly.
- Bake: Bake for 20–25 minutes. They are done when the edges are slightly golden (hard to tell on red dough, I know) and the centers don’t look raw.
- The Frosting: While they bake, whip your room-temp cream cheese and butter until smooth. Slowly beat in the powdered sugar, vanilla, and salt until fluffy and tangy.
- The Finale: Let the rolls cool for about 10 minutes before slathering them with the frosting. If you frost them piping hot, the frosting will melt entirely. (Which, honestly, isn’t the worst thing in the world, but it looks less pretty).
Common Mistakes to Avoid
Don’t sabotage your own breakfast! Watch out for these pitfalls.
- Killing the Yeast: I mentioned it before, but it bears repeating. If your milk is hot to the touch, let it cool down. Dead yeast equals dense, sad rolls.
- Using Cold Ingredients: Cold eggs and cold buttermilk will shock your warm yeast mixture and cause the butter to re-solidify into weird clumps. Room temperature everything is key for a smooth dough.
- Not Using Gel Coloring: Seriously, don’t try this with the liquid drops. You will be disappointed by your brownish-pink rolls.
- Over-flouring the Dough: It’s tempting to keep adding flour if the dough feels sticky. Resist! Too much flour makes dry, tough rolls. Only add enough so you can handle it. The dough should be soft.
- Rushing the Rise: Yeast cannot be rushed. If your kitchen is cold, it might take longer than an hour for the first rise. Give the dough the time it needs to double in size. Patience is a virtue, especially when cinnamon rolls are involved.
Alternatives & Substitutions
We all have those moments when we open the fridge and realize we’re missing something.
- No Buttermilk? No problem. Make “sour milk.” Measure just under 1/2 cup of regular milk and add 1.5 teaspoons of white vinegar or lemon juice. Let it sit for 5 minutes until it looks curdled and gross. Voila—buttermilk substitute.
- Can I make them Dairy-Free? IMO, these are best with real dairy fat. But yes, you can use plant-based milk (soy or almond work best), vegan butter sticks, and vegan cream cheese. They will still be good, just slightly less rich.
- Bread Flour vs. All-Purpose: You can absolutely use bread flour. It will give the rolls a slightly chewier, sturdier texture, more like a bakery bun. All-purpose makes them softer and cakier. Both are delicious.
- Cream Cheese Haters: First of all, who hurt you? Second, if you must, you can use a standard vanilla powdered sugar glaze (milk + powdered sugar + vanilla). But it won’t feel like true red velvet without the tang.
FAQ (Frequently Asked Questions)
Can I make these ahead of time? Yes! You can do the “overnight” method. After you cut the rolls and put them in the pan (Step 11), cover them tightly and put the whole pan in the fridge overnight instead of doing the second rise. In the morning, pull them out, let them come to room temperature and finish rising on the counter (about an hour), then bake. Fresh hot rolls for breakfast without the 5 AM wake-up call.
Why didn’t my rolls turn bright red? Did you use the liquid drops instead of the gel? Be honest. The cocoa powder also darkens the dough, so if you used too much cocoa, it can muddy the red color.
How do I store leftovers? Because of the cream cheese frosting, these should be stored in an airtight container in the fridge for up to 4 days.
What’s the best way to reheat them? Microwave them for about 15-20 seconds. They get instantly gooey and soft again.
Can I freeze them? Yes. You can freeze baked, unfrosted rolls. Wrap them tightly. Thaw and warm them before frosting.
Final Thoughts
There you have it. A red velvet cinnamon rolls recipe that is guaranteed to make you the hero of brunch, Christmas morning, or just an average Tuesday that needs saving.
Are they healthy? absolutely not. Are they worth every single calorie? A thousand percent yes.
Now go forth, make a mess in your kitchen, stain your fingers red, and impress someone—even if that someone is just yourself looking in the mirror. You’ve earned this gooey masterpiece. Happy baking!