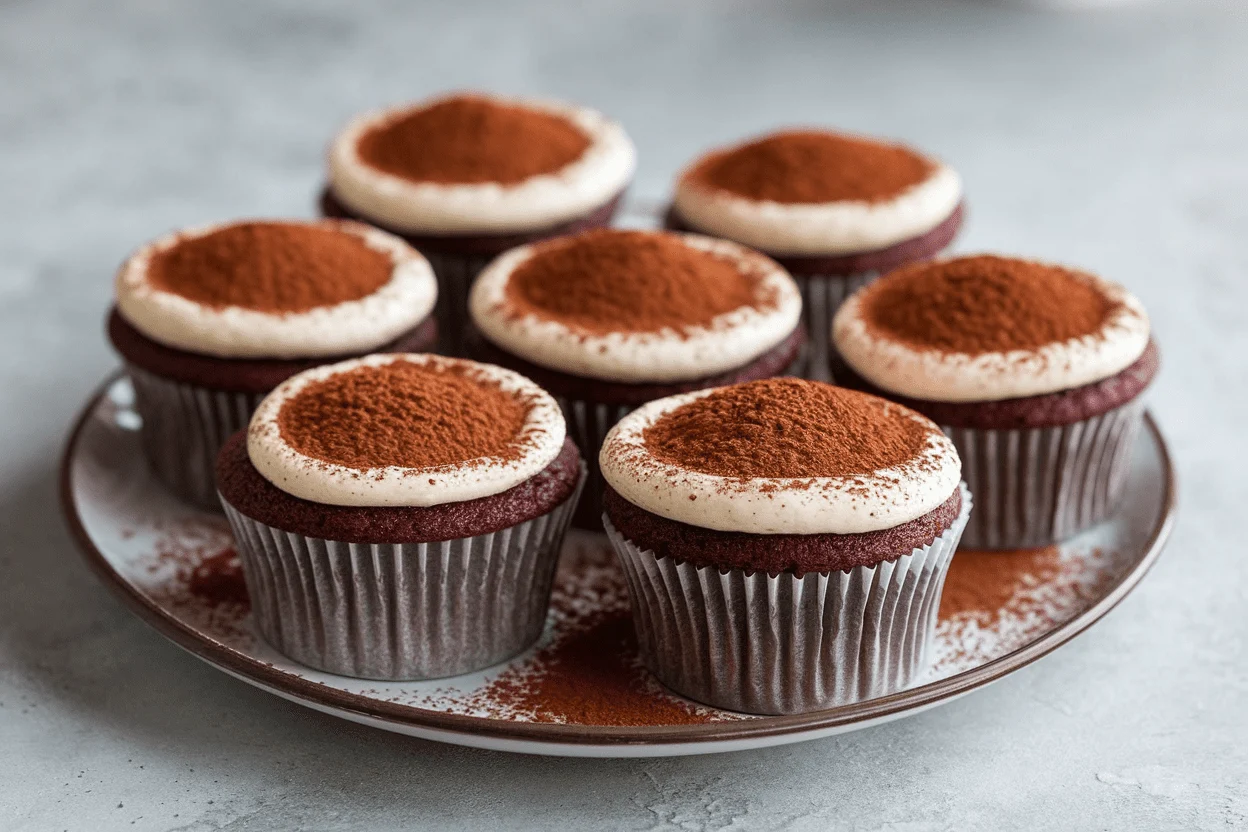
Red Velvet Cupcakes Recipe That Break the Internet: Bakery-Perfect, Zero Fuss
👩🍳 The Home Chef's Essential Kitchen
Consistently cooking incredible, healthy meals at home is so much easier when you aren't fighting with cheap tools. These are the 5 absolute powerhouse kitchen essentials that professional chefs and serious home cooks rely on every single day to get perfect results.
🍳 Lodge 10.25" Cast Iron Skillet
The single greatest value in all of cookware. It retains heat infinitely better than cheap non-stick pans, allowing you to get a restaurant-quality crust on steaks or perfect crispy edges on cornbread. With proper care, this $20 pan will literally outlive you.
🔪 Victorinox Fibrox Pro 8" Chef's Knife
A dull knife makes cooking a frustrating chore. This specific blade is the undisputed champion of the culinary world—it holds a terrifyingly sharp edge, features a comfortable non-slip grip, and performs identical to German knives that cost quadruple the price.
🌡️ ThermoPro Instant Read Thermometer
Never serve dry chicken or undercooked pork again. An instant-read thermometer is the secret difference between amateur cooks who 'guess' when protein is done, and professionals who know exactly when to pull meat off the heat for maximum juiciness.
🍲 Lodge Enameled Cast Iron Dutch Oven
The ultimate workhorse for soups, stews, braised short ribs, and baking crusty artisanal bread. The enameled interior provides incredible heat distribution for slow-cooking while eliminating the intense seasoning maintenance required by bare cast iron.
🥄 Bpa-Free Silicone Utensil Set
Throw away those melting plastic spatulas and bacteria-harboring wooden spoons. This pure silicone set is heat-resistant up to 600°F, won't scratch your expensive pans, and features seamless designs that make cleaning out thick sauces and batters effortless.
You know that one dessert that makes people stop mid-conversation and ask, “Who made these?” That’s these red velvet cupcakes. They’re plush, deeply cocoa-kissed, and topped with a tangy cream cheese cloud that basically disappears in your mouth. No boxed shortcuts, no weird aftertaste, just pure, show-stopping flavor.
If you’ve ever wanted bakery-level results without bakery-level drama, this is your mic-drop moment.
Why You’ll Love This Recipe
- Crazy moist crumb: Buttermilk and oil create a tender, melt-in-your-mouth texture that stays soft for days.
- Balanced flavor: The cocoa, vanilla, and a whisper of tang make these taste like more than “just red cake.” They’re layered and legit.
- Foolproof rise: Vinegar meets baking soda for that signature lift—domed tops, minimal sink, chef’s kiss.
- Iconic look: Vivid red with creamy white frosting equals instant “save to camera roll.”
- Party-ready: Makes 12–14 standard cupcakes, perfect for birthdays, potlucks, or Tuesday. We don’t judge.
What You’ll Need (Ingredients)
- 1 1/2 cups (180 g) all-purpose flour
- 2 tablespoons unsweetened cocoa powder (natural, not Dutch-processed)
- 1 cup (200 g) granulated sugar
- 1/2 teaspoon baking soda
- 1/2 teaspoon baking powder
- 1/2 teaspoon fine salt
- 2 large eggs, room temperature
- 3/4 cup (180 ml) buttermilk, room temperature
- 1/2 cup (120 ml) neutral oil (canola, vegetable, or light olive)
- 2 teaspoons pure vanilla extract
- 1 teaspoon white vinegar
- 1 tablespoon red gel food coloring (or 2–3 tablespoons liquid; gel gives better color with less dilution)
Cream Cheese Frosting:
- 8 oz (225 g) cream cheese, cold but workable
- 1/2 cup (113 g) unsalted butter, slightly softened
- 2 1/2–3 cups (300–360 g) powdered sugar, sifted
- 1 teaspoon pure vanilla extract
- Pinch of fine salt
Let’s Get Cooking – Instructions
- Prep the stage: Preheat oven to 350°F (175°C). Line a standard muffin tin with 12–14 liners.
Set out eggs and buttermilk to warm up. Cold ingredients = sad crumb.
- Dry mix: In a large bowl, whisk flour, cocoa, sugar, baking soda, baking powder, and salt until evenly combined. No clumps, no drama.
- Wet mix: In another bowl, whisk eggs, buttermilk, oil, vanilla, vinegar, and food coloring.
Aim for a rich red; add more gel if needed.
- Combine: Pour wet into dry. Whisk gently until just smooth. Overmixing develops gluten and turns cupcakes tough—don’t do that to yourself.
- Fill: Divide batter among liners, filling each about 2/3 to 3/4 full.
A large cookie scoop = clean edges and even portions, FYI.
- Bake: Bake 16–19 minutes until tops spring back and a toothpick comes out with a few moist crumbs. Don’t wait for it to be bone-dry. Moist is the goal.
- Cool down: Let cupcakes rest in the pan for 5 minutes, then transfer to a wire rack.
Cool completely before frosting, or you’ll create a frosting slip-n-slide.
- Make frosting: Beat butter for 1 minute until creamy. Add cream cheese and beat until smooth. Gradually add powdered sugar, then vanilla and a pinch of salt.
Beat 1–2 minutes until fluffy.
- Frost like a pro: Use a piping bag with a large round or star tip, or go rustic with an offset spatula. Sprinkle with red velvet crumbs if you want to flex.
Preservation Guide
- Room temp: Unfrosted cupcakes keep in an airtight container for 2 days.
- Refrigerated: Frosted cupcakes keep 3–4 days. Bring to room temp before serving for best texture.
- Freezer: Unfrosted cupcakes freeze up to 2 months.
Wrap individually, then store in a zip bag. Thaw at room temp, then frost.
- Make-ahead frosting: Refrigerate frosting up to 5 days. Rewhip for 20–30 seconds to restore fluff.
Nutritional Perks
Red velvet’s not a salad, but it’s not chaos either.
The oil and buttermilk keep the crumb tender with less butter, and cocoa adds a hint of antioxidants (yes, really). Portion-controlled cupcakes help you enjoy dessert without a 9-inch cake staring you down. And the tangy cream cheese?
It delivers flavor so you don’t need mountains of frosting to feel satisfied.
What Not to Do
- Don’t skip the vinegar: It’s essential for lift and that classic red velvet tang.
- Don’t overmix: Once the wet meets dry, stir just until smooth. Overmixing = rubbery cupcakes. Hard pass.
- Don’t overbake: Dry cupcakes are not the personality you want.
Pull them when crumbs still cling to the tester.
- Don’t use Dutch-processed cocoa: It messes with the leavening and flavor profile. Natural cocoa is your friend.
- Don’t frost warm cupcakes: Unless you enjoy frosting avalanches. Cool completely.
Recipe Variations
- Swirled cheesecake cupcakes: Spoon a teaspoon of sweetened cream cheese into each cup and swirl before baking.
Instant marble magic.
- Chocolate-chip upgrade: Fold 1/2 cup mini chocolate chips into the batter for a little extra oomph.
- Filled center: Core baked cupcakes and fill with raspberry jam or chocolate ganache. Hidden treasure vibe.
- Gluten-free: Use a 1:1 gluten-free flour blend with xanthan gum. Check doneness on the early side.
- Lightened frosting: Swap half the cream cheese with Neufchâtel and reduce sugar by 1/2 cup.
Still luxe, slightly lighter.
- Mini cupcakes: Bake 10–12 minutes; this yields about 36 minis. Perfect for parties or portion control, IMO.
FAQ
Can I use natural food coloring?
Yes, but the color will be more muted—think deep brick rather than neon red. Beet powder or natural liquid dyes work, though you may need more to achieve saturation.
What if I don’t have buttermilk?
Make a quick sub: mix 3/4 cup milk with 2 teaspoons lemon juice or white vinegar, rest 5 minutes, then use.
It won’t be identical, but it’s close enough for prime-time.
Why is my frosting runny?
Likely too warm. Chill the bowl for 10 minutes, then rebeat. Also, always sift powdered sugar and measure it properly.
A pinch more sugar can tighten it up, but don’t overdo it.
Can I bake this as a cake?
Yes. Pour into an 8-inch square pan and bake 22–28 minutes, or make two 6-inch rounds. Same batter, same vibes, just more slices to negotiate over.
How do I get ultra-smooth tops?
Tap the filled pan gently on the counter to pop surface bubbles.
A thicker batter from gel coloring also helps. And use fresh baking soda for consistent rise.
Can I reduce the sugar?
In the cupcakes, you can trim up to 2 tablespoons with minimal impact. In the frosting, reduce by 1/2 cup and taste; the texture will be softer but still spreadable.
What piping tip should I use?
A large open star (1M) gives the classic swirl.
A round tip (2A) looks modern and clean. No bag? A zip-top bag with the corner snipped gets it done.
🍰 The Master Baker & Prep Kit
Baking is a science, and meal prep requires efficiency. If you want consistently flaky pie crusts, perfectly risen cakes, and healthy meals ready for the week, these are the 5 upgrade tools that take your execution to the next level.
⚖️ OXO Good Grips 11lb Food Scale
The secret to why bakery bread and cookies are always perfect while home batches vary wildly. Measuring by weight (grams) instead of volume (cups) guarantees precise hydration and flawlessly consistent results every single time you bake.
🧑🍳 KitchenAid Classic Stand Mixer
The undisputed holy grail of the kitchen. From aggressively kneading heavy pizza doughs to whipping meringues into stiff peaks, this powerful motor saves your arms from exhaustion and cuts your hands-on prep time in half.
🍪 Silpat Premium Silicone Baking Mats
Stop wasting money on rolls of parchment paper or agonizing over cookies permanently fused to your metal pans. These reusable, professional-grade silicone mats ensure completely even heat distribution and instantly release even the stickiest caramel.
🌪️ Braun MultiQuick Immersion Blender
The ultimate shortcut tool for creamy tomato soups, lump-free gravies, and rapid smoothies. Avoid the burns and mess of dangerously transferring boiling liquids in batches to a traditional blender by simply blending right inside your cooking pot.
🍱 Premium Glass Meal Prep Containers
If you want to bake and cook healthier, batch preparation is required. These durable glass containers transition safely from freezer to microwave, never absorb tomato sauce stains, and feature airtight seals to keep your hard work fresh all week.
In Conclusion
These red velvet cupcakes bring bakery swagger without the stress.
Fluffy crumb, vivid color, and that tangy, silky frosting everybody “just one more bites” until they vanish. Keep this recipe in your back pocket and you’ll own birthdays, potlucks, and late-night cravings like a pro. Now go bake the kind of cupcake people won’t stop talking about—because yes, you’re that person now.