This Rice Pudding Recipe Easy Enough for a Monday, Irresistible Enough for a Holiday
👩🍳 The Home Chef's Essential Kitchen
Consistently cooking incredible, healthy meals at home is so much easier when you aren't fighting with cheap tools. These are the 5 absolute powerhouse kitchen essentials that professional chefs and serious home cooks rely on every single day to get perfect results.
🍳 Lodge 10.25" Cast Iron Skillet
The single greatest value in all of cookware. It retains heat infinitely better than cheap non-stick pans, allowing you to get a restaurant-quality crust on steaks or perfect crispy edges on cornbread. With proper care, this $20 pan will literally outlive you.
🔪 Victorinox Fibrox Pro 8" Chef's Knife
A dull knife makes cooking a frustrating chore. This specific blade is the undisputed champion of the culinary world—it holds a terrifyingly sharp edge, features a comfortable non-slip grip, and performs identical to German knives that cost quadruple the price.
🌡️ ThermoPro Instant Read Thermometer
Never serve dry chicken or undercooked pork again. An instant-read thermometer is the secret difference between amateur cooks who 'guess' when protein is done, and professionals who know exactly when to pull meat off the heat for maximum juiciness.
🍲 Lodge Enameled Cast Iron Dutch Oven
The ultimate workhorse for soups, stews, braised short ribs, and baking crusty artisanal bread. The enameled interior provides incredible heat distribution for slow-cooking while eliminating the intense seasoning maintenance required by bare cast iron.
🥄 Bpa-Free Silicone Utensil Set
Throw away those melting plastic spatulas and bacteria-harboring wooden spoons. This pure silicone set is heat-resistant up to 600°F, won't scratch your expensive pans, and features seamless designs that make cleaning out thick sauces and batters effortless.
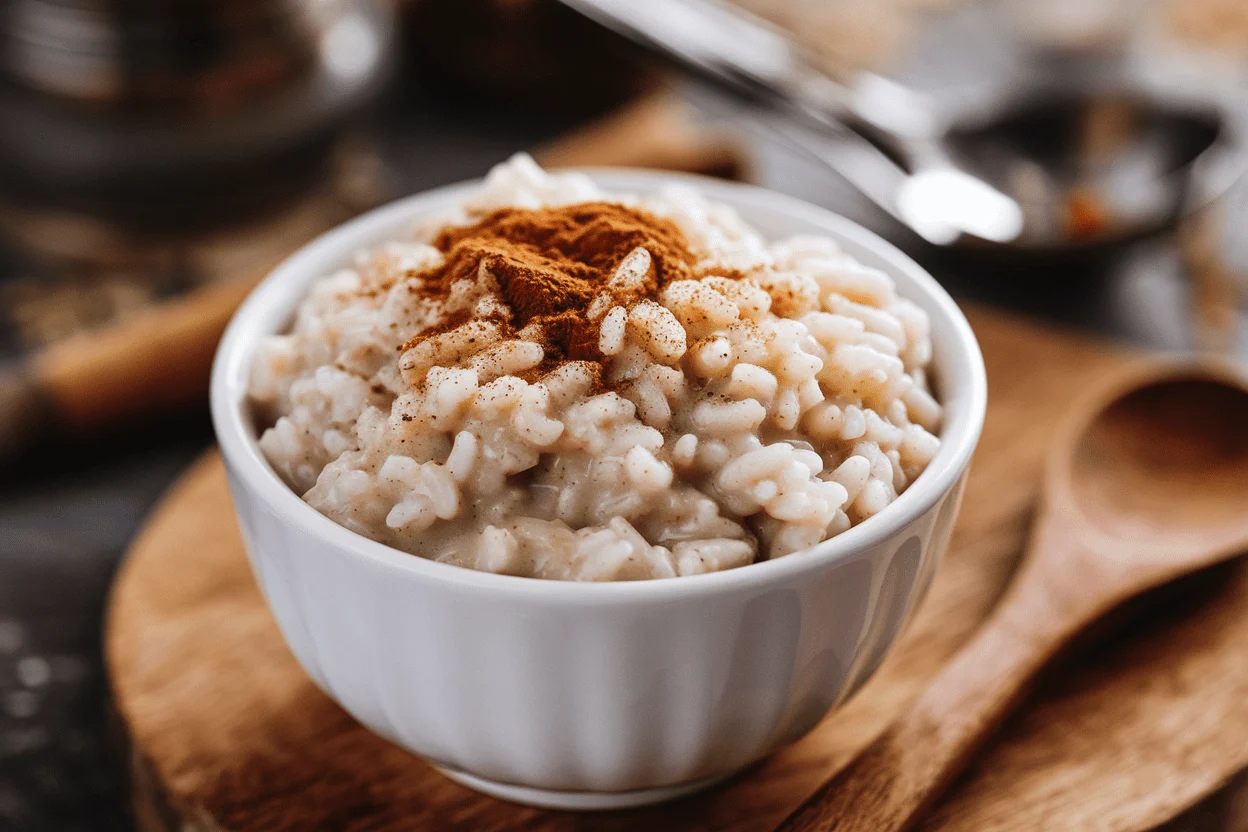
You want comfort? This is it—creamy, cozy rice pudding that tastes like a hug and costs less than your latte. No fancy tools, no pastry-school skills, just pantry basics and 30 minutes of attention.
The secret flex: it’s silky, perfectly sweet, and customizable for any mood—from classic vanilla to bold coconut-cardamom. You’ll make it once and immediately wonder why you ever bought the store-bought cup stuff. Spoiler: this version wins on texture, flavor, and pure nostalgia.
What Makes This Recipe So Good
- Ultra-creamy texture: The starch in the rice thickens the milk naturally, creating a custardy finish—no eggs needed.
- Ridiculously simple: One pot, basic stirring, done.
If you can make oatmeal, you can master this.
- Balanced sweetness: Just sweet enough to feel dessert-y without turning into sugar overload.
- Customizable: Warm spices, citrus zest, chocolate, or coconut—this pudding is a blank (delicious) canvas.
- Budget-friendly comfort: Pantry ingredients transform into a dessert you’d proudly serve guests.
- Great hot or cold: Eat it warm and cozy, or chill it for a firm, scoopable treat.
What Goes Into This Recipe – Ingredients
- 1 cup short-grain or medium-grain rice (Arborio or Calrose preferred for extra creaminess; long-grain works but will be less lush)
- 4 cups whole milk (or 3 cups whole milk + 1 cup heavy cream for super luxe; use 2% if you must)
- 1 cup water (helps hydrate rice evenly before milk thickens)
- 1/2 cup granulated sugar (adjust to taste)
- 1/4 teaspoon fine salt (amplifies flavor—don’t skip)
- 1 to 1.5 teaspoons pure vanilla extract (or 1 vanilla bean, split and scraped)
- 1/2 teaspoon ground cinnamon (plus more for garnish)
- 1/4 teaspoon ground nutmeg (optional but highly recommended)
- 1/2 cup raisins or golden raisins (optional; soak in warm water or rum for 10 minutes for extra pop)
- 1 tablespoon unsalted butter (optional, for glossy finish)
- Orange or lemon zest (optional, 1 teaspoon for brightness)
The Method – Instructions
- Rinse the rice: Put the rice in a fine-mesh sieve and rinse under cool water until the water runs mostly clear. This removes excess surface starch so the pudding thickens without turning gummy.
- Start with water: In a medium heavy-bottomed pot, combine rinsed rice and 1 cup water. Bring to a simmer over medium heat and cook 5 minutes, stirring once or twice, until most water is absorbed.
- Add milk and salt: Pour in the milk (and cream if using) and add salt.
Bring to a gentle simmer, not a rolling boil—scorched milk is not the vibe.
- Simmer low and slow: Reduce heat to low and cook 20–25 minutes, stirring frequently, scraping the bottom and sides to prevent sticking. The mixture should thicken and the rice should become very soft.
- Sweeten and spice: Stir in sugar, cinnamon, and nutmeg. Continue cooking 5–10 more minutes, stirring, until the pudding is creamy and coats the back of a spoon.
If using raisins, drain and add now.
- Finish and flavor: Remove from heat. Stir in vanilla, butter, and zest if using. The pudding will look slightly loose—FYI, it thickens as it cools.
- Adjust thickness: If it’s too thick, stir in a splash of warm milk.
Too loose? Simmer a few more minutes. Taste and tweak sweetness/spices.
- Serve: Spoon into bowls warm, dust with extra cinnamon, or chill 2–4 hours for a firmer, scoopable texture.
How to Store
- Refrigerate: Cool completely, then store in an airtight container for up to 4 days.
- It thickens in the fridge: Stir in a bit of milk when reheating to get back that creamy texture.
- Reheat gently: Warm on the stovetop over low heat or microwave in short bursts, stirring between each.
- Freezing: Not ideal.
The dairy can separate and the rice can turn grainy. If you must, freeze flat up to 1 month and thaw slowly in the fridge, then whisk with warm milk.
Health Benefits
- Steady comfort carbs: Rice provides energy and, in moderate portions, is gentle on the stomach—a classic recovery food.
- Calcium and protein: Milk adds calcium for bones and a dose of protein, especially if you use whole milk.
- Spice perks: Cinnamon and nutmeg bring antioxidants and flavor without extra calories. Flavor ROI is high here.
- Customizable macros: You control sugar and fat—use less sugar or swap part of the milk for higher-protein dairy (like adding a splash of evaporated milk) to shift the nutrition profile.
Pitfalls to Watch Out For
- Scorched bottom: High heat burns milk.
Keep it low and stir frequently, especially near the end.
- Too thick, too fast: Rice keeps absorbing liquid. Stop cooking when it’s slightly looser than you want. It firms up as it cools—science doing its thing.
- Underseasoning: A pinch of salt is non-negotiable.
It makes the vanilla and cinnamon pop.
- Wrong rice, wrong texture: Long-grain can work, but short- or medium-grain gives that beloved creamy chew. Avoid parboiled rice—it won’t release enough starch.
- Curdling with acidic add-ins: Add citrus zest at the end, not early in the simmer.
Variations You Can Try
- Tropical Coconut: Swap 1–2 cups milk with canned coconut milk, add 1/2 teaspoon cardamom, top with toasted coconut and mango.
- Bakery-Style Vanilla Bean: Use a split vanilla bean during simmering, remove at the end, and add an extra 1 tablespoon butter for gloss.
- Spanish-Style Arroz con Leche: Add a strip of lemon peel and a cinnamon stick during cooking; finish with a caramelized sugar sprinkle.
- Chocolate Nightcap: Stir in 3 ounces chopped dark chocolate off heat with 1 teaspoon espresso powder. A little dramatic?
Yes. Worth it.
- Protein Boost: Whisk in 1/2 cup evaporated milk at the end, or stir in 2–3 tablespoons powdered milk. Subtle, effective.
- Cardamom-Rose: 1/2 teaspoon ground cardamom + 1 teaspoon rose water at the end; garnish with pistachios and dried rose petals.
- Dairy-Free: Use almond or oat milk plus a splash of full-fat coconut milk for body.
Sweeten with maple syrup.
FAQ
Can I use leftover cooked rice?
Yes. Use 3 cups cooked rice, 3 cups milk, and skip the initial water step. Simmer 15–20 minutes until creamy, then proceed with sugar and spices.
It won’t be as custardy as raw rice, but it’s a great “rescue the leftovers” move.
Why is my rice pudding runny?
It likely needs more time. Keep simmering on low until it coats the back of a spoon. Also remember it thickens significantly as it cools.
If it’s still thin, mix 1 teaspoon cornstarch with 2 teaspoons cold milk and stir in, simmering 1–2 minutes.
Which rice is best?
Short- or medium-grain (Arborio, Calrose) for maximum creaminess. Jasmine and basmati smell great but make a looser pudding. Avoid instant or parboiled rice.
Can I cut the sugar?
Absolutely.
Start with 1/3 cup, taste, and adjust. You can also swap in honey, maple syrup, or coconut sugar. Just add liquids like honey toward the end.
How do I prevent the skin on top?
Press plastic wrap directly onto the surface while cooling, or stir in a teaspoon of butter at the end and give it a gentle stir every few minutes as it cools.
Is this safe for kids?
Yes, it’s kid-friendly.
If you’re adding raisins soaked in rum, keep the boozy version for the grown-ups, IMO.
Final Thoughts
This rice pudding recipe easy enough for weeknights delivers bakery-level results with pantry basics and a little patience. Keep the heat low, stir often, and finish with vanilla and a touch of butter—small moves, huge payoff. Make it classic or dress it up with coconut, citrus, or chocolate.
Either way, it’s comfort in a bowl and proof that simple done right beats complicated every time. Now grab a spoon before someone else does.