Simple Apple Crisp Recipe: The Easiest Fall Dessert You’ll Ever Make!
Is there anything that screams “autumn” quite like the aroma of warm apples and cinnamon wafting from the oven? Apple crisp is the quintessential fall dessert, a comforting and satisfying treat that’s perfect for chilly evenings, holiday gatherings, or just a simple weeknight indulgence. But often, dessert recipes can seem intimidating, with long lists of ingredients and complicated steps. Fear not! This recipe is designed for simplicity, delivering all the deliciousness of a classic apple crisp without any of the fuss. It’s so easy, even a beginner baker can master it, and so delicious, even the most discerning dessert connoisseur will be impressed. Get ready to enjoy a warm, bubbly, and perfectly spiced apple crisp that will become a new family favorite!
Why This Recipe Works
This apple crisp recipe is all about maximizing flavor with minimal effort. Here’s what makes it so successful:
- Simple Ingredients: We use pantry staples and readily available apples, so you don’t have to hunt down obscure ingredients.
- Quick Preparation: From start to finish, this recipe takes about an hour, with most of that time being hands-off baking.
- Perfect Apple-to-Crisp Ratio: The balance of sweet, tender apples and buttery, crunchy topping is key. We’ve carefully calculated the proportions to ensure every bite is a delight.
- Customizable: This recipe is a great base to build upon. Feel free to add your own personal touches, like nuts, dried fruit, or different spices.
- Foolproof Method: The instructions are clear and concise, making it virtually impossible to mess up.
Ingredients
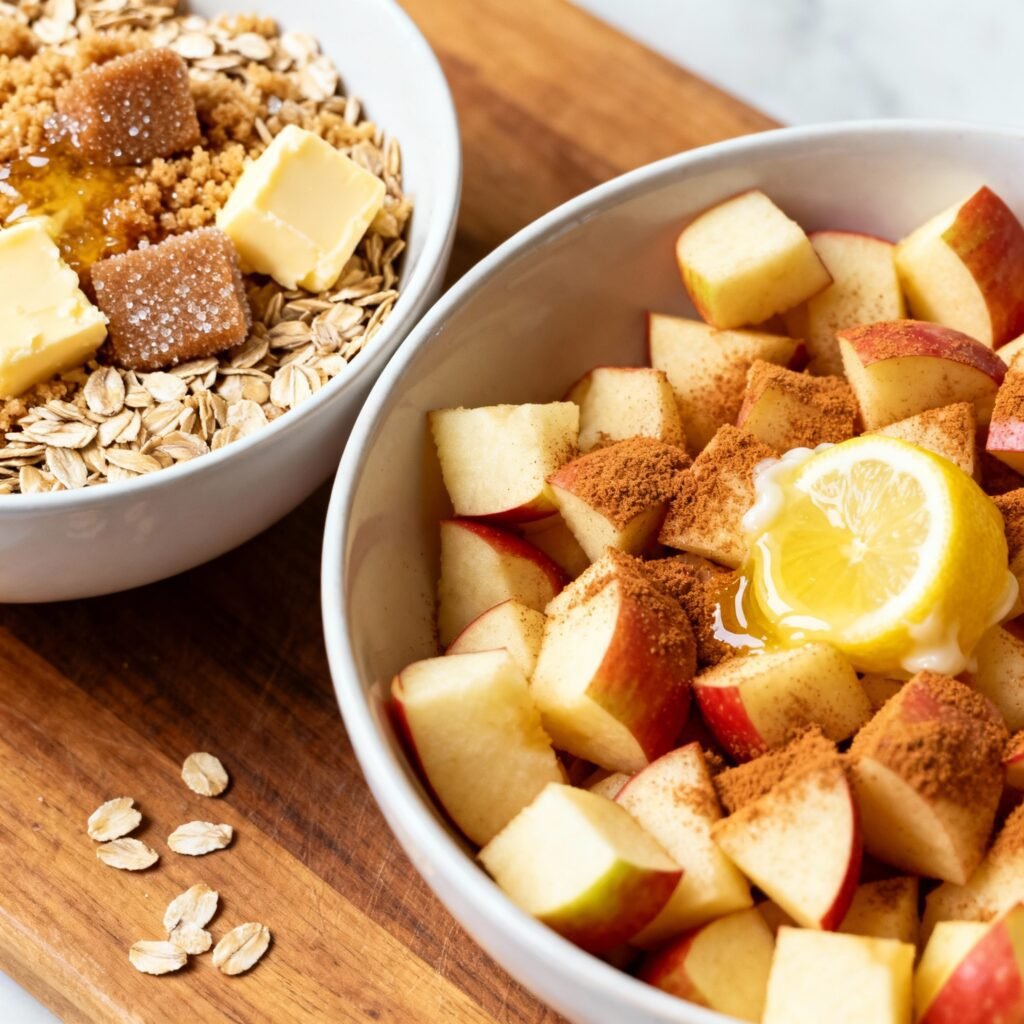
- Apples: 6 medium apples (such as Honeycrisp, Granny Smith, Gala, or a combination), peeled, cored, and sliced.
- All-Purpose Flour: 1 cup, for the topping and a little for tossing with the apples.
- Rolled Oats: 3/4 cup, for that classic crisp texture.
- Brown Sugar: 3/4 cup, packed, for sweetness and a hint of molasses flavor.
- Granulated Sugar: 1/4 cup, to enhance the apple’s natural sweetness.
- Butter: 1/2 cup (1 stick), cold and cut into small cubes, for the buttery crumble.
- Cinnamon: 1 teaspoon, ground, for warm spice.
- Nutmeg: 1/4 teaspoon, ground, for a touch of warmth and complexity.
- Lemon Juice: 1 tablespoon, to prevent the apples from browning and brighten the flavor.
- Water: 2 tablespoons, to help the apples soften.
- Salt: 1/4 teaspoon, to enhance the other flavors.
Instructions
- Preheat the Oven: Preheat your oven to 375°F (190°C).
- Prepare the Apples: In a large bowl, toss the sliced apples with 1 tablespoon of lemon juice, 1/4 cup granulated sugar, 1/2 teaspoon of cinnamon, and 1 tablespoon of all-purpose flour. This will help thicken the juices and prevent the apples from becoming too watery.
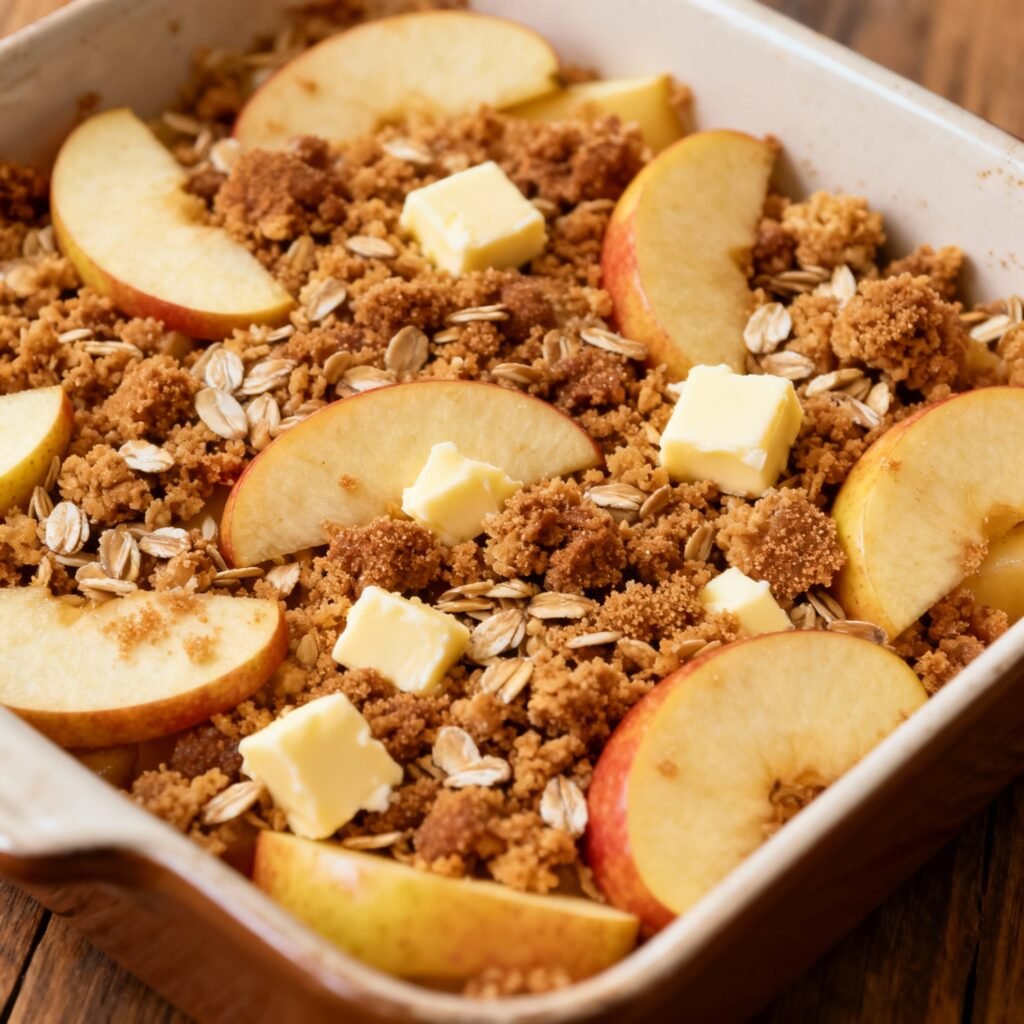
- Make the Crisp Topping: In a separate bowl, combine the 1 cup all-purpose flour, 3/4 cup rolled oats, 3/4 cup packed brown sugar, 1/2 teaspoon of cinnamon, 1/4 teaspoon of nutmeg, and 1/4 teaspoon of salt.
- Cut in the Butter: Add the cold, cubed butter to the dry ingredients. Use a pastry blender or your fingers to cut the butter into the mixture until it resembles coarse crumbs. The butter should be well distributed throughout the dry ingredients. This is key to a crumbly, delicious topping.
- Assemble the Crisp: Pour the apple mixture into a 9-inch square baking dish or a similar-sized oven-safe dish. Sprinkle the crisp topping evenly over the apples.
- Add Water: Pour 2 tablespoons of water evenly over the apples around the edges of the baking dish. This will help the apples steam and soften during baking.
- Bake: Bake for 40-45 minutes, or until the topping is golden brown and the apples are tender and bubbly. If the topping starts to brown too quickly, you can loosely tent the dish with foil for the last 10-15 minutes of baking.
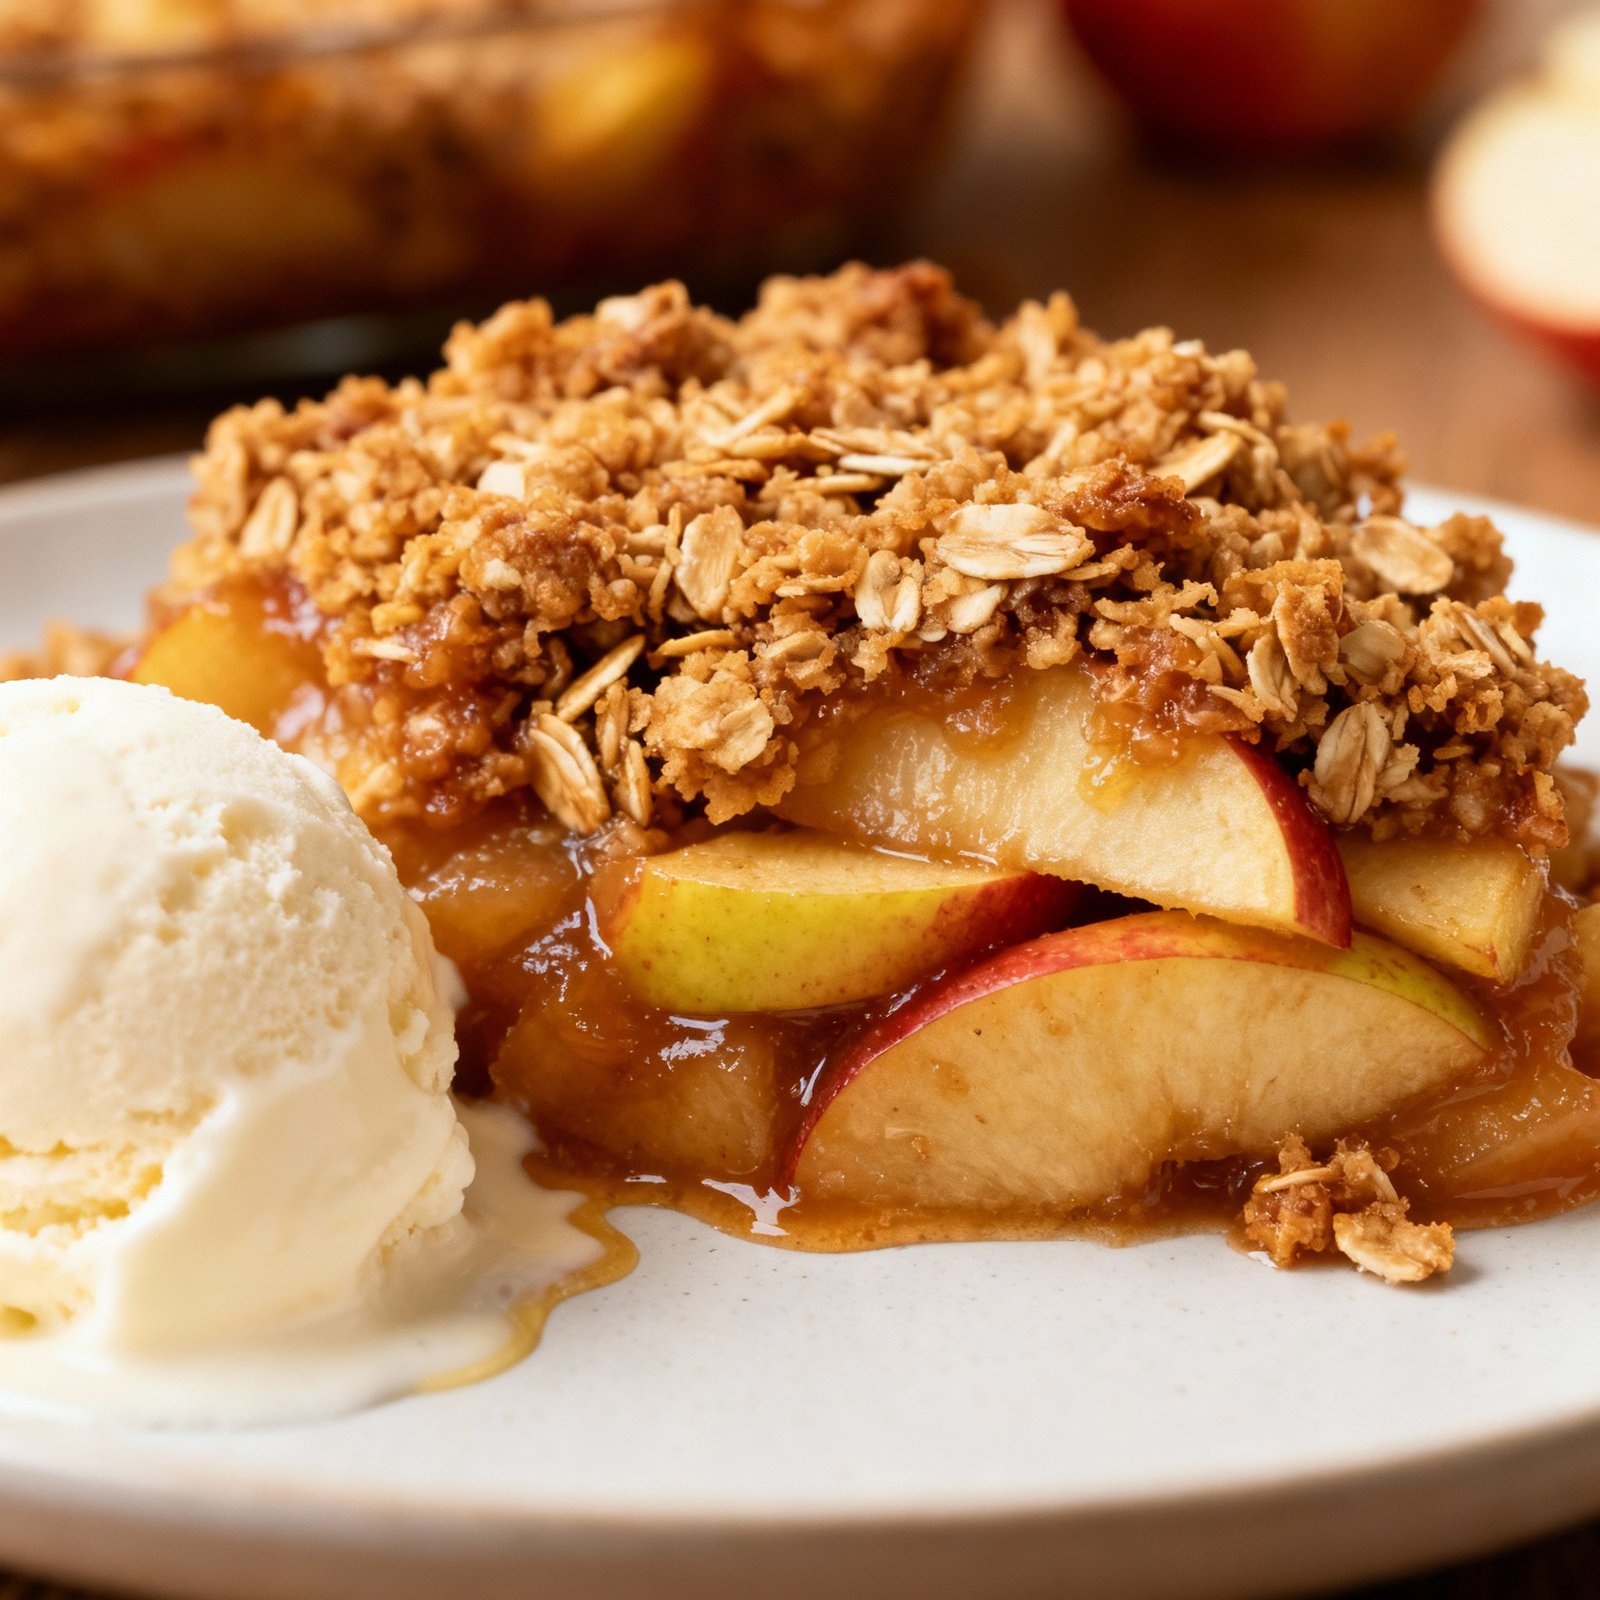
- Cool and Serve: Let the apple crisp cool for at least 15 minutes before serving. This allows the juices to thicken slightly. Serve warm, plain or with a scoop of vanilla ice cream, whipped cream, or a drizzle of caramel sauce.
Tips for Success
- Use a Variety of Apples: Combining different apple varieties will give your crisp a more complex flavor and texture. Honeycrisp adds sweetness and crispness, Granny Smith provides tartness, and Gala offers a balanced flavor.
- Don’t Overcrowd the Baking Dish: Make sure the apples are in a single layer in the baking dish. Overcrowding will prevent them from cooking evenly.
- Cold Butter is Key: Using cold butter is crucial for creating a crumbly topping. If the butter is too soft, the topping will be greasy and dense.
- Adjust Sweetness to Taste: If you prefer a less sweet crisp, you can reduce the amount of sugar in the apple mixture or topping.
- Add Nuts for Extra Crunch: For added texture and flavor, consider adding 1/2 cup of chopped nuts (such as pecans, walnuts, or almonds) to the crisp topping.
- Spice it Up: Experiment with different spices, such as ginger, cloves, or cardamom, to customize the flavor of your apple crisp.
Storage Instructions
To Store: Leftover apple crisp can be stored in the refrigerator for up to 3-4 days. Cover the baking dish tightly with plastic wrap or transfer the crisp to an airtight container.
To Reheat: Reheat individual portions in the microwave for 30-60 seconds, or until warmed through. You can also reheat the entire dish in a preheated oven at 350°F (175°C) for 10-15 minutes, or until heated through.
To Freeze: Apple crisp can be frozen for up to 2-3 months. Let the crisp cool completely before wrapping it tightly in plastic wrap and then foil. Thaw in the refrigerator overnight before reheating.
FAQ
Can I use a different type of fruit?
Yes! This recipe works well with other fruits, such as peaches, berries, or pears. Adjust the baking time as needed.
Can I make this recipe gluten-free?
Yes, simply substitute the all-purpose flour with a gluten-free all-purpose flour blend. Make sure to use gluten-free rolled oats as well.
Can I use melted butter for the topping?
While you *can*, the texture will be different. Using melted butter will result in a more dense and less crumbly topping. Cold, cubed butter is recommended for the best texture.
My topping is browning too quickly. What should I do?
If the topping starts to brown too quickly, loosely tent the dish with foil for the last 10-15 minutes of baking.
Can I make this recipe ahead of time?
You can assemble the apple crisp ahead of time and store it in the refrigerator for up to 24 hours before baking. Add the topping just before baking to prevent it from getting soggy.
Conclusion
This simple apple crisp recipe is a guaranteed crowd-pleaser. With its easy preparation, delicious flavor, and customizable nature, it’s the perfect dessert for any occasion. Whether you’re looking for a quick weeknight treat or a show-stopping holiday dessert, this recipe will deliver every time. So gather your ingredients, preheat your oven, and get ready to enjoy the comforting warmth and irresistible flavors of homemade apple crisp. Happy baking!