This Cake Balls Recipe Easy Enough to Nail Tonight (But Fancy Enough to Flex at Any Party)
You want dessert that looks like it took four hours but actually took 40 minutes? This is that. Cake balls are the culinary cheat code—outrageously cute, ridiculously tasty, and nearly impossible to mess up.
Bake a cake, crumble it, squish it with frosting, dip in chocolate—boom. You now look like a pro baker without sacrificing your evening or your sanity. Let’s turn a simple cake mix into the snack that vanishes first from every table.
What Makes This Recipe So Good
- Low effort, high reward: No pastry school needed.
If you can roll a meatball, you can make these.
- Budget-friendly: Cake mix, frosting, chocolate coating. That’s it. Minimal ingredients, maximum wow.
- Customizable: Change the cake, frosting, or coating and you’ve got an entirely new vibe.
- Perfect for leftovers: Got a dry cake or cupcakes lingering?
Cake balls rescue them like dessert EMTs.
- Portable party fuel: Easy to serve, easy to share, and they don’t require plates. Your dishwasher says thanks.
Ingredients Breakdown
- 1 box cake mix (vanilla, chocolate, red velvet—your call) + ingredients listed on the box (usually eggs, oil, water)
- 1/2 to 3/4 cup frosting (store-bought or homemade; vanilla, cream cheese, chocolate)
- 12–16 ounces candy melts or baking chocolate (white, milk, or dark)
- 1 tablespoon coconut oil or vegetable shortening (optional, for smoother dipping)
- Sprinkles, crushed nuts, cookie crumbs, or flaky salt (optional toppings)
- Tools: baking sheet, parchment paper, mixing bowl, microwave-safe bowl, fork or dipping tool, cookie scoop (helpful but optional)
Instructions
- Bake the cake: Prepare the cake according to the box directions in a 9×13-inch pan. Let it cool completely.
Warm cake + frosting = mushy chaos, so wait.
- Crumble like a pro: In a big bowl, crumble the cooled cake with clean hands until it’s fine crumbs. No big chunks—think sand, not gravel.
- Add frosting strategically: Start with 1/2 cup frosting. Mix until the crumbs hold together when pressed.
If it’s dry, add a tablespoon more at a time. Don’t overdo it or you’ll get sticky, saggy balls. We want truffle texture, not paste.
- Roll the balls: Scoop 1 to 1.5 tablespoons per ball. Roll between your palms until smooth.
Place on a parchment-lined baking sheet.
- Chill time: Freeze for 15–20 minutes or refrigerate for 45–60 minutes. Slightly firm = easier dipping and cleaner coats.
- Melt the coating: In a microwave-safe bowl, heat candy melts or chopped chocolate in 20–30 second bursts, stirring between each. Add a teaspoon of coconut oil if it’s thick. Silky and pourable is the goal.
- Dip the balls: Use a fork or dipping tool.
Lower a chilled cake ball into the chocolate, coat fully, tap gently to remove excess, and slide back onto parchment. Work in small batches so they stay firm.
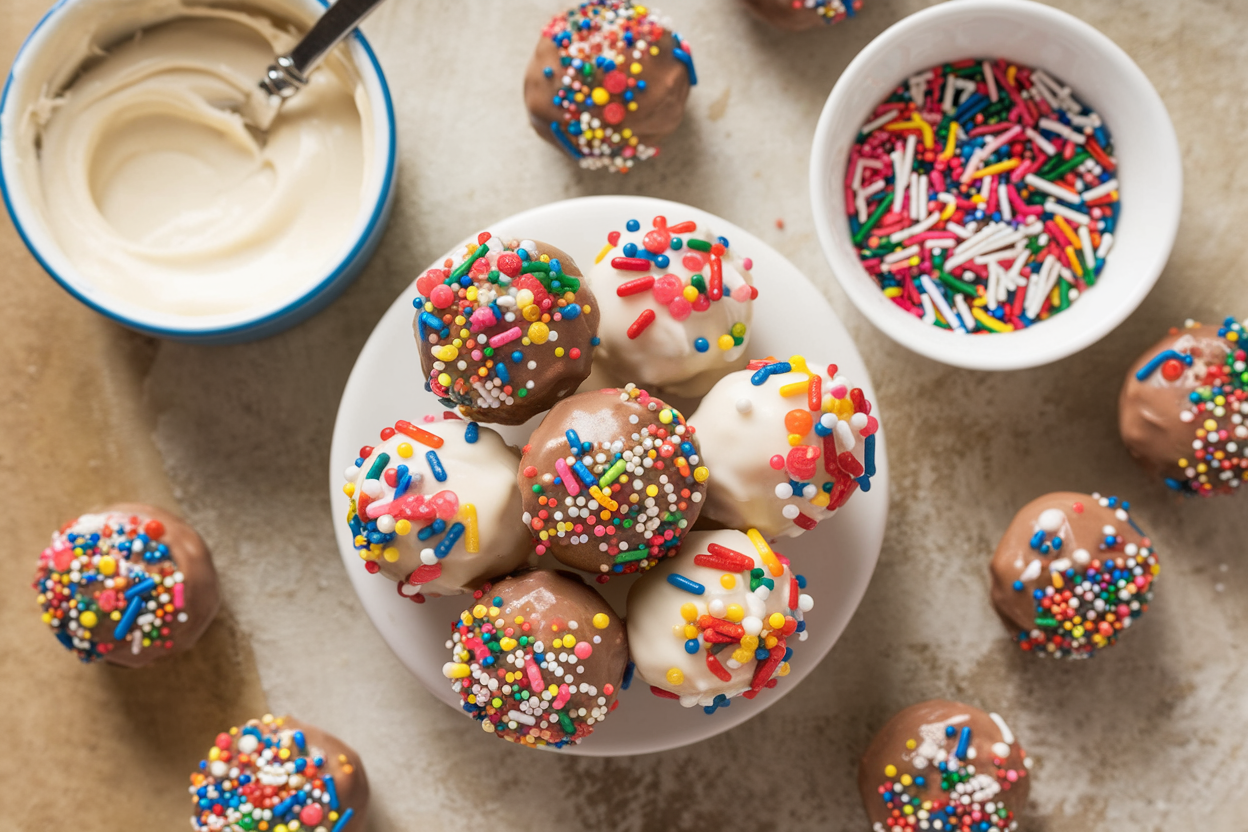
- Decorate fast: Add sprinkles, nuts, or crumbs while the coating is still wet. If you wait, they’ll slide off like a bad decision.
- Set and serve: Let them set at room temp 20–30 minutes or refrigerate for 10 minutes.
Eat, brag, repeat.
How to Store
- Room temperature: Up to 2 days in an airtight container if your frosting is shelf-stable and your room isn’t a sauna.
- Refrigerator: 5–7 days in an airtight container. Separate layers with parchment to avoid sticking.
- Freezer: Up to 2 months. Freeze on a sheet pan first, then transfer to a freezer bag.
Thaw in the fridge for best texture. FYI: condensation can dull the chocolate a bit—not a dealbreaker.
Health Benefits
Let’s be honest: these are treats, not kale. But there are a few wins worth noting, because balance.
- Portion control built-in: Single-serve bites help you enjoy dessert without going full cake-slice mode.
- Customizable ingredients: Use reduced-sugar cake mix, Greek yogurt frosting, or dark chocolate for a lighter twist.
- Dark chocolate perks: If you go 60%+ cocoa, you’ll snag some antioxidants.
It still counts as dessert, but hey, small wins.
- Allergy-friendly options: Easily adapted to gluten-free, dairy-free, or nut-free diets with the right substitutions.
Don’t Make These Errors
- Adding too much frosting: This is the #1 rookie mistake. Start small. You want a dough that holds, not spreads.
- Skipping the chill: Warm, soft balls will crack, slide, and haunt your dreams.
Chill for clean dipping.
- Overheating chocolate: Burnt chocolate turns grainy and moody. Microwave in short bursts and stir obsessively.
- Using wet tools: Water seizes chocolate instantly. Keep bowls and utensils bone-dry.
- Dipping in thick coating: Add a little coconut oil to thin it out.
Thick chocolate = clumpy coats.
- Working too slowly: Do small batches. Once the balls warm up, they break in the coating. Not cute.
Variations You Can Try
- Red Velvet + Cream Cheese: Classic combo.
Dip in white chocolate, finish with red crumbs for drama.
- Funfetti Birthday: Vanilla cake + vanilla frosting + rainbow sprinkles inside and out. Party in a bite.
- Mocha Buzz: Chocolate cake + espresso buttercream, dipped in dark chocolate. Top with cocoa nibs.
You’re welcome.
- Cookies & Cream: Vanilla cake + crushed chocolate sandwich cookies mixed into the crumbs. White chocolate dip, cookie dust on top.
- Peanut Butter Cup: Chocolate cake + peanut butter frosting. Dip in milk chocolate, sprinkle with chopped peanuts.
Check allergy notes, obviously.
- Lemon Pop: Lemon cake + lemon or vanilla frosting. White chocolate dip, lemon zest or crushed freeze-dried raspberries on top. Bright and zippy.
- Gluten-Free Swap: Use a GF cake mix and ensure all add-ins are certified GF.
Texture stays on point.
- Dairy-Free/Vegan: Vegan cake + dairy-free frosting + dairy-free chocolate. Coconut oil helps the coating set nicely.
FAQ
Can I use leftover cake instead of baking a fresh one?
Absolutely. This recipe is a legendary save for dry or day-old cake and cupcakes.
Just adjust the frosting amount since older cake may be drier.
Why are my cake balls cracking after dipping?
The temperature difference is usually the culprit. If the balls are too cold and the coating is warm, cracks happen. Let the rolled balls sit at room temp for 5–10 minutes after chilling, then dip.
Which chocolate is best for coating?
Candy melts are the most forgiving and smooth.
Baking chocolate tastes richer but can be thicker—thin with a bit of coconut oil. Avoid chocolate chips unless you thin them; they’re formulated to hold shape, not melt perfectly.
How do I get perfectly round cake balls?
Use a cookie scoop for consistent size, roll with slightly damp hands, and chill before dipping. If you see flat bottoms after chilling, reshape quickly before dipping—two-second fix.
Can I turn these into cake pops?
Yep.
Dip one end of a lollipop stick in melted coating, insert halfway into a chilled ball, then chill again 10 minutes. Dip the pop and let it set upright in a styrofoam block or a box with holes.
How much frosting should I use?
Start with 1/2 cup and add more a tablespoon at a time. The ideal texture holds together without sticking like glue.
If it’s too sticky, add a pinch of extra cake crumbs.
Final Thoughts
This cake balls recipe easy method is the dessert equivalent of a shortcut that actually works. Quick, adaptable, and dangerously snackable, these little bites turn basic pantry items into party-level treats. Whether you’re flexing for a crowd or sneaking a midnight sweet, you’ll get pro results with minimal effort.
Make a batch, stash a few in the freezer, and accept the compliments—you earned them (in under an hour, IMO).