This Easy Shepherds Pie Recipe Turns Pantry Scraps Into a Weeknight Legend
You want dinner that hits like comfort food but cooks like a Tuesday. This is it—rich, savory meat under a golden cloud of mashed potatoes that tastes like you spent all day on it (you didn’t). Think pub classic without the pub tab or the wait.
If you can brown meat and mash potatoes, you’re already 90% of the way there. The other 10%? A few smart shortcuts and a hot oven.
Let’s turn leftovers into applause.
Why This Recipe Works
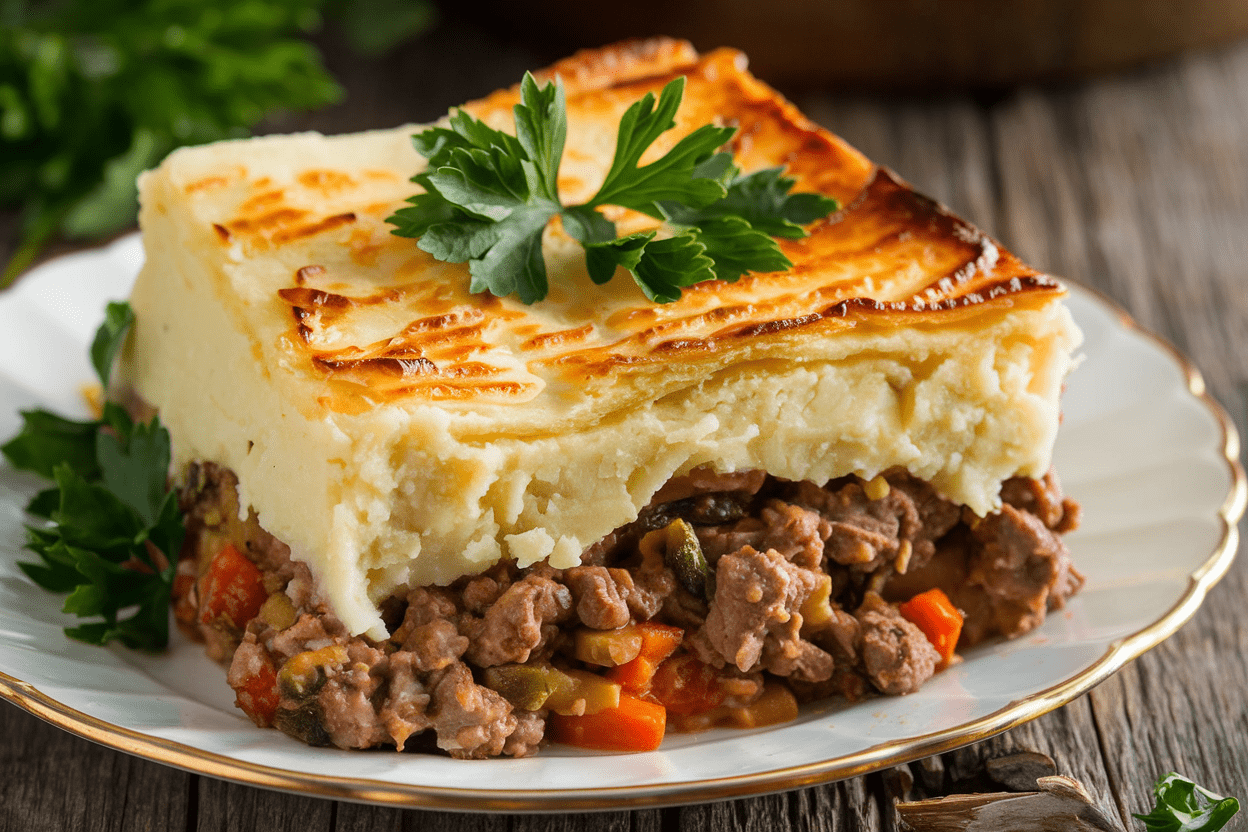
This easy shepherds pie recipe leans on a few power moves: a flavorful meat base with concentrated tomato paste, a splash of Worcestershire, and a quick cornstarch slurry for a glossy, rich gravy. That means no watery filling and no bland bites—just fork-tender vegetables and deeply seasoned meat. On top, creamy mashed potatoes mixed with butter and sour cream bake into a golden crust that seals in moisture.
The broil at the end delivers the signature peaks and crisp edges that make shepherd’s pie irresistible. And yes, the whole thing scales perfectly for meal prep, game days, or “in-laws are here” emergencies.
Shopping List – Ingredients
- For the potato topping:
- 2 pounds russet or Yukon Gold potatoes, peeled and chopped
- 4 tablespoons unsalted butter
- 1/2 cup milk (whole or 2%)
- 1/4 cup sour cream or plain Greek yogurt
- Salt and black pepper, to taste
- Optional: 1/2 cup shredded cheddar, 1 egg yolk for extra sheen
- For the filling:
- 1 pound ground lamb (traditional) or ground beef (cottage pie)
- 1 tablespoon olive oil (if meat is very lean)
- 1 medium yellow onion, diced
- 2 carrots, diced small
- 2 cloves garlic, minced
- 1 cup frozen peas
- 1/2 cup frozen corn (optional but nice)
- 2 tablespoons tomato paste
- 1 teaspoon dried thyme (or 1 tablespoon fresh)
- 1 teaspoon dried rosemary, crushed
- 1 tablespoon Worcestershire sauce
- 3/4 cup beef or chicken broth
- 1 tablespoon cornstarch mixed with 1 tablespoon water (slurry)
- Salt and pepper, to taste
- Finishing:
- Chopped parsley for garnish
- Flaky salt (optional)
Let’s Get Cooking – Instructions
- Boil the potatoes: Add potatoes to a large pot, cover with cold water by 1 inch, salt generously, and bring to a boil. Cook until fork-tender, 12–15 minutes.
Drain well.
- Mash like you mean it: Return potatoes to the hot pot. Add butter, milk, and sour cream. Mash until smooth but not gluey.
Season with salt and pepper. Stir in cheddar or egg yolk if using.
- Preheat the oven: Set to 400°F (200°C). Grab a 9×13-inch baking dish or a large oven-safe skillet.
- Brown the meat: In a large skillet over medium-high heat, cook lamb or beef until browned, 5–7 minutes.
If there’s excess fat, spoon it off. Season with salt and pepper.
- Build the flavor base: Push meat to the edges. Add a drizzle of oil if needed, then cook onion and carrots until soft, 5–6 minutes.
Stir in garlic for 30 seconds until fragrant.
- Tomato paste + herbs = magic: Stir in tomato paste, thyme, and rosemary; cook 1 minute to caramelize. Add Worcestershire and broth, scraping up browned bits—those are flavor gold.
- Thicken it: Stir in peas and corn. Pour in the cornstarch slurry and simmer 1–2 minutes until the sauce is glossy and coats the spoon.
Taste and adjust salt and pepper.
- Assemble: Spread the filling evenly in the baking dish. Dollop mashed potatoes over the top, then gently spread to the edges to create a seal. Use a fork to rake peaks (they crisp beautifully).
- Bake: Cook at 400°F for 20 minutes until bubbling around the edges.
- Broil for the win: Switch to broil for 2–4 minutes until the potatoes get golden-brown spots.
Watch closely—blink and it can go from perfect to “oops.”
- Rest and serve: Let it stand 10 minutes to set. Sprinkle parsley, add a pinch of flaky salt, and serve hot.
Storage Instructions
Cool completely, then cover tightly. In the fridge, it keeps up to 4 days.
Reheat covered at 350°F for 20–25 minutes, then uncover to crisp the top. For the freezer, wrap in two layers (foil + plastic) and freeze up to 3 months. Thaw overnight in the fridge or bake from frozen at 350°F for 45–60 minutes, covering until hot, then broil to crisp.
FYI: Individual portions reheat fastest and reduce sogginess.
What’s Great About This
- Weeknight-fast: One skillet, one pot, and a 30-minute bake—no chef diploma required.
- Budget-friendly: Uses pantry staples and freezer veg you already own.
- Comfort that scales: Double it for crowds; it plays nice with meal prep.
- Balanced bite: Protein, carbs, and veggies in every forkful—no side dish guilt necessary.
- Customizable: Swap meats, tweak spices, or sneak in extra veggies. Your kitchen, your rules.
Common Mistakes to Avoid
- Watery filling: Don’t skip the cornstarch slurry or reduce the liquid too little. You want a thick, glossy sauce, not soup.
- Bland potatoes: Salt the potato water and season the mash.
Potatoes are like tiny salt vacuums—feed them.
- Gummy mash: Overmixing releases starch. Mash by hand and stop when creamy.
- Burnt top, cold middle: Bake covered if your oven runs hot, then broil briefly at the end.
- Dry meat: Don’t overcook the filling before baking; it will cook again in the oven.
- No edge seal: Spread mash to the pan’s edges to trap steam and keep the filling juicy.
Alternatives
- Protein swaps: Ground turkey or chicken for lighter fare; lentils and mushrooms for a hearty vegetarian version.
- Flavor twists: Add smoked paprika, a splash of red wine, or Dijon mustard to the filling. Top with Parmesan for extra umami.
- Veg upgrades: Toss in diced celery, parsnips, or mushrooms.
Spinach works too—stir in at the end so it doesn’t weep.
- Potato remix: Try half cauliflower mash, or sweet potatoes for a lightly sweet, autumn vibe.
- Gluten-free and dairy-free: This is naturally GF if your Worcestershire is certified. Use olive oil and dairy-free milk/yogurt for the mash.
- Sheet pan shortcut: Spread the filling on a sheet pan, top with mashed potatoes, and broil for a fast, crispy-topped version. Efficiency mode: on.
FAQ
Can I make this ahead?
Yes.
Assemble fully, cover, and refrigerate up to 24 hours. Bake straight from the fridge at 375–400°F for 30–35 minutes until hot, then broil to brown. If the top darkens too quickly, tent with foil.
What’s the difference between shepherd’s pie and cottage pie?
Traditionally, shepherd’s pie uses lamb, while cottage pie uses beef.
Same cozy concept, different animal. Use what you love or what’s on sale—no one’s checking your passport.
Can I use instant mashed potatoes?
Yes, if time is tight. Make them thicker than usual so they hold structure.
Stir in butter and a little sour cream for flavor insurance.
How do I keep the top from sinking into the filling?
Make sure the filling is thick and not watery, and let it cool a few minutes before topping. Spread the potatoes gently and seal to the edges.
Can I make it in a cast-iron skillet?
Absolutely. Cook the filling in a 10–12 inch oven-safe skillet, top with mash, and bake directly.
Fewer dishes, more joy—IMO that’s a win.
What sides go well with shepherd’s pie?
A crisp green salad with lemony dressing, roasted Brussels sprouts, or buttered green beans cut the richness nicely. Bread is optional but never a mistake.
The Bottom Line
This easy shepherds pie recipe nails that sweet spot between fast and legendary—savory, saucy meat under creamy, crisped potatoes that feels like a hug and tastes like a win. With a few smart tricks and flexible ingredients, you get maximum flavor with minimum stress.
Keep this in your weeknight rotation and you’ll never fear the 6 p.m. “what’s for dinner” question again. Your future self just high-fived you.