Fried Lobster Tail Recipe: Crispy, Buttery Perfection!
👩🍳 The Home Chef's Essential Kitchen
Consistently cooking incredible, healthy meals at home is so much easier when you aren't fighting with cheap tools. These are the 5 absolute powerhouse kitchen essentials that professional chefs and serious home cooks rely on every single day to get perfect results.
🍳 Lodge 10.25" Cast Iron Skillet
The single greatest value in all of cookware. It retains heat infinitely better than cheap non-stick pans, allowing you to get a restaurant-quality crust on steaks or perfect crispy edges on cornbread. With proper care, this $20 pan will literally outlive you.
🔪 Victorinox Fibrox Pro 8" Chef's Knife
A dull knife makes cooking a frustrating chore. This specific blade is the undisputed champion of the culinary world—it holds a terrifyingly sharp edge, features a comfortable non-slip grip, and performs identical to German knives that cost quadruple the price.
🌡️ ThermoPro Instant Read Thermometer
Never serve dry chicken or undercooked pork again. An instant-read thermometer is the secret difference between amateur cooks who 'guess' when protein is done, and professionals who know exactly when to pull meat off the heat for maximum juiciness.
🍲 Lodge Enameled Cast Iron Dutch Oven
The ultimate workhorse for soups, stews, braised short ribs, and baking crusty artisanal bread. The enameled interior provides incredible heat distribution for slow-cooking while eliminating the intense seasoning maintenance required by bare cast iron.
🥄 Bpa-Free Silicone Utensil Set
Throw away those melting plastic spatulas and bacteria-harboring wooden spoons. This pure silicone set is heat-resistant up to 600°F, won't scratch your expensive pans, and features seamless designs that make cleaning out thick sauces and batters effortless.
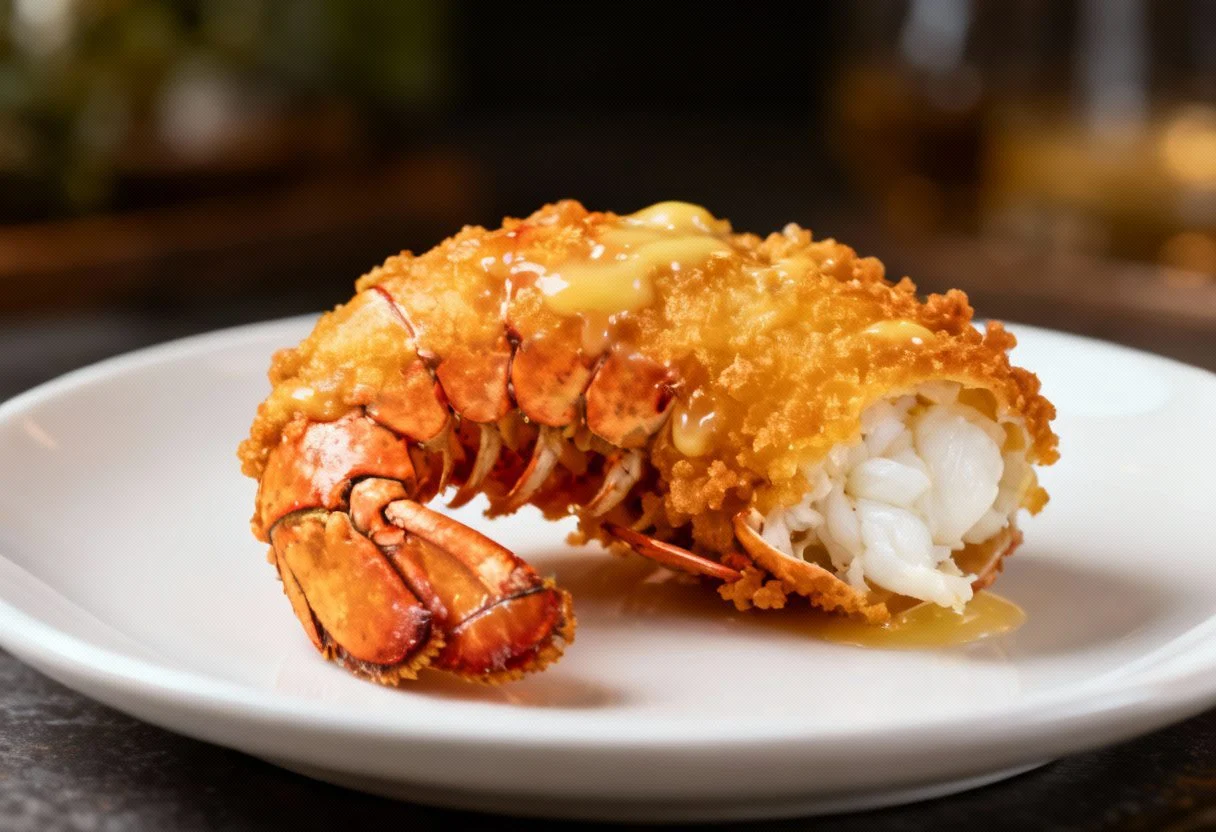
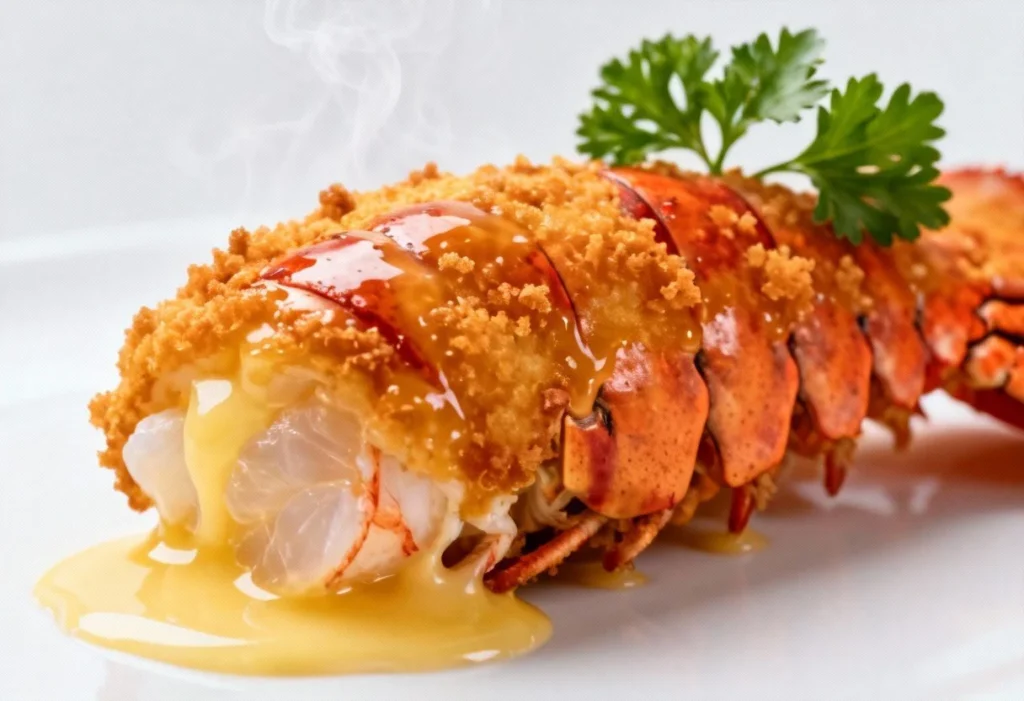
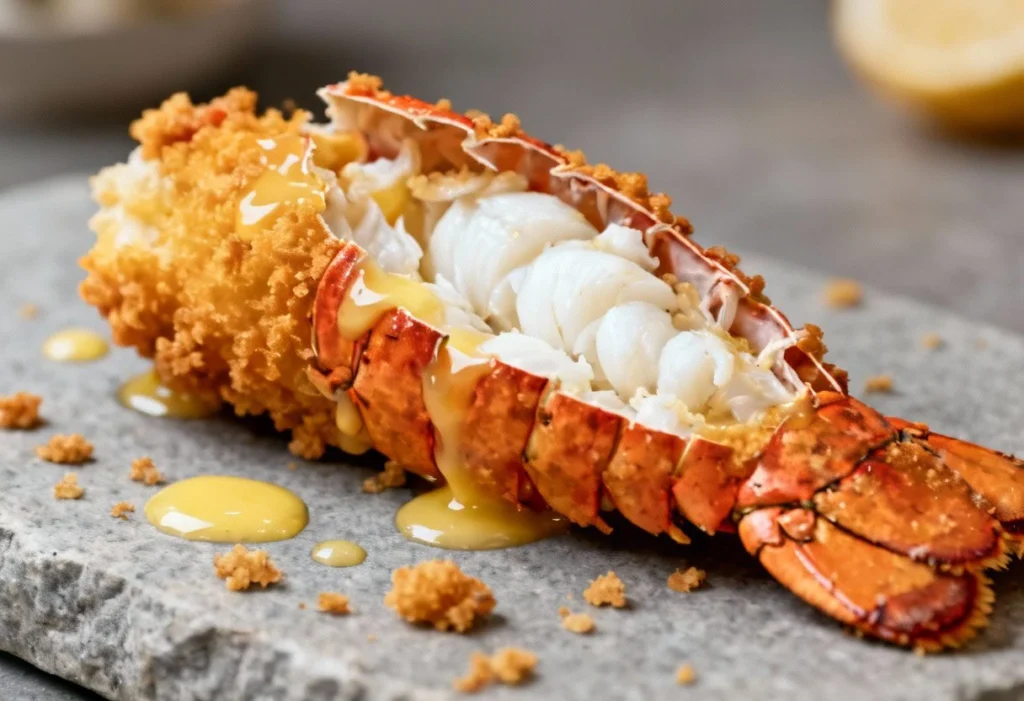
Imagine sinking your teeth into succulent, sweet lobster meat encased in a shatteringly crisp, golden-brown crust. Sounds divine, right? Well, stop dreaming and start cooking! This fried lobster tail recipe transforms a luxurious ingredient into an approachable and utterly irresistible dish. Forget the fancy restaurants and sky-high prices; with this simple guide, you can create restaurant-quality fried lobster tails in the comfort of your own kitchen. Get ready to impress your family and friends with this surprisingly easy and incredibly delicious treat. It’s perfect as an appetizer, a decadent main course, or even a show-stopping addition to a seafood platter. Let’s dive in!
Why This Recipe Works
This recipe focuses on achieving the perfect balance of textures and flavors. Here’s why it’s so successful:
- The Brine: A quick brine infuses the lobster meat with moisture and flavor, ensuring it remains tender and juicy during frying. It also helps to season the lobster from the inside out.
- The Double Dredge: The double dredge in seasoned flour and cornstarch creates a light and crispy coating that clings beautifully to the lobster tail. Cornstarch contributes to extra crispiness.
- The Hot Oil: Maintaining the correct oil temperature is crucial for achieving a golden-brown, crispy crust without overcooking the lobster. We aim for that sweet spot where the outside is perfectly crisp and the inside is cooked through but still succulent.
- The Quick Fry: Lobster cooks quickly! A short frying time prevents the meat from becoming tough and rubbery. We’re aiming for just enough time to cook the lobster and get that beautiful golden-brown color.
- The Butter Bath (Optional): A final dip in melted butter, infused with garlic and herbs, adds an extra layer of richness and flavor that elevates this dish to a whole new level of indulgence.
Ingredients
- Lobster Tails: 4 (6-8 ounce) lobster tails, thawed if frozen
- Brine:
- 4 cups cold water
- 1/4 cup kosher salt
- 2 tablespoons sugar
- Dredge:
- 1 cup all-purpose flour
- 1/2 cup cornstarch
- 1 tablespoon paprika
- 1 teaspoon garlic powder
- 1 teaspoon onion powder
- 1/2 teaspoon cayenne pepper (optional, for a little heat)
- Salt and freshly ground black pepper to taste
- Oil: 4 cups vegetable oil or canola oil, for frying
- Garlic Herb Butter (Optional):
- 1/2 cup (1 stick) unsalted butter
- 2 cloves garlic, minced
- 1 tablespoon fresh parsley, chopped
- 1 tablespoon fresh chives, chopped
- Pinch of red pepper flakes (optional)
- Lemon wedges, for serving
Instructions
- Prepare the Brine: In a large bowl, combine the cold water, salt, and sugar. Stir until the salt and sugar are completely dissolved.
- Brine the Lobster Tails: Place the lobster tails in the brine, ensuring they are fully submerged. Cover the bowl and refrigerate for 30 minutes.
- Prepare the Dredge: While the lobster tails are brining, prepare the dredge. In a shallow dish, whisk together the flour, cornstarch, paprika, garlic powder, onion powder, cayenne pepper (if using), salt, and pepper.
- Prepare the Frying Station: Set up a dredging station with the bowl of flour mixture and a clean plate or wire rack.
- Heat the Oil: Pour the vegetable oil or canola oil into a large, heavy-bottomed pot or deep fryer. Heat the oil over medium-high heat to 350°F (175°C). Use a deep-fry thermometer to monitor the temperature.
- Dredge the Lobster Tails: Remove the lobster tails from the brine and pat them completely dry with paper towels. This is crucial for achieving a crispy crust.
- Double Dredge: Dredge each lobster tail in the flour mixture, ensuring it’s fully coated. Shake off any excess flour. Then, dredge it again for a thicker coating.
- Fry the Lobster Tails: Carefully place the dredged lobster tails in the hot oil, being careful not to overcrowd the pot. Fry for 3-5 minutes per side, or until golden brown and the internal temperature reaches 140°F (60°C). Use a meat thermometer to check the internal temperature.
- Drain and Rest: Remove the fried lobster tails from the oil and place them on a wire rack lined with paper towels to drain excess oil.
- Prepare the Garlic Herb Butter (Optional): While the lobster tails are draining, prepare the garlic herb butter. In a small saucepan, melt the butter over medium heat. Add the minced garlic and red pepper flakes (if using) and cook for 1-2 minutes, or until fragrant. Remove from heat and stir in the fresh parsley and chives.
- Butter Bath (Optional): Dip each fried lobster tail in the garlic herb butter, ensuring it’s well coated.
- Serve: Serve the fried lobster tails immediately with lemon wedges for squeezing.
Tips for Success
- Don’t Overcrowd the Pot: Frying too many lobster tails at once will lower the oil temperature and result in soggy lobster. Fry in batches if necessary.
- Maintain Oil Temperature: Monitor the oil temperature throughout the frying process and adjust the heat as needed to maintain a consistent 350°F (175°C).
- Pat Dry Thoroughly: Ensure the lobster tails are completely dry before dredging to help the flour mixture adhere properly and create a crispy crust.
- Use Fresh Oil: Fresh oil will give you the best flavor and prevent the lobster tails from tasting greasy.
- Don’t Overcook: Lobster cooks quickly. Overcooking will result in tough, rubbery meat. Use a meat thermometer to ensure it’s cooked to the correct internal temperature.
- Customize the Seasoning: Feel free to adjust the seasonings in the dredge to your liking. Add more cayenne pepper for extra heat, or experiment with other herbs and spices.
Storage Instructions
Fried lobster tails are best enjoyed immediately. However, if you have leftovers, you can store them in an airtight container in the refrigerator for up to 2 days. To reheat, bake in a preheated oven at 350°F (175°C) for 10-15 minutes, or until heated through. Reheating in the oven will help to crisp up the crust. Microwaving is not recommended as it can make the lobster tails soggy.
FAQ
Q: Can I use frozen lobster tails?
A: Yes, but make sure to thaw them completely before brining. Thaw them overnight in the refrigerator for best results.
Q: Can I use a different type of oil for frying?
A: Yes, you can use any oil with a high smoke point, such as peanut oil or safflower oil.
Q: Can I air fry the lobster tails?
A: Yes, you can air fry them! Preheat your air fryer to 400°F (200°C). Spray the dredged lobster tails with cooking spray and air fry for 8-10 minutes, or until golden brown and cooked through. Flip halfway through.
Q: What can I serve with fried lobster tails?
A: Fried lobster tails are delicious served with lemon wedges, tartar sauce, cocktail sauce, or drawn butter. They also pair well with side dishes like coleslaw, french fries, or a simple salad.
🍰 The Master Baker & Prep Kit
Baking is a science, and meal prep requires efficiency. If you want consistently flaky pie crusts, perfectly risen cakes, and healthy meals ready for the week, these are the 5 upgrade tools that take your execution to the next level.
⚖️ OXO Good Grips 11lb Food Scale
The secret to why bakery bread and cookies are always perfect while home batches vary wildly. Measuring by weight (grams) instead of volume (cups) guarantees precise hydration and flawlessly consistent results every single time you bake.
🧑🍳 KitchenAid Classic Stand Mixer
The undisputed holy grail of the kitchen. From aggressively kneading heavy pizza doughs to whipping meringues into stiff peaks, this powerful motor saves your arms from exhaustion and cuts your hands-on prep time in half.
🍪 Silpat Premium Silicone Baking Mats
Stop wasting money on rolls of parchment paper or agonizing over cookies permanently fused to your metal pans. These reusable, professional-grade silicone mats ensure completely even heat distribution and instantly release even the stickiest caramel.
🌪️ Braun MultiQuick Immersion Blender
The ultimate shortcut tool for creamy tomato soups, lump-free gravies, and rapid smoothies. Avoid the burns and mess of dangerously transferring boiling liquids in batches to a traditional blender by simply blending right inside your cooking pot.
🍱 Premium Glass Meal Prep Containers
If you want to bake and cook healthier, batch preparation is required. These durable glass containers transition safely from freezer to microwave, never absorb tomato sauce stains, and feature airtight seals to keep your hard work fresh all week.
Conclusion
This fried lobster tail recipe is a guaranteed crowd-pleaser. It’s surprisingly easy to make, incredibly delicious, and perfect for any occasion. From the initial brine to the final dip in garlic herb butter (optional, but highly recommended!), every step contributes to creating a truly unforgettable culinary experience. So, ditch the restaurant reservations and get ready to impress with your own homemade fried lobster tails. Enjoy!