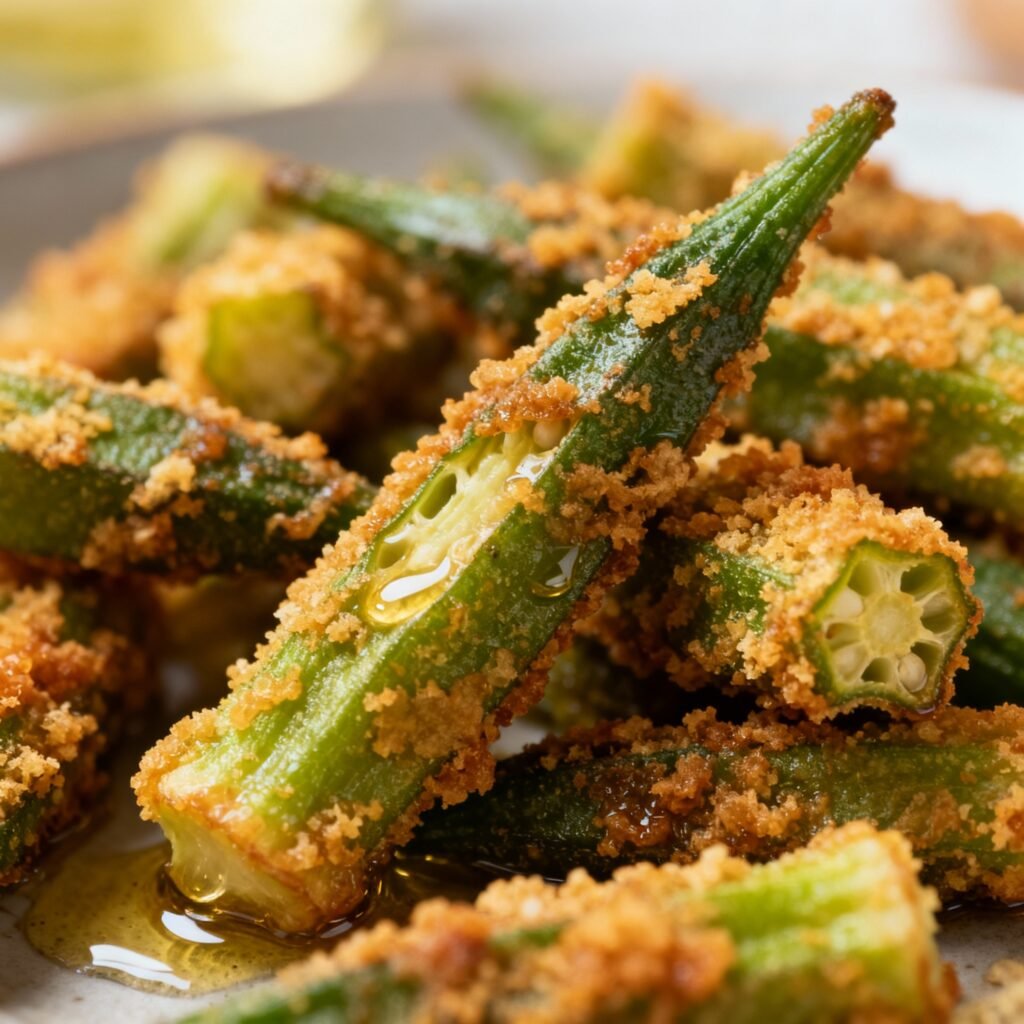
Fried Okra Recipe Southern: Crispy Perfection!
Fried okra. The very words conjure up images of lazy summer afternoons, family gatherings, and the unmistakable, satisfying crunch that only perfectly fried okra can deliver. This isn’t just a recipe; it’s a tradition, a taste of the South, and a testament to the simple pleasures of good food. Forget the slimy, sad excuses for fried okra you might have encountered elsewhere. This recipe guarantees crispy, golden-brown perfection every single time. Get ready to experience okra like never before!
Why This Recipe Works
This recipe isn’t just about throwing okra in hot oil. It’s about understanding the science behind the crunch. Here’s why it works so well:
- The Double Dredge: A double coating of seasoned flour and cornmeal is the key to achieving that signature crispy crust. The flour helps the cornmeal adhere better, creating a thicker, more protective layer that prevents the okra from becoming soggy.
- Buttermilk Soak: Soaking the okra in buttermilk not only adds a subtle tang but also helps the flour mixture cling to the okra more effectively. The buttermilk’s acidity also helps tenderize the okra slightly.
- Hot Oil, Right Temperature: Maintaining the correct oil temperature is crucial. Too low, and the okra will absorb too much oil and become greasy. Too high, and it will burn before it cooks through. We’ll guide you on how to achieve that sweet spot.
- Don’t Overcrowd the Pan: Frying in batches prevents the oil temperature from dropping too drastically, ensuring each piece of okra gets evenly cooked and crispy.
- Proper Seasoning: A generous blend of salt, pepper, garlic powder, and paprika elevates the flavor of the okra and complements the cornmeal coating.
Ingredients
- 1 pound fresh okra, washed and sliced into 1/2-inch rounds
- 1 cup buttermilk
- 1 cup all-purpose flour
- 1 cup yellow cornmeal
- 1 teaspoon salt
- 1/2 teaspoon black pepper
- 1/2 teaspoon garlic powder
- 1/4 teaspoon paprika
- Vegetable oil or peanut oil, for frying (about 3-4 cups)

Instructions
- Prepare the Okra: Wash the okra thoroughly and pat it dry. Slice it into 1/2-inch rounds. It’s important to dry the okra well to ensure the coating sticks properly.
- Soak in Buttermilk: Place the sliced okra in a bowl and pour the buttermilk over it. Toss to coat evenly. Let it soak for at least 30 minutes, or up to an hour, in the refrigerator. This helps tenderize the okra and allows the coating to adhere better.
- Prepare the Dredging Station: In a shallow dish or bowl, combine the flour, cornmeal, salt, pepper, garlic powder, and paprika. Mix well to ensure the seasonings are evenly distributed.
- Dredge the Okra: Remove the okra from the buttermilk, allowing any excess to drip off. Dredge the okra in the flour mixture, making sure each piece is fully coated. Then, return the okra to the buttermilk for a quick dip. Dredge it once more in the flour mixture, pressing gently to ensure the coating adheres well. This double dredge is crucial for a crispy crust.
- Heat the Oil: Pour the vegetable or peanut oil into a large, heavy-bottomed skillet or Dutch oven. Heat the oil over medium-high heat until it reaches 350-375°F (175-190°C). Use a deep-fry thermometer to monitor the temperature. If you don’t have a thermometer, you can test the oil by dropping a small amount of the flour mixture into it. If it sizzles and browns quickly, the oil is ready.
- Fry the Okra: Carefully add the okra to the hot oil in batches, making sure not to overcrowd the pan. Overcrowding will lower the oil temperature and result in soggy okra. Fry for 2-3 minutes per side, or until golden brown and crispy.
- Drain the Okra: Use a slotted spoon or spider to remove the fried okra from the oil and place it on a wire rack lined with paper towels to drain excess oil.
- Serve Immediately: Season the fried okra with a pinch of salt while it’s still hot. Serve immediately and enjoy the crispy goodness!
Tips for Success
- Fresh Okra is Best: While you can use frozen okra in a pinch, fresh okra will always yield the best results. Look for firm, bright green pods that are about 3-4 inches long.
- Don’t Oversoak: While soaking in buttermilk is important, don’t soak the okra for too long, or it may become soggy. An hour is the maximum recommended time.
- Use a Heavy-Bottomed Pan: A heavy-bottomed pan will help distribute heat evenly and prevent hot spots, ensuring the okra cooks properly.
- Maintain Oil Temperature: Keeping the oil at the correct temperature is essential for crispy okra. Use a deep-fry thermometer to monitor the temperature and adjust the heat as needed.
- Season Generously: Don’t be afraid to season the flour mixture generously. The seasonings will add flavor to the okra and complement the cornmeal coating.
- Adjust Seasonings to Taste: Feel free to adjust the seasonings to your liking. Add a pinch of cayenne pepper for a little heat, or use different herbs and spices to create your own unique flavor profile.
Storage Instructions
Fried okra is best enjoyed immediately while it’s still hot and crispy. However, if you have leftovers, you can store them in an airtight container in the refrigerator for up to 2 days. Keep in mind that the okra will lose some of its crispness as it sits. To reheat, spread the okra in a single layer on a baking sheet and bake at 350°F (175°C) for about 10-15 minutes, or until heated through. You can also reheat it in an air fryer for a few minutes to help restore some of the crispness.
FAQ
Q: Can I use frozen okra?
A: While fresh okra is preferred, you can use frozen okra. Thaw it completely and pat it dry before soaking it in buttermilk. Keep in mind that frozen okra may not be as crispy as fresh okra.
Q: Can I use self-rising flour?
A: It’s not recommended. Self-rising flour already contains baking powder and salt, which can affect the texture and flavor of the fried okra. It’s best to use all-purpose flour and add your own seasonings.
Q: Can I use a different type of oil?
A: Yes, you can use other oils with a high smoke point, such as canola oil, grapeseed oil, or sunflower oil. Peanut oil is a popular choice for frying because it imparts a subtle nutty flavor.
Q: My okra is slimy. What am I doing wrong?
A: The key to preventing slimy okra is to dry it thoroughly before coating it and frying it in hot oil. Soaking it in buttermilk also helps reduce sliminess. Avoid overcrowding the pan, as this can lower the oil temperature and cause the okra to steam instead of fry.
Q: Can I make this recipe gluten-free?
A: Yes! Simply substitute the all-purpose flour with a gluten-free all-purpose flour blend. Make sure the blend contains xanthan gum for the best results.
Conclusion
This fried okra recipe is more than just a set of instructions; it’s an invitation to experience a true Southern classic. With its crispy coating, tender interior, and irresistible flavor, this okra is sure to become a family favorite. So, gather your ingredients, fire up the skillet, and get ready to enjoy the best fried okra you’ve ever tasted! This recipe is a guaranteed crowd-pleaser, perfect for potlucks, barbecues, or simply a satisfying weeknight meal. Enjoy!