Homemade Cake Pops Recipe: The Ultimate Guide to Perfect Pops
Cake pops! Those adorable, bite-sized treats on a stick are always a crowd-pleaser. Whether you’re planning a birthday party, a baby shower, or just want a fun baking project, homemade cake pops are a fantastic option. But let’s be honest, making them can sometimes feel a little daunting. Fear not! This recipe breaks down the process into easy-to-follow steps, guaranteeing delicious and beautiful cake pops every time. We’ll cover everything from baking the cake to dipping and decorating, so you can create these delightful treats with confidence.
Why This Recipe Works
This recipe isn’t just another cake pop tutorial; it’s a carefully crafted guide designed for success. Here’s what sets it apart:
- Detailed Instructions: We provide clear, step-by-step instructions with helpful tips and visuals to guide you through each stage.
- Versatile Cake Base: You can use your favorite cake recipe or even a store-bought cake mix! We offer suggestions for different cake flavors to complement your desired decorations.
- Perfect Cake-to-Frosting Ratio: We’ve tested and perfected the ideal ratio of cake to frosting, ensuring moist and flavorful cake pops that hold their shape without being overly sweet.
- Foolproof Dipping Technique: Learn the secrets to achieving a smooth, even chocolate coating without cracks or drips.
- Creative Decoration Ideas: We’ll inspire you with a variety of decorating options, from simple sprinkles to elaborate designs, so you can create cake pops that are as unique as you are.
Ingredients
- Cake:
- 1 box (15.25 oz) cake mix (any flavor, such as vanilla, chocolate, red velvet, or funfetti) OR your favorite homemade cake recipe (equivalent to one box mix)
- Ingredients required for the cake mix (usually eggs, oil, and water) OR ingredients for your homemade cake recipe
- Frosting:
- Approximately 1/2 cup (4 oz) cream cheese frosting, vanilla frosting, or chocolate frosting (store-bought or homemade)
- Chocolate Coating:
- 12 oz candy melts (available in various colors) OR melting chocolate (dark, milk, or white chocolate)
- 1 tablespoon vegetable shortening or coconut oil (optional, for smoother melting)
- Cake Pop Sticks:
- Lollipop sticks (4-6 inches long)
- Decorations (Optional):
- Sprinkles, edible glitter, chopped nuts, mini chocolate chips, crushed cookies, etc.
- Colored candy melts for drizzling

Instructions
- Bake the Cake:
Prepare the cake mix according to the package directions or bake your homemade cake recipe. Let the cake cool completely in the pan.
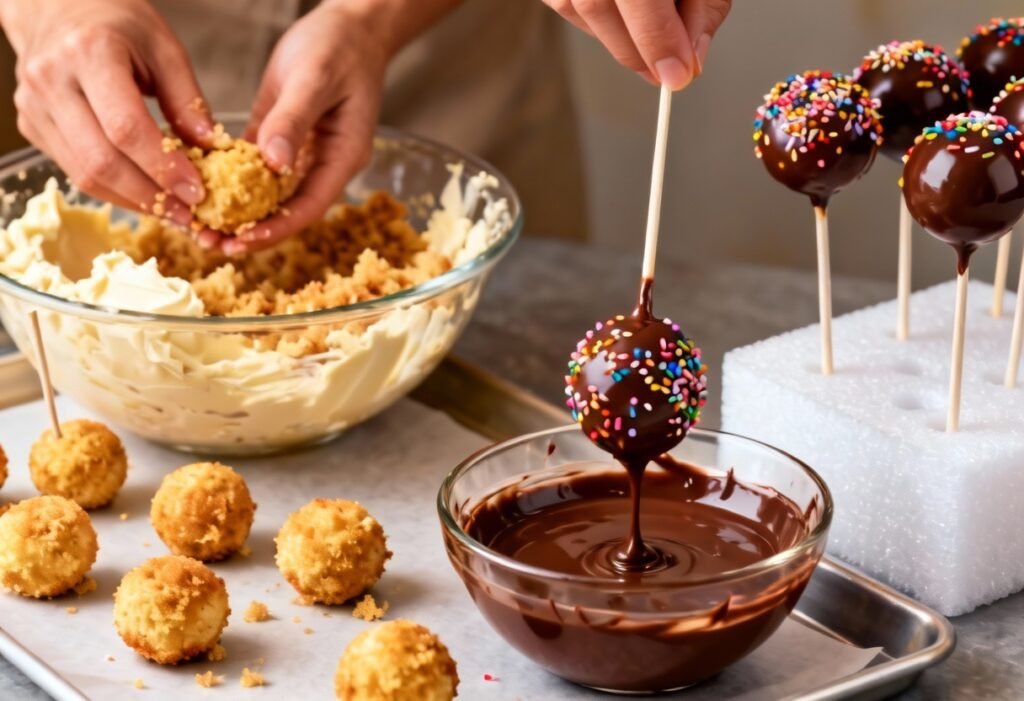
- Crumble the Cake:
Once the cake is completely cool, crumble it into a large bowl. You can use your hands or a fork to break it down into fine crumbs. Remove any hard or crusty edges.
- Mix in the Frosting:
Add the frosting to the crumbled cake, starting with 1/4 cup. Mix well with your hands until the cake crumbs are evenly moistened and the mixture comes together to form a dough-like consistency. Add more frosting, 1 tablespoon at a time, if needed, but be careful not to add too much, or the cake pops will be too soft. The mixture should hold its shape when squeezed.
- Shape the Cake Pops:
Roll the cake mixture into small, even-sized balls, about 1-1.5 inches in diameter. Place the cake balls on a baking sheet lined with parchment paper or wax paper.
- Chill the Cake Pops:
Place the baking sheet with the cake balls in the refrigerator for at least 30 minutes, or in the freezer for 15 minutes. This will help them firm up and prevent them from falling off the sticks during dipping.
- Melt the Chocolate:
While the cake pops are chilling, melt the candy melts or chocolate in a double boiler or in the microwave. If using a microwave, heat in 30-second intervals, stirring in between, until completely melted and smooth. Add the vegetable shortening or coconut oil (if using) to the melted chocolate and stir until well combined. This will help create a smoother, more fluid coating.
- Dip the Sticks:
Remove the cake pops from the refrigerator or freezer. Dip the tip of a lollipop stick into the melted chocolate (about 1/2 inch). Insert the chocolate-covered end of the stick into the center of a cake ball, going about halfway through. This helps to secure the stick to the cake pop.
- Dip the Cake Pops:
Dip the entire cake pop into the melted chocolate, making sure it’s completely covered. Gently tap off any excess chocolate by holding the cake pop upside down and lightly tapping your wrist. You can also use a toothpick to remove any air bubbles.
- Decorate the Cake Pops:
Immediately decorate the cake pops with sprinkles, edible glitter, or other decorations while the chocolate is still wet. If the chocolate starts to set too quickly, you can re-melt it slightly.
- Let the Chocolate Set:
Insert the cake pops into a styrofoam block or place them on a baking sheet lined with parchment paper to allow the chocolate to set completely. This usually takes about 30-60 minutes at room temperature, or you can speed up the process by placing them in the refrigerator for 15-20 minutes.
Tips for Success
- Don’t Overbake the Cake: Overbaked cake will be dry and crumbly, making it difficult to form the cake pops.
- Chill the Cake Pops: Chilling the cake pops is crucial for preventing them from falling off the sticks during dipping.
- Melt the Chocolate Properly: Avoid overheating the chocolate, as it can become thick and grainy. Use a double boiler or microwave in short intervals, stirring frequently.
- Thin the Chocolate (Optional): If the melted chocolate is too thick, add a small amount of vegetable shortening or coconut oil to thin it out.
- Tap Off Excess Chocolate: Tapping off excess chocolate is essential for achieving a smooth, even coating.
- Work Quickly: Decorate the cake pops immediately after dipping them, while the chocolate is still wet.
- Use a Styrofoam Block: A styrofoam block is ideal for holding the cake pops upright while the chocolate sets.
Storage Instructions
Store the finished cake pops in an airtight container at room temperature for up to 3 days. For longer storage, you can refrigerate them for up to a week. Keep in mind that refrigeration may slightly alter the texture of the cake.
FAQ
- Can I use a different type of chocolate?
Yes, you can use any type of chocolate you prefer, such as dark chocolate, milk chocolate, or white chocolate. Just make sure it’s a good quality chocolate that melts smoothly.
- Can I use a different type of frosting?
Yes, you can use any type of frosting you like. Cream cheese frosting, vanilla frosting, and chocolate frosting are all good options. Just be sure to use enough frosting to bind the cake crumbs together, but not so much that the mixture becomes too soft.
- Why are my cake pops cracking?
Cake pops can crack if the chocolate coating sets too quickly or if the cake pops are too cold when dipped. Make sure the chocolate is not too hot and that the cake pops are not excessively chilled. You can also try adding a small amount of vegetable shortening or coconut oil to the melted chocolate to make it more pliable.
- How do I prevent the cake pops from falling off the sticks?
Make sure to chill the cake pops thoroughly before dipping them in chocolate. Also, dip the tip of the lollipop stick into the melted chocolate before inserting it into the cake ball. This will help to secure the stick to the cake pop.
- Can I freeze cake pops?
Yes, you can freeze undecorated cake pops for up to 2 months. Wrap them individually in plastic wrap and then place them in an airtight container. Thaw them in the refrigerator before decorating.
Conclusion
Congratulations! You’ve successfully mastered the art of homemade cake pops. With this recipe and these tips, you’ll be able to create these adorable treats for any occasion. Get creative with your cake flavors, frosting choices, and decorations, and have fun experimenting with different designs. Enjoy!