🍋 The Ultimate Lemon Lush Dessert Recipe: Better Than Grandma’s
👩🍳 The Home Chef's Essential Kitchen
Consistently cooking incredible, healthy meals at home is so much easier when you aren't fighting with cheap tools. These are the 5 absolute powerhouse kitchen essentials that professional chefs and serious home cooks rely on every single day to get perfect results.
🍳 Lodge 10.25" Cast Iron Skillet
The single greatest value in all of cookware. It retains heat infinitely better than cheap non-stick pans, allowing you to get a restaurant-quality crust on steaks or perfect crispy edges on cornbread. With proper care, this $20 pan will literally outlive you.
🔪 Victorinox Fibrox Pro 8" Chef's Knife
A dull knife makes cooking a frustrating chore. This specific blade is the undisputed champion of the culinary world—it holds a terrifyingly sharp edge, features a comfortable non-slip grip, and performs identical to German knives that cost quadruple the price.
🌡️ ThermoPro Instant Read Thermometer
Never serve dry chicken or undercooked pork again. An instant-read thermometer is the secret difference between amateur cooks who 'guess' when protein is done, and professionals who know exactly when to pull meat off the heat for maximum juiciness.
🍲 Lodge Enameled Cast Iron Dutch Oven
The ultimate workhorse for soups, stews, braised short ribs, and baking crusty artisanal bread. The enameled interior provides incredible heat distribution for slow-cooking while eliminating the intense seasoning maintenance required by bare cast iron.
🥄 Bpa-Free Silicone Utensil Set
Throw away those melting plastic spatulas and bacteria-harboring wooden spoons. This pure silicone set is heat-resistant up to 600°F, won't scratch your expensive pans, and features seamless designs that make cleaning out thick sauces and batters effortless.
So, you’re craving something tasty but too lazy to spend forever in the kitchen, huh? Same. Honestly, looking at a recipe that requires a candy thermometer or a water bath makes me want to order pizza and give up. But this? This is different.
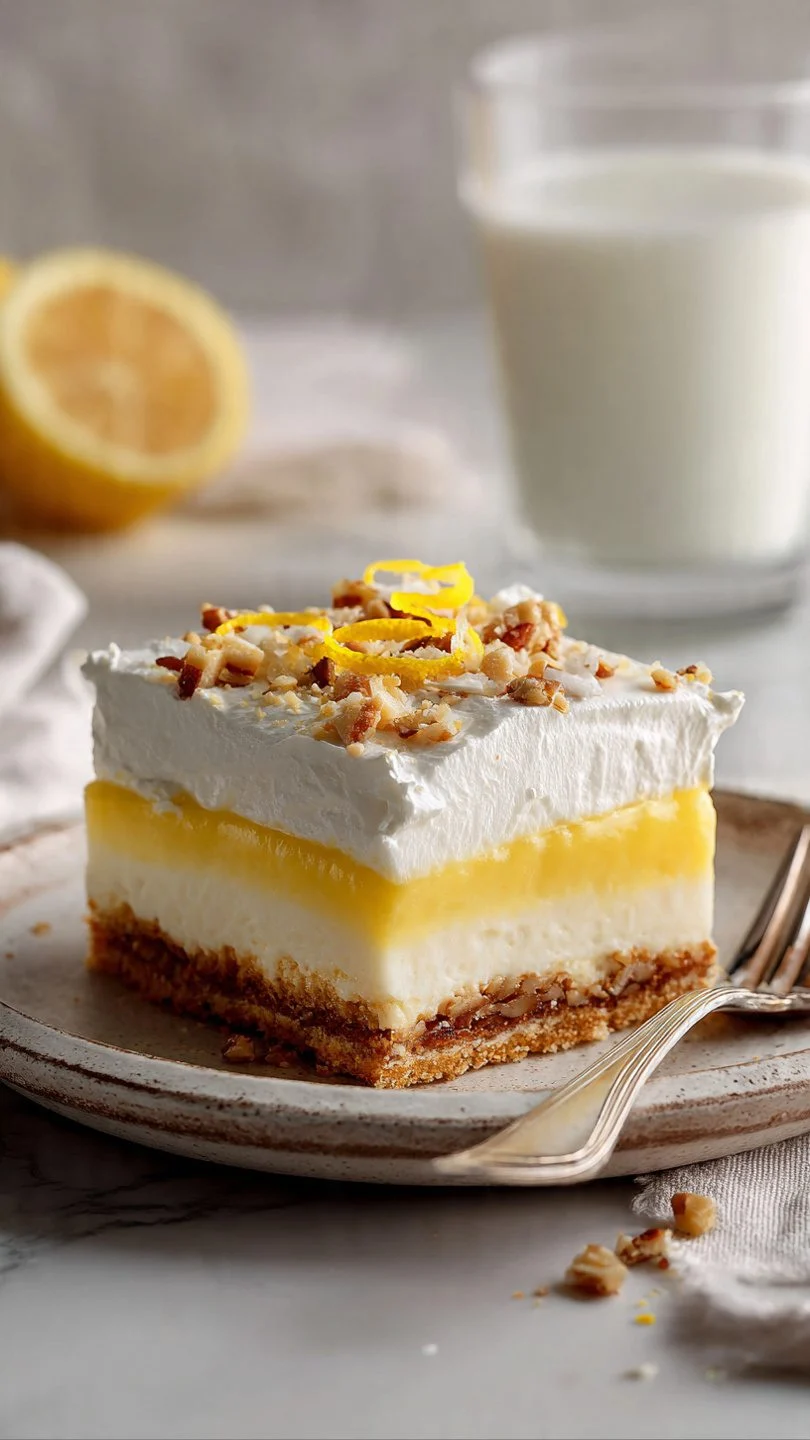
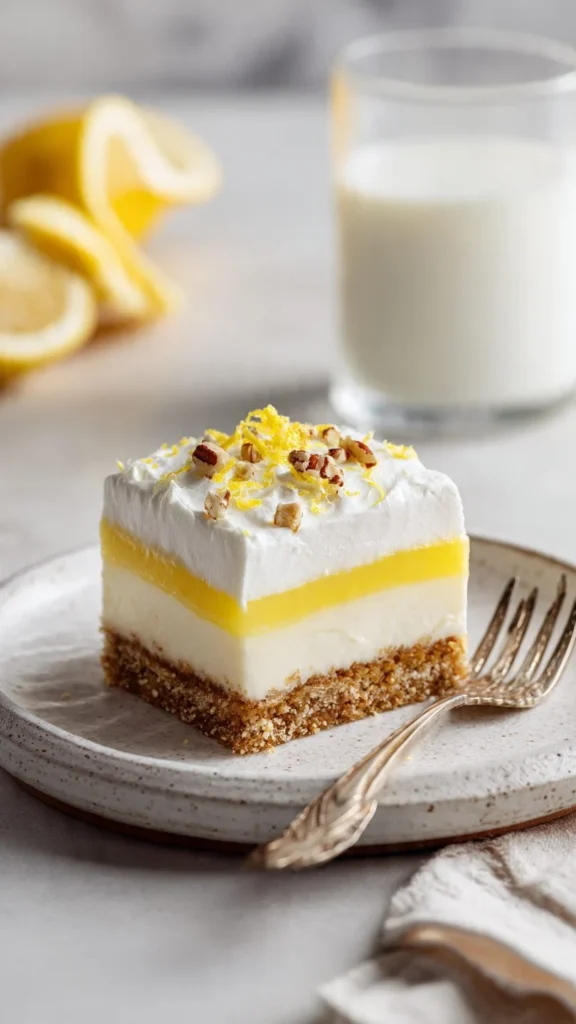
We are talking about a Lemon Lush Dessert Recipe that essentially tastes like sunshine decided to take a nap on a bed of cheesecake and crunchy pecans. It’s creamy, it’s zesty, and it looks impressive enough that people will assume you have serious culinary training (spoiler: you just need a hand mixer and the ability to not drop things). Whether you call it Lemon Lush, Lemon Lasagna, or that “Yellow Layered Thingy,” it is the absolute champion of potlucks and sad Tuesday nights alike.
Why This Recipe is Awesome
Let’s be real for a second: there are a million lemon desserts out there. So why is this specific lemon lush dessert recipe the hill I’m willing to die on?
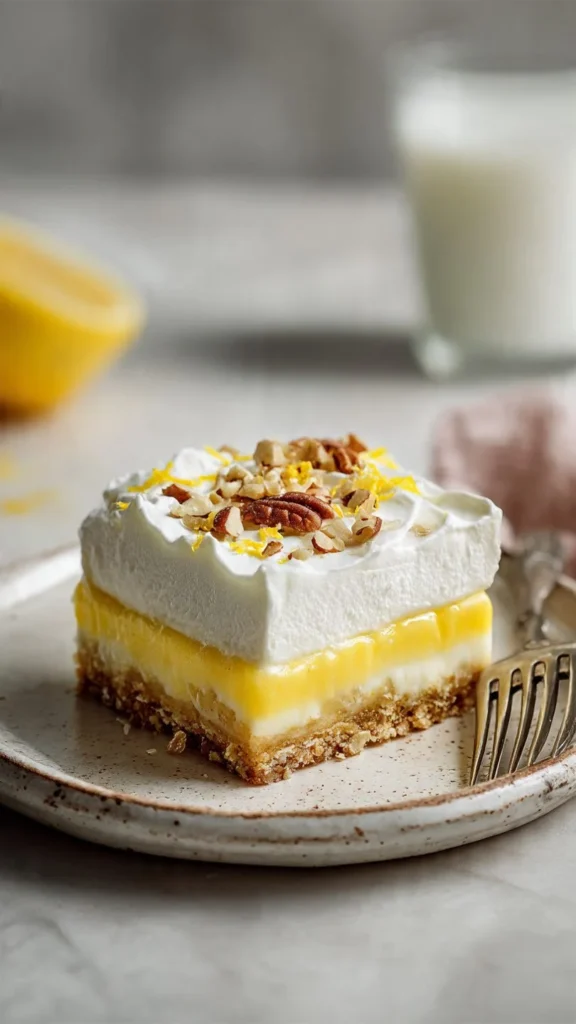
First off, it’s all about the textural architecture. Yes, I’m using fancy words, but hear me out. You start with a pecan shortbread crust that is buttery and slightly salty. That crunch is absolutely vital because what follows is a whole lot of soft, creamy goodness. If you didn’t have that crust, you’d just be eating pudding with a spoon (which is fine, no judgment, but we aim higher).
Secondly, the balance here is idiot-proof. Even I didn’t mess it up the first time I made it, and I once burned soup. The tangy lemon pudding layer cuts right through the richness of the sweetened cream cheese layer. It’s that sweet-tart dynamic that makes your tastebuds do a little happy dance. It’s not cloyingly sweet like a birthday cake, but it’s rich enough to feel like a reward.
Also, let’s talk about the “Chill Factor.” This is a nearly no-bake dessert (you only bake the crust). The rest is just mixing and layering. It’s the perfect recipe for summer when turning on the oven feels like a personal attack, or for winter when you need a bright, citrusy reminder that seasonal depression isn’t permanent.
Finally, science! The way the proteins in the cream cheese interact with the powdered sugar creates a stabilized structure that holds up the pudding, while the modified food starch in the instant pudding sets firmly enough to slice cleanly. It’s not magic; it’s culinary chemistry working in your favor to make you look like a pro.
Ingredients You’ll Need
Don’t panic—you can find all of this at the most basic grocery store. No hunting for obscure spices or fairy dust.
- All-Purpose Flour: The backbone of your crust. Nothing fancy needed here.
- Butter: Salted or unsalted works, but melted. Do not use margarine. If you use margarine, the ghost of Julia Child will haunt your kitchen.
- Pecans: Finely chopped. These add a nutty, toasted flavor that makes the crust taste like luxury.
- Cream Cheese: One 8oz block. IMPORTANT: It needs to be softened to room temperature. If it’s cold, your filling will be lumpy, and nobody likes lumpy lush.
- Powdered Sugar: To sweeten the cream cheese layer without the grit of granulated sugar.
- Cool Whip: You’ll need a big tub (or two smaller ones). You divide this between the cream cheese layer and the top layer. (See the “Alternatives” section if you’re a “Real Whipped Cream Only” purist).
- Instant Lemon Pudding Mix: Two small boxes (3.4 oz each). Make sure it says INSTANT. If you buy the “Cook & Serve” kind, you are going to have a bad time.
- Milk: Cold. Whole milk makes the pudding richer, but 2% works fine. Skim milk is risky business—it might be too runny.
Step-by-Step Instructions
This is happening. Put on some music, maybe pour a glass of wine. Let’s layer.
Phase 1: The Crunchy Foundation
- Heat it up. Preheat your oven to 350°F (175°C).
- Mix the crust. In a medium bowl, combine your 1 cup of flour, 1 stick of melted butter, and ½ cup of chopped pecans. Stir it until it looks like crumbly wet sand.
- Press and Bake. Dump that mixture into a 9×13 inch baking dish. Use the bottom of a measuring cup or your clean hands to press it down firmly and evenly. Bake for 15–20 minutes until the edges are golden brown.
- THE MOST IMPORTANT STEP: Let the crust cool completely. I mean it. If you put the cream cheese layer on a hot crust, it will melt into a greasy puddle of sadness. Go watch an episode of your favorite show while it cools.
Phase 2: The Cheesecake Layer
- Beat the cheese. In a large bowl, beat the 8 oz softened cream cheese and 1 cup of powdered sugar together until it’s smooth and creamy. Scrape down the sides of the bowl to get all the lumps.
- Fold in the fluff. Gently fold in 1 cup of Cool Whip. You want to keep the air in there, so be gentle—don’t aggressively stir it like you’re angry at it.
- Spread. Spread this mixture carefully over your cooled crust. An offset spatula is a game-changer here, but the back of a spoon works if you have patience.
Phase 3: The Lemon Layer
- Whisk away. In another bowl, whisk together the two boxes of lemon pudding mix and 3 cups of cold milk. Whisk for about 2 minutes until it starts to thicken up. You’ll feel the resistance change—that’s the starches gelatinizing.
- Layer it. Pour the thickening pudding over the cream cheese layer. Spread it out to the edges. It should sit nicely on top without sinking because your cream cheese layer is sturdy (good job on that).
Phase 4: The Grand Finale
- Top it off. Spread the remaining Cool Whip over the lemon layer.
- Garnish (Optional but recommended). Sprinkle extra chopped pecans or lemon zest on top. It adds a “chef’s kiss” visual appeal.
- The Chill. Put the whole thing in the fridge for at least 3 to 4 hours, or overnight. This allows the layers to set and marry each other.
Common Mistakes to Avoid
Listen, I’ve made these mistakes so you don’t have to. Learn from my failures.
- Rushing the Crust Cooling: I mentioned this before, but I’m mentioning it again because it’s the #1 killer of this recipe. If the pan is even slightly warm, the butter in the crust will liquefy your cheese layer. Patience is a virtue.
- Using “Cook & Serve” Pudding: This type of pudding requires boiling to activate the thickeners. If you mix it cold with milk, you will just have yellow lemon soup. Read the box carefully!
- Cold Cream Cheese: If you try to beat cold cream cheese, you will end up with tiny white chunks in your filling. It looks weird, and the texture is off. If you forgot to take it out of the fridge, microwave it for 10-15 seconds (without the foil wrapper, obviously).
- Overworking the Topping: When folding Cool Whip into the cream cheese, if you mix too vigorously, you deflate the air bubbles. The result is a dense, heavy layer rather than a fluffy cloud. Fold, don’t stir.
Alternatives & Substitutions
Cooking is art; baking is science. But this recipe is forgiving enough to allow for some artistic license.
- Hate Pecans? No problem. You can swap them for walnuts if you want a similar vibe. Or, if you have a nut allergy, just omit them entirely. You can also swap the flour/butter crust for a Golden Oreo crust or a standard Graham Cracker crust (no baking required for those, usually).
- Not a Cool Whip Fan? I get it, some people prefer the real deal. You can absolutely whip heavy cream with a little vanilla and powdered sugar until stiff peaks form. Use that instead. Just know that real whipped cream isn’t quite as stable as Cool Whip, so the dessert won’t last as long in the fridge (but let’s be honest, you’re going to eat it all in one day anyway).
- Change the Flavor: This “Lush” format works with almost any pudding. Chocolate Lush? Use chocolate pudding. Pistachio Lush? Use pistachio pudding (IMO, this is a close second to lemon).
- Lighten it Up: You can use light cream cheese, skim milk, and sugar-free pudding mix if you’re watching your macros. It won’t be quite as rich, but it still tastes pretty darn good.
FAQ (Frequently Asked Questions)
Can I make this ahead of time? Absolutely. In fact, it tastes better the next day after the flavors have had a slumber party in the fridge. It’s the perfect “prepare on Saturday for Sunday dinner” dessert.
How long does it last in the fridge? If covered tightly with plastic wrap or a lid, it stays good for about 3 to 4 days. After that, the crust might start getting a little soggy, and the whipped topping might start to weep (cry water).
Can I freeze this lemon lush dessert recipe? Technically, yes! It freezes surprisingly well. Just thaw it in the fridge for a few hours before serving. It eats almost like an ice cream cake if you serve it semi-frozen.
Can I use margarine instead of butter for the crust? Sigh. Technically, yes. But butter has a lower water content and better flavor. Margarine might make your crust softer and less flavorful. Why hurt your soul like that? Use the butter.
Why is my pudding layer runny? You likely either used too much milk (follow the recipe, not the box instructions—sometimes the box calls for more milk than you want for a pie/layer setting) or you didn’t let it set long enough in the fridge.
Can I use fresh lemon juice? The lemon flavor comes from the pudding mix. However, if you want extra zing, feel free to add a tablespoon of fresh lemon zest to the cream cheese layer or the garnish. Don’t add juice to the milk/pudding mix, or the acidity might curdle the milk.

Final Thoughts
There you have it—a lemon lush dessert recipe that is bright, happy, and dangerously easy to consume in large quantities. It brings the perfect mix of textures and temperatures, and it’s nostalgic in the best way possible.
Whether you’re bringing this to a BBQ, a baby shower, or just eating it straight out of the pan while standing in front of the open refrigerator at midnight (we’ve all been there), this dessert delivers.
Now go impress someone—or yourself—with your new culinary skills. You’ve earned it!