🍞 Simple Sourdough Discard Recipe for Beginners
So, you’re staring at that jar of sourdough starter on your counter. It’s looking at you. You’re looking at it. It’s feeding time, and you know what that means: the dreaded “discard.” You’re craving something tasty, but you are also way too lazy to spend forever in the kitchen waiting for dough to rise. Same.
We all go through the cycle. You feel guilty throwing the discard in the trash (it’s literally flour and water, aka liquid gold), but you also don’t have the energy to bake a three-day artisanal loaf just to use up half a cup of goo.
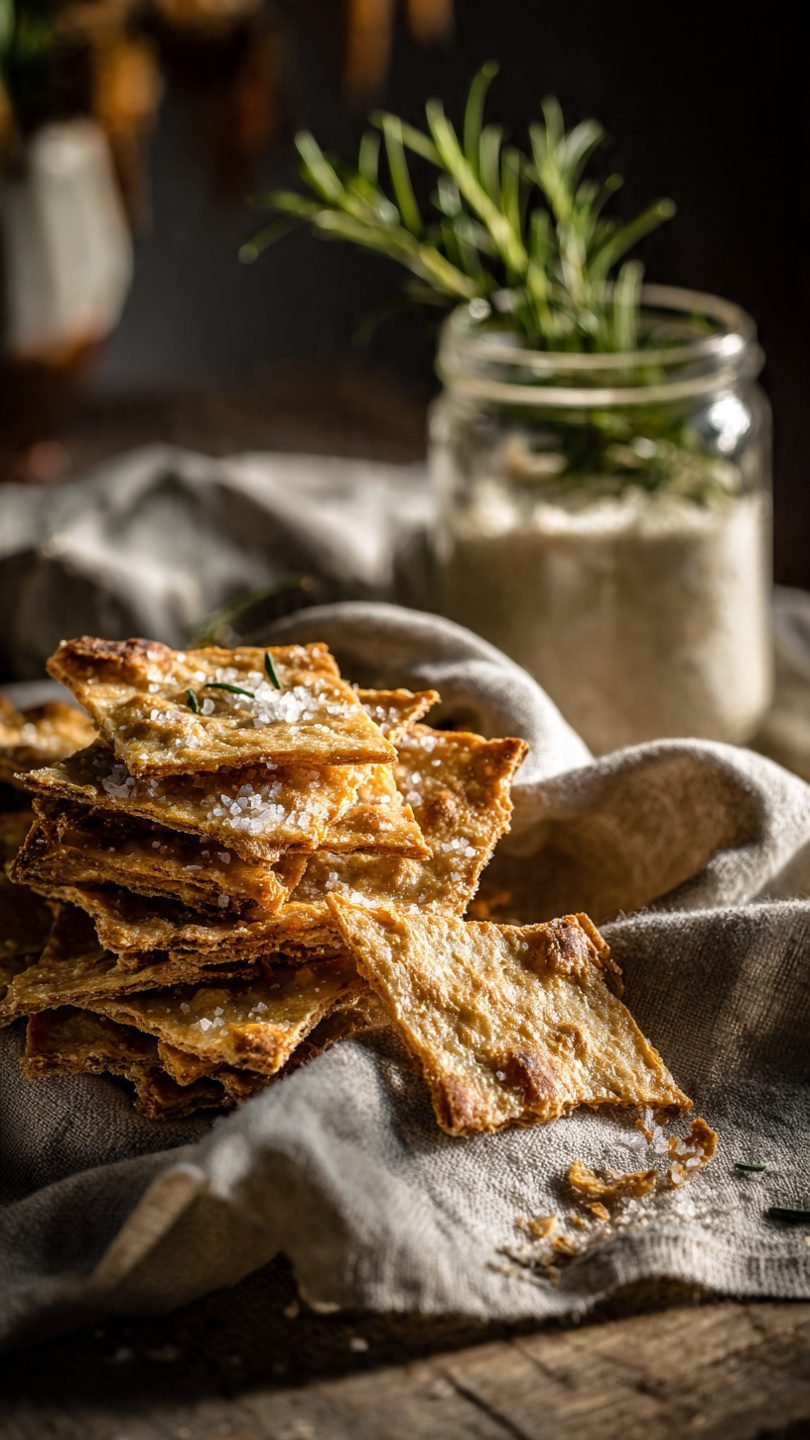
Enter the hero we didn’t know we needed: The Simple Sourdough Discard Recipe. Specifically, we are making Cheesy Garlic Sourdough Crackers. They are crunchy, salty, addictive, and require zero brain cells to make. Let’s do this.

Why This Recipe is Awesome
Look, I don’t use the word “life-changing” lightly—mostly because I save that for when I find a parking spot right in front of the grocery store—but this recipe is close.
First off, it is the ultimate zero-waste hack. If you are a sourdough parent, you know the emotional toll of pouring discard down the drain (plus, it’s bad for your pipes, FYI). This recipe takes that “trash” and turns it into a snack that tastes like a Cheez-It and a gourmet cracker had a beautiful baby.
Secondly, there is absolutely no waiting. None. Zilch. Most sourdough recipes are like, “Mix this, then wait 4 hours, then fold it, then wait 12 hours, then contemplate the meaning of the universe.” Not this one. We are mixing, spreading, and baking. Immediate gratification is the name of the game here.
Let’s talk about the flavor science for a second. Because your discard has been fermenting (even if just for a day), it has a depth of flavor that plain flour and water just don’t have. It’s tangy. It’s complex. When you mix that tang with rich butter, sharp cheddar, and aromatic garlic, you get a savory umami bomb. The acid in the sourdough also helps tenderize the gluten structure just enough so that the crackers are crispy, not rock-hard.
Finally, it is idiot-proof. Even I haven’t messed this up, and I once burned water. It’s forgiving. If you roll them a little thick? You get a flatbread. Roll them thin? Chips. It’s a win-win situation.
Ingredients You’ll Need
We are keeping this pantry-friendly. You likely have all of this right now.
- Sourdough Discard: (About 1 cup or 200g). It can be fresh from a feeding or cold from the fridge. It doesn’t matter. The discard is the boss here.
- All-Purpose Flour: Just a bit to bind it all together.
- Butter (Melted): Use unsalted so you can control the salt level, but if you only have salted, just live dangerously and reduce the added salt. Margarine works too, but butter tastes better. Don’t shoot the messenger.
- Dried Herbs: I use a mix of dried rosemary, thyme, or Italian seasoning. Fresh herbs are great, but they contain moisture which can make the cracker soggy if you aren’t careful. Dried is easier.
- Garlic Powder: The MVP. Do not be shy here. We want vampire-repelling levels of garlic.
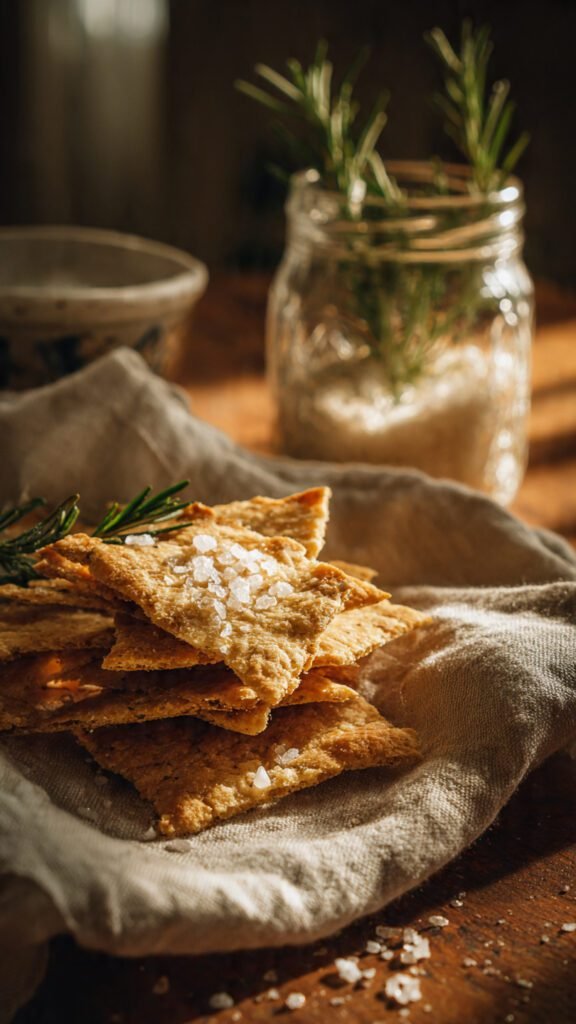
- Parmesan or Sharp Cheddar (Finely Grated): This creates those crispy, lacy cheese edges that everyone fights over.
- Salt & Black Pepper: Kosher salt or flaky sea salt for topping is non-negotiable.
- Olive Oil: Just for brushing the top to get that golden-brown tan.
Step-by-Step Instructions
Ready to channel your inner Martha Stewart (but with less stress and more snacking)? Let’s go.
1. Preheat and Prep
Crank that oven to 325°F (165°C). We are baking “low and slow” to dry these bad boys out without burning them. Line a large baking sheet with parchment paper. Do not skip the parchment paper unless you enjoy scrubbing pans for three hours.
2. The Dump and Mix
In a medium bowl, dump in your sourdough discard, flour, melted butter, herbs, garlic powder, and grated cheese.
- Tip: Use a fork or a spatula to mix. You want to combine it until it forms a shaggy ball.
- Sensory Check: It should smell tangy and buttery. If it feels too sticky (like gum), add a tablespoon of flour. If it’s too dry and crumbly, add a tiny splash of oil.

3. The Spread (The Most Important Part)
Place your dough ball onto the parchment paper. Now, put another piece of parchment paper on top of the dough. You are making a dough sandwich.
- Grab a rolling pin (or a wine bottle, I don’t judge) and roll the dough out.
- Goal: You want this thin. Like, “credit card” thin. The thinner the dough, the crunchier the cracker. If you leave it thick, it’ll be chewy.
4. The Reveal and Score
Peel off the top layer of parchment paper. Admire your work.
- Take a pizza cutter or a sharp knife and score the dough into squares or rectangles. You don’t need to separate them; just cut lines so they snap apart easily later.
- Pro Move: Prick each square with a fork. This is called “docking.” It stops the crackers from puffing up like balloons. Unless you want pita chips, poke the holes.
5. Season and Bake
Brush the top lightly with olive oil and sprinkle generously with flaky sea salt or sesame seeds.
- Slide the tray into the oven.
- Bake for 40–50 minutes.
- Crucial Step: Rotate the pan halfway through. Ovens are notorious liars and usually have hot spots. Rotating ensures even browning.
6. The Texture Test
Around the 40-minute mark, check them. They should be golden brown and feel firm to the touch. If they bend when you poke them, they aren’t done. Give them another 5-10 minutes.
- Turn the oven off and crack the door open, leaving the crackers inside for 10 minutes as it cools. This dries out any remaining moisture.
7. Cool and Snap
Remove from the oven and let them cool completely. I know, waiting is hard, but they crisp up as they cool. Once cold, snap them along the score lines. Listen to that satisfying crack. That is the sound of success.
Common Mistakes to Avoid
Even though this is a simple sourdough discard recipe, things can go sideways if you get cocky.
- The “Soggy Bottom” Syndrome: This happens if you roll the dough too thick. Seriously, roll it thinner than you think you need to. If the middle feels soft after baking, break off the crispy outer pieces and throw the middle pieces back in the oven for 5 minutes.
- Burning the Edges: Because the dough is thin, the edges cook faster than the center. Watch them like a hawk during the last 10 minutes. If the edges are getting too dark, you can cover them with foil while the center finishes.
- Using Chunky Cheese: If you use big shreds of cheese, they will melt into oily puddles and create holes in your crackers. Use finely grated cheese (like the dusty parmesan or a micro-plane grate) for the best texture.
- Skipping the “Docking”: If you don’t poke holes with a fork, you will end up with giant air bubbles. While fun to pop, they shatter immediately when you try to dip them in hummus. Tragic.
Alternatives & Substitutions
Cooking is art, baking is science, but this recipe is kind of a mix of both. Feel free to get weird with it.
- Gluten-Free Options: Yes, you can use a GF sourdough starter and GF 1-to-1 baking flour. The texture might be slightly more brittle, but it works.
- Veganize It: Swap the butter for a high-quality vegan butter block or even coconut oil (though coconut oil will give it a… well, coconut taste). Nutritional yeast makes a great sub for the parmesan cheese if you want that cheesy flavor without the dairy.
- Flavor Variations:
- Everything Bagel: Ditch the herbs and coat the top in Everything Bagel seasoning.
- Spicy Boi: Add a teaspoon of smoked paprika and a pinch of cayenne pepper to the dough.
- Sweet Tooth: Omit the garlic/cheese/herbs. Add cinnamon and 2 tablespoons of sugar. Boom—cinnamon sugar crisps.
FAQ (Frequently Asked Questions)
1. Can I use active, bubbly starter for this? Technically, yes. But why waste the good stuff? Active starter has more rising power, which might make your crackers puffy rather than flat and crisp. Save the active starter for bread; use the sad, deflated discard for this.
2. How long do these stay fresh? In my house? About 20 minutes because we eat them all. But realistically, if you store them in an airtight container, they stay crunchy for about a week. If they go stale, pop them in the toaster oven for 2 minutes to revive them.
3. Why are my crackers chewy? Two reasons: You didn’t bake them long enough, or you rolled the dough too thick. IMO, patience is the secret ingredient here. Let them bake until they are deeply golden.
4. Can I freeze the dough? Absolutely! You can mix the dough, wrap it in plastic, and freeze it for up to a month. Just let it thaw in the fridge before rolling it out.
5. Is sourdough discard actually healthy? Let’s not pretend this is a kale salad, but yes, it has benefits! The fermentation process breaks down some of the gluten and anti-nutrients (phytates) in the grain, making it easier to digest than standard crackers. So, basically, it’s health food. (Don’t quote me to your doctor).
6. Do I need a stand mixer? Heck no. A bowl and a fork are all you need. Don’t dirty a giant appliance for this.
Final Thoughts
There you have it. You have successfully diverted waste from the landfill, saved money on store-bought snacks, and created something delicious. You’re basically an eco-warrior now.
This simple sourdough discard recipe is one of those tricks you’ll keep up your sleeve for last-minute guests or late-night munchies. It’s rustic, it’s messy, and it’s perfectly imperfect.
Now go impress someone—or just yourself—with your new culinary skills. You’ve earned it!