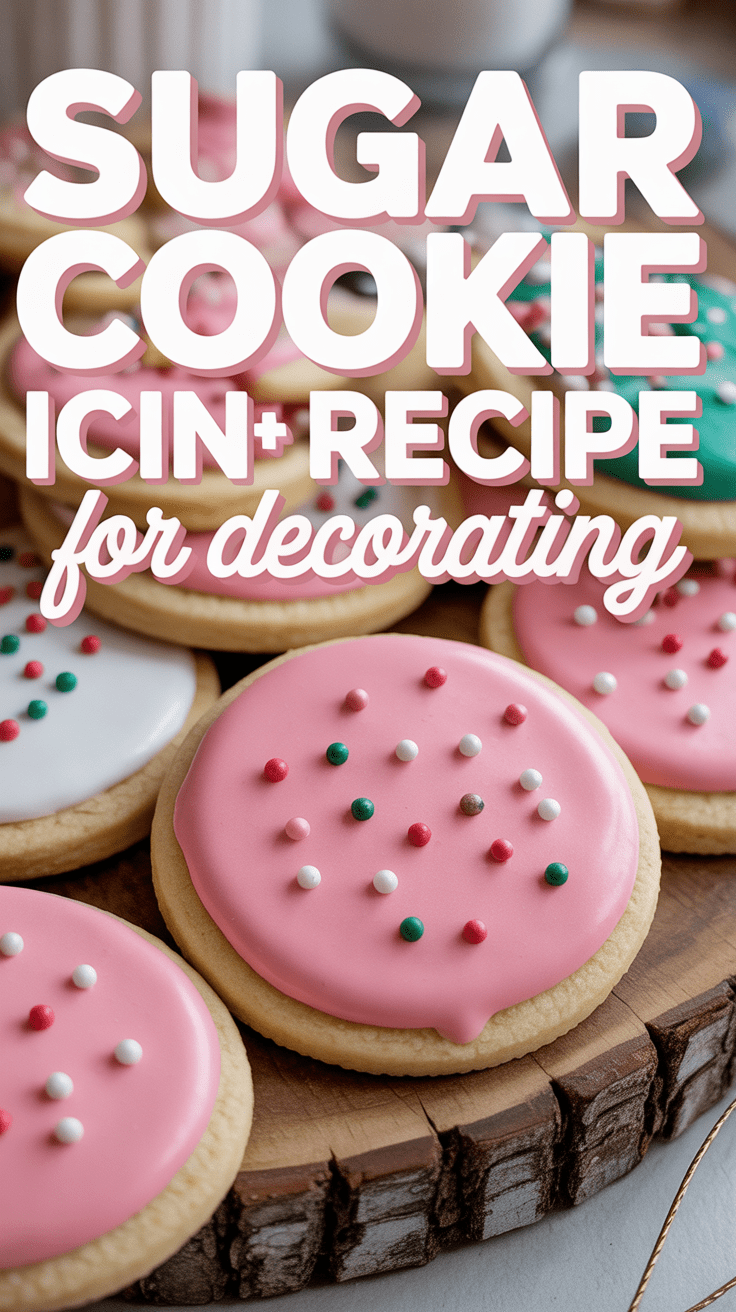
Sugar Cookie Icing Recipe That Hardens: The Perfect Gloss
Sugar cookies, those delightful canvases of holiday cheer (or any occasion, really!), are only as good as their icing. We’ve all been there – painstakingly decorating cookies only to find the icing stays sticky, smudges easily, and attracts every stray crumb in a five-mile radius. Fear not, fellow bakers! This recipe is your ticket to sugar cookie icing nirvana: a smooth, glossy, and perfectly hardened finish that will make your creations look professional and taste divine.
Why This Recipe Works
This isn’t just any sugar cookie icing recipe; it’s a carefully balanced formula designed for optimal hardening and a beautiful sheen. The key lies in the combination of ingredients and the method used to prepare them. Here’s the breakdown:
- Powdered Sugar: Provides the bulk and sweetness of the icing. Its fine texture ensures a smooth finish.
- Milk (or Liquid): The liquid component binds the sugar together. The amount is crucial – too much, and the icing will be too thin; too little, and it will be too thick and difficult to spread.
- Light Corn Syrup: This is the secret weapon! Corn syrup adds shine and helps the icing harden properly, preventing a chalky or brittle texture. It also contributes to a smoother consistency.
- Vanilla Extract (or Other Flavoring): Adds flavor depth and complexity to the icing. A little goes a long way!
The precise measurements and the thorough mixing process ensure that all the ingredients are properly incorporated, resulting in a consistent and reliable icing that hardens beautifully every time.
Ingredients
- 4 cups (about 1 pound) powdered sugar, sifted
- 5-7 tablespoons milk (or water, lemon juice, or other liquid – see variations below)
- 2 tablespoons light corn syrup
- 1 teaspoon vanilla extract (or other flavoring)
- Food coloring (gel or liquid), optional
Instructions
- Sift the Powdered Sugar: Sifting the powdered sugar is crucial for a smooth, lump-free icing. This step prevents any unwanted bumps or grittiness in the final product.
- Combine Ingredients: In a large bowl, whisk together the sifted powdered sugar, corn syrup, and vanilla extract.
- Add Liquid Gradually: Begin adding the milk (or chosen liquid) one tablespoon at a time, whisking well after each addition. The goal is to achieve a smooth, pourable consistency. Start with 5 tablespoons and add more as needed.
- Achieve the Right Consistency: The icing should be thick enough to hold its shape slightly but thin enough to spread easily. A good test is to lift the whisk – the icing should ribbon off and slowly disappear back into the bowl. If it’s too thick, add a tiny bit more liquid (a teaspoon at a time). If it’s too thin, add a tablespoon of powdered sugar.
- Add Food Coloring (Optional): If desired, divide the icing into separate bowls and add food coloring, mixing well until the color is evenly distributed. Gel food coloring is generally preferred as it is more concentrated and less likely to thin the icing.
- Decorate! Immediately transfer the icing to piping bags or use a spoon to decorate your sugar cookies. Work quickly, as the icing will begin to harden as it sits.
- Let Harden: Allow the iced cookies to dry completely at room temperature. This typically takes 1-3 hours, depending on the thickness of the icing and the humidity. Avoid refrigerating the cookies while the icing is hardening, as this can cause condensation and affect the finish.
Tips for Success
- Use Sifted Powdered Sugar: This cannot be stressed enough! Sifting eliminates lumps and ensures a smooth, professional-looking icing.
- Control the Liquid: Add the liquid gradually, a tablespoon at a time, until you reach the desired consistency. It’s easier to add more liquid than to take it away.
- Corn Syrup is Key: Don’t skip the corn syrup! It contributes to the shine and helps the icing harden properly.
- Gel Food Coloring is Best: Gel food coloring is more concentrated and won’t thin the icing as much as liquid food coloring.
- Work Quickly: The icing will start to harden as it sits, so work efficiently when decorating.
- Piping Consistency vs. Flooding Consistency: For outlining and detailed work, you’ll want a thicker “piping” consistency. For filling in larger areas (“flooding”), you’ll want a slightly thinner consistency. You can achieve this by adding a tiny bit more liquid to a portion of the icing.
- Practice Your Piping: Before decorating your cookies, practice your piping techniques on a piece of parchment paper. This will help you get a feel for the icing and ensure that your designs are neat and consistent.
- Prevent Clogging: If using piping bags, make sure to snip off the tip only when you’re ready to use the icing. This will prevent the icing from drying out and clogging the tip.
Storage Instructions
Un-iced Cookies: Store un-iced sugar cookies in an airtight container at room temperature for up to 5 days.
Iced Cookies: Once the icing has completely hardened, store the iced cookies in an airtight container at room temperature for up to 3 days. Avoid stacking the cookies directly on top of each other, as this can cause the icing to smudge. You can place parchment paper between layers to prevent sticking.
Icing: Leftover icing can be stored in an airtight container in the refrigerator for up to a week. Before using, bring it to room temperature and stir well to restore its consistency. You may need to add a tiny bit of liquid to thin it out if it has become too thick.

FAQ
Q: Can I use a different type of liquid instead of milk?
A: Yes! Water, lemon juice, almond milk, or even coffee can be used. Lemon juice will add a subtle tang, while coffee will complement chocolate-flavored cookies. Experiment to find your favorite flavor combination!
Q: Can I use honey instead of corn syrup?
A: While honey will add sweetness, it doesn’t have the same properties as corn syrup for creating a glossy and hardened finish. The icing may not harden as well and could be stickier.
Q: My icing is too thick. What should I do?
A: Add a tiny bit of liquid (a teaspoon at a time), mixing well after each addition, until you reach the desired consistency.
Q: My icing is too thin. What should I do?
A: Add a tablespoon of sifted powdered sugar, mixing well, until you reach the desired consistency.
Q: Why is my icing cracking?
A: Cracking can be caused by the icing being too thick or drying out too quickly. Make sure the icing is properly thinned and consider covering the cookies lightly with plastic wrap (without touching the icing) during the drying process to slow down evaporation.
Q: Can I freeze iced sugar cookies?
A: While technically possible, freezing iced sugar cookies is not recommended. The icing can become sticky or develop condensation upon thawing, affecting the overall appearance and texture. It’s best to enjoy them fresh!
Conclusion
With this recipe and these tips, you’re well on your way to creating stunning sugar cookies that taste as good as they look. The key is to follow the instructions carefully, pay attention to the consistency of the icing, and have fun with your decorating! So, gather your ingredients, unleash your creativity, and get ready to impress everyone with your beautifully iced sugar cookies. Happy baking!