Stuffed Paratha Recipe Indian: The Ultimate Guide to Fluffy, Flavorful Flatbreads
👩🍳 The Home Chef's Essential Kitchen
Consistently cooking incredible, healthy meals at home is so much easier when you aren't fighting with cheap tools. These are the 5 absolute powerhouse kitchen essentials that professional chefs and serious home cooks rely on every single day to get perfect results.
🍳 Lodge 10.25" Cast Iron Skillet
The single greatest value in all of cookware. It retains heat infinitely better than cheap non-stick pans, allowing you to get a restaurant-quality crust on steaks or perfect crispy edges on cornbread. With proper care, this $20 pan will literally outlive you.
🔪 Victorinox Fibrox Pro 8" Chef's Knife
A dull knife makes cooking a frustrating chore. This specific blade is the undisputed champion of the culinary world—it holds a terrifyingly sharp edge, features a comfortable non-slip grip, and performs identical to German knives that cost quadruple the price.
🌡️ ThermoPro Instant Read Thermometer
Never serve dry chicken or undercooked pork again. An instant-read thermometer is the secret difference between amateur cooks who 'guess' when protein is done, and professionals who know exactly when to pull meat off the heat for maximum juiciness.
🍲 Lodge Enameled Cast Iron Dutch Oven
The ultimate workhorse for soups, stews, braised short ribs, and baking crusty artisanal bread. The enameled interior provides incredible heat distribution for slow-cooking while eliminating the intense seasoning maintenance required by bare cast iron.
🥄 Bpa-Free Silicone Utensil Set
Throw away those melting plastic spatulas and bacteria-harboring wooden spoons. This pure silicone set is heat-resistant up to 600°F, won't scratch your expensive pans, and features seamless designs that make cleaning out thick sauces and batters effortless.
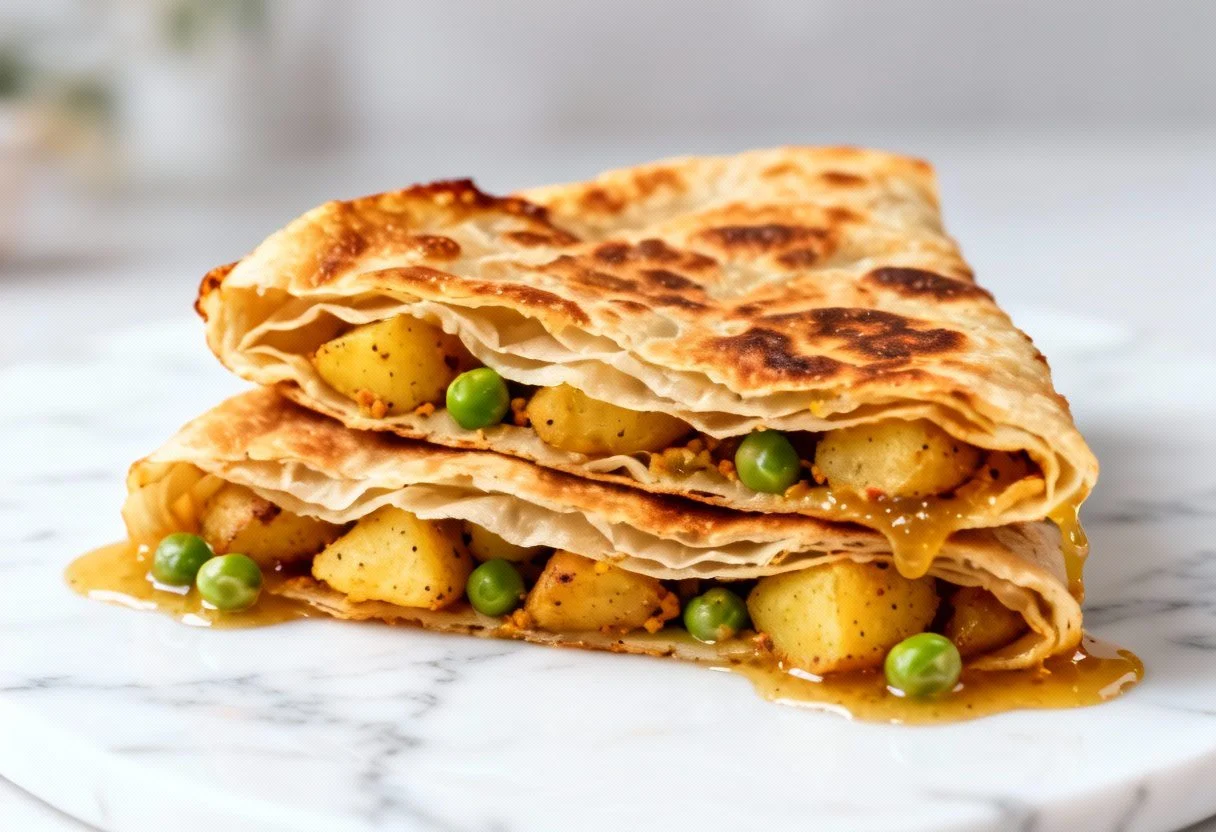
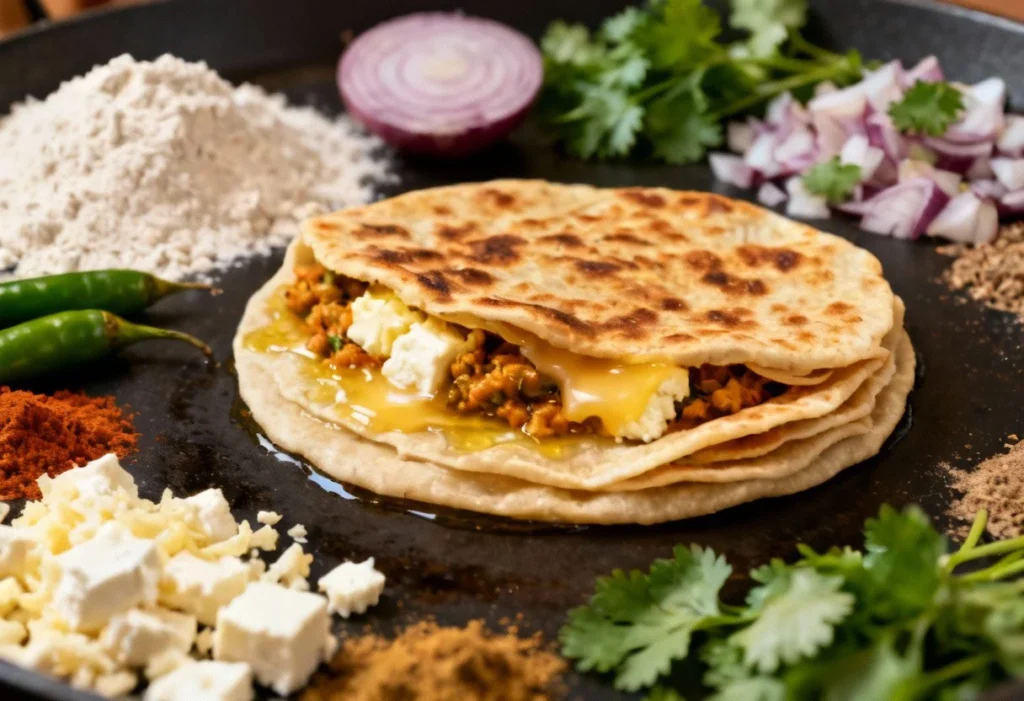
Stuffed parathas are a cornerstone of Indian cuisine, a delightful and satisfying flatbread that’s perfect for breakfast, lunch, or dinner. Imagine biting into a warm, golden-brown paratha, its crispy exterior giving way to a soft, flavorful filling. Whether it’s spiced potatoes, crumbled paneer, or a medley of vegetables, the possibilities are endless! This recipe provides a comprehensive guide to making perfect stuffed parathas every time, transforming simple ingredients into a culinary masterpiece.
Why This Recipe Works
This recipe is designed for success, even for beginner cooks. Here’s why it works:
- Detailed Instructions: Each step is clearly explained with precise measurements and helpful tips, leaving no room for guesswork.
- Dough Perfection: We focus on creating a soft, pliable dough that’s easy to roll out and won’t tear during stuffing.
- Flavorful Filling: The fillings are seasoned with a balanced blend of spices that complement each other perfectly.
- Sealing Technique: We provide a foolproof method for sealing the paratha, preventing the filling from leaking during cooking.
- Cooking Expertise: Learn the secrets to achieving that perfect golden-brown color and crispy texture.
Ingredients
For the Dough:
- 2 cups whole wheat flour (atta)
- 1/2 teaspoon salt
- 1 tablespoon oil or ghee
- Approximately 3/4 cup warm water
For the Filling (Aloo Paratha – Potato):
- 2 medium-sized potatoes, boiled, peeled, and mashed
- 1 small onion, finely chopped
- 1-2 green chilies, finely chopped (adjust to taste)
- 1/2 teaspoon red chili powder (adjust to taste)
- 1/2 teaspoon turmeric powder
- 1/2 teaspoon coriander powder
- 1/4 teaspoon garam masala
- 1/4 teaspoon amchur powder (dry mango powder) – optional
- 2 tablespoons chopped cilantro (coriander leaves)
- Salt to taste
Other:
- Oil or ghee for cooking
- Dry flour for dusting
Instructions
Making the Dough:
- Combine Dry Ingredients: In a large bowl, mix together the whole wheat flour and salt.
- Add Oil/Ghee: Add the oil or ghee to the flour mixture and rub it in with your fingertips until the flour resembles breadcrumbs. This step is crucial for a soft paratha.
- Add Water Gradually: Gradually add warm water, kneading the dough until it forms a soft, pliable, and non-sticky dough. You might need slightly more or less water depending on the flour.
- Knead Well: Knead the dough for 5-7 minutes until it becomes smooth and elastic. This develops the gluten and ensures a soft texture.
- Rest the Dough: Cover the dough with a damp cloth or plastic wrap and let it rest for at least 30 minutes. This allows the gluten to relax, making the dough easier to roll out.
Preparing the Filling:
- Mash the Potatoes: Ensure the boiled potatoes are thoroughly mashed and free of any lumps.
- Combine Ingredients: In a bowl, combine the mashed potatoes, chopped onion, green chilies, red chili powder, turmeric powder, coriander powder, garam masala, amchur powder (if using), cilantro, and salt.
- Mix Well: Mix all the ingredients thoroughly until well combined. Taste and adjust the seasoning if needed. The filling should be flavorful and slightly spicy.
Stuffing and Rolling the Parathas:
- Divide the Dough: Divide the dough into equal-sized portions (about the size of a golf ball).
- Roll into a Ball: Roll each portion into a smooth ball.
- Dust and Roll: Lightly dust a rolling surface with dry flour. Gently roll out one dough ball into a small circle (about 3-4 inches in diameter).
- Add the Filling: Place a generous spoonful of the potato filling in the center of the rolled-out circle.
- Seal the Paratha: Bring the edges of the circle together towards the center, pinching them to seal the filling completely. Ensure there are no gaps or openings. You can also use the “gather and pinch” method, or the “fold over” method.
- Flatten and Dust: Gently flatten the stuffed ball with your palms. Dust the rolling surface again with dry flour.
- Roll Out Gently: Using a rolling pin, gently roll out the stuffed paratha into a larger circle (about 6-8 inches in diameter). Be careful not to apply too much pressure, or the filling might leak. Rotate the paratha while rolling to ensure an even thickness.
Cooking the Parathas:
- Heat the Tawa: Heat a flat griddle or tawa over medium heat.
- Place the Paratha: Carefully place the rolled-out paratha on the hot tawa.
- Cook One Side: Cook for about a minute or two, or until small bubbles start to appear on the surface.
- Flip and Cook: Flip the paratha and cook the other side for another minute or two.
- Add Oil/Ghee: Add a teaspoon of oil or ghee around the edges of the paratha and on top.
- Cook Until Golden Brown: Flip the paratha again and press gently with a spatula to ensure even cooking and a golden-brown color. Cook for another minute or two, until golden brown spots appear on both sides.
- Serve Hot: Remove the cooked paratha from the tawa and serve hot immediately.
- Repeat: Repeat the stuffing, rolling, and cooking process with the remaining dough and filling.
Tips for Success
- Dough Consistency: The dough should be soft and pliable, not sticky or dry. Adjust the water accordingly.
- Resting Time: Don’t skip the resting time for the dough. It makes a significant difference in the texture of the paratha.
- Filling Consistency: The filling should not be too wet, or it will make the paratha soggy.
- Rolling Technique: Roll the paratha gently and evenly to prevent tearing.
- Cooking Temperature: Cook the paratha over medium heat to ensure it cooks through without burning.
- Use Ghee: Using ghee (clarified butter) adds a rich flavor and aroma to the paratha.
- Serve Immediately: Stuffed parathas are best served hot and fresh.
- Experiment with Fillings: Feel free to experiment with different fillings like paneer (Indian cheese), vegetables, or dal (lentils).
Storage Instructions
Cooked stuffed parathas are best enjoyed fresh. However, you can store them for later consumption:
- Room Temperature: Allow the parathas to cool completely. Store them in an airtight container at room temperature for up to 2 days.
- Refrigerator: Store the cooled parathas in an airtight container in the refrigerator for up to 3 days. Reheat them on a tawa or in a microwave before serving.
- Freezer: For longer storage, you can freeze the cooked parathas. Wrap each paratha individually in plastic wrap and then place them in a freezer bag. They can be stored in the freezer for up to 2 months. Thaw them completely before reheating.

FAQ
- Can I use all-purpose flour instead of whole wheat flour? While you can use all-purpose flour, whole wheat flour is traditionally used for parathas and provides a healthier and more flavorful result.
- My parathas are tearing while rolling. What am I doing wrong? This could be due to several reasons: the dough might be too dry, you might be using too much pressure while rolling, or the filling might be too wet. Make sure the dough is soft and pliable, roll gently, and ensure the filling is not too moist.
- How do I prevent the filling from leaking while cooking? Ensure that the paratha is properly sealed after stuffing. Roll it out gently and evenly, and cook it over medium heat.
- Can I make the dough ahead of time? Yes, you can make the dough ahead of time and store it in the refrigerator for up to 24 hours. Bring it to room temperature before rolling.
- What can I serve with stuffed parathas? Stuffed parathas are delicious on their own, but they can also be served with yogurt (dahi), chutney, pickle, or a dollop of butter.
🍰 The Master Baker & Prep Kit
Baking is a science, and meal prep requires efficiency. If you want consistently flaky pie crusts, perfectly risen cakes, and healthy meals ready for the week, these are the 5 upgrade tools that take your execution to the next level.
⚖️ OXO Good Grips 11lb Food Scale
The secret to why bakery bread and cookies are always perfect while home batches vary wildly. Measuring by weight (grams) instead of volume (cups) guarantees precise hydration and flawlessly consistent results every single time you bake.
🧑🍳 KitchenAid Classic Stand Mixer
The undisputed holy grail of the kitchen. From aggressively kneading heavy pizza doughs to whipping meringues into stiff peaks, this powerful motor saves your arms from exhaustion and cuts your hands-on prep time in half.
🍪 Silpat Premium Silicone Baking Mats
Stop wasting money on rolls of parchment paper or agonizing over cookies permanently fused to your metal pans. These reusable, professional-grade silicone mats ensure completely even heat distribution and instantly release even the stickiest caramel.
🌪️ Braun MultiQuick Immersion Blender
The ultimate shortcut tool for creamy tomato soups, lump-free gravies, and rapid smoothies. Avoid the burns and mess of dangerously transferring boiling liquids in batches to a traditional blender by simply blending right inside your cooking pot.
🍱 Premium Glass Meal Prep Containers
If you want to bake and cook healthier, batch preparation is required. These durable glass containers transition safely from freezer to microwave, never absorb tomato sauce stains, and feature airtight seals to keep your hard work fresh all week.
Conclusion
Making stuffed parathas may seem daunting at first, but with this detailed recipe and helpful tips, you’ll be whipping up delicious and satisfying flatbreads in no time. Experiment with different fillings and spices to create your own signature paratha. Enjoy the warm, comforting flavors of this classic Indian dish! Happy cooking!